INSTALLATION GUIDE Arlo™ Single Lever Basin Faucet KBF-1201 www.kraususa.com I Toll Free: 1.800.775.0703 I © 2019 Kraus USA Inc. I REV.
Congratulations on the purchase of your new Kraus plumbing fixture! Please keep the box and packaging materials until your product is completely installed. If you have any questions, require technical assistance, or have any problems with your product: DO NOT RETURN TO STORE Please contact our Customer Service Team 1-800-775-0703 / customerservice@kraususa.com Have the model number available, and retain a copy of your receipt with purchase date for reference.
Prior to Installation: • Make sure you have all necessary parts by checking the diagram and parts list.
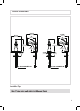
Diagram and Parts List I A D E J F B G K A. Faucet Body B. Waterlines C. Flange & Washer D. Aerator 3 H E. Aerator Key F. Hex Wrench G. Metal Washer H. Nut C I. Deck plate & Base plate J. Drain K.
Faucet Dimension 6 3/4” 6 5/8” [172mm] 6 1/4” [169mm] 5” [159mm] 5” [126mm] [126mm] 8” 8” [203mm] [203mm] 4” 4” [100mm] 2 1/2” [64mm] 2-9/16-24UNEF-2B [100mm] 2 1/4” [57mm] 2 1/2” [64mm] 2-9/16-24UNEF-2B Installer Tip: 4
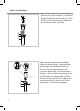
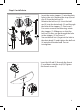
Step 1: Remove washer and lock nut a. b. old faucet. Clean the mounting surface. WITH FLANGE: Remove the metal washer (G) and lock nut (H) from the faucet (A) as a. A A WITH DECK PLATE: Remove the metal b. C G G H H Step 2.1: Install faucet (with deck plate) A I H K G B G H 5 K Align the hole on the deck plate (I) with the mounting hole on the sink. Place the faucet (A) through the deck plate & base plate (I) and mounting hole on the sink until the faucet (A) sets on top of deck plate (I).
Step 2.2: I Before installation, ensure that the A C G H B K G of the faucet (A). Place the faucet (A) through the mounting holes in the sink until the faucet (A) sets on top of the sink. Secure the faucet (A) to the sink using the washer (G) and lock nut (H) provided. Tighten lock nut (H) with spanner key (K) provided. Ensure the washer (G) and hoses (B) are no interference. H K Step 3: Connect waterlines to main valve Attach waterlines(B) to angle stops and tighten until snug.
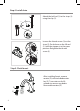
Step 4: Install drain Remove the waste stopper (1) and drain flange (2) from the drain body (5). Screw the nut (4) all the way down, and push the concave washer (3) down. 1 2 3 4 5 SI LI 1 2 3 4 7 a Apply silicone sealant (not included) under the drain flange(1) and place the drain flange (1)into the drain hole of the sink. From underneath the sink, screw the drain body (4) onto the drain flange (1).
Step 4: Install drain Insert 2 Insert 1 6 3 1 A 2 B 4 2 5 C 2 Insert the waste stopper (1) into the drain hole in the sink. Remove the strap (6) and clip (5) from the ball rod (3). Remove the ball nut (4). Insert the ball rod (3) into the drain body (2) and through the hole of the stopper (1). See Insert 1. For easier removal and cleaning, rotate the stopper (1) 90 degrees so that the ball rod (3) does not go through the hole in the stopper (1).See Insert 2.
Step 4: Install drain Attach the ball rod (1) to the strap (3) using the clip (2). 3 1 2 1 2 3 Loosen the thumb screw (3) on the strap (2). Push down on the lift rod (1) until the stopper is in the open position. Retighten the thumb screw (3). Step 5: Flush faucet D E 9 After installing faucet, remove aerator (D) with included aerator key (E). Turn water on for 30 seconds to remove any debris. Reassemble aerator (D).
Replacement Parts 3 2 1 17 Replacement Parts List Finish / Color Part # 1. Cover Button KP27002 2. Set Screw 4 GR, BL KP27001 5 6 3. Handle CH, SFS, ORB, MB KP27046 BG 7 4. Cap CH, SFS, ORB, MB KP27048 BG 8 9 14 15 10 11 12 5. Bonnet Nut KP27049 6. Screw KP27047 7. Cartridge KP27050 8. Aerator KP27051 9. Aerator Key KP27052 10. Flange & Washer CH, SFS, ORB, MB KP27053 BG 11. Metal Washer KP27054 12. Nut KP27055 13. Spanner Key KP27144 14.
Trouble - Shooting If you have followed the instructions carefully and your faucet still does not work properly, take the following corrective steps: PROBLEM CAUSE Leakage under the handle 10 Bonnet nut (6) has come loose Hexagon Nut 9 11 ACTION Remove the index (1). Loosen set screw (2) with hex wrench (14). Remove the handle (3). Unscrew cap (5) (by hand only).
Codes/Standards Applicable: NSF/ANSI 372 LEAD FREE IA P MO R& T NSF/ANSI 61 ASME A112.18.1 1.2GPM 4.5L/min maximum TM Faucet Warranty Kraus products are manufactured and tested to the highest quality standards by Kraus USA Inc. (“Kraus”). Kraus extends this warranty to the original purchaser for personal household use of the “Faucet” in its original location. The warranty is non-transferable.
Except as otherwise provided above, Kraus makes no warranties, expressed or implied, including warranties of merchantability and fitness for a particular purpose, or compliance with any code. Shipping charges will be covered for the first (1) year of the warranted replacement part or product (HI, AK, and Puerto Rico shipping charges may apply). International shipping fees are not included.
IMPORTANT Register Your Kraus Product Activate Your Warranty Access Premium Customer Support Get Product Information REGISTER TODAY http://www.kraususa.com/registration www.kraususa.