
Installation Guide


Trouble - Shooting
If you have followed the instructions carefully and your faucet still does not work
properly, take the following corrective steps:
PROBL E M C A U S E A C T I O N
Leakage under the
handle
Bonnet nut (6) has
come loose
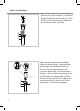
Remove the index (1). Loosen
set screw (2) with hex wrench
(14). Remove the handle (3).
Unscrew cap (5) (by hand only).
Tighten bonnet nut (6) with
an adjustable wrench
Aerator drips or has
inconsistent water
ow
pattern
Aerator (8) is dirty or
not seated properly
Unscrew aerator (8)
with aerator wrench (9)
and clean out debris
Water will not shut o
completely
Cartridge may need to
be adjusted or replaced
Care & Maintenance
*To keep the product clean & shining, follow the steps below:
1. Rinse with clean water & dry with a soft cloth
2. Do not clean with soaps, acid, polish, abrasives, or harsh cleaners
3. Do not use cloth with a coarse surface
4. Unscrew the aerator and clean when necessary
*This installation manual is subject to change without further notice.
10
9
11
12
13
Hexagon Nut
Hot
Water
Cold
Water
1
11
Close
Open
Left
Hot Water
Push
25˚
90˚
12
13
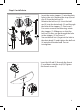
Remove the index (1). Loosen
set screw (2) with hex wrench
(14). Remove the handle (3).
Unscrew cap (5) (by hand only).
Tighten bonnet nut (6) with an
adjustable wrench. Remove the
cartridge (7). Check for cracks
There is leaking from the
sink drain at the base of
the sink.
The sink has a rough or
irregular surface.
Apply additional silicone
sealant to the beveled side of
the drain ange. Retighten
and test for leaks
11
There is a low ow of
water.
The screen lter in the
hose connectors is dirty.
Turn o the water supply at
water valve and unscrew the
hose connectors from water
supply lines. Clean the screen
in the water lines with hot
water, removing any debris
or calcium build up.