R INSTALLATION MANUAL Fireclay Dual Mount Workstation Kitchen Sink KFDW1-33 www.kraususa.com I Toll Free: 1.800.775.0703 I © 2023 Kraus USA Plumbing LLC I REV.
Congratulations on the purchase of your new Kraus plumbing fixture! R Please keep the box and packaging materials until your product is completely installed. If you have any questions, require technical assistance or have any problems with your product: STOP DO NOT RETURN TO STORE Please contact our Customer Service Team 1-800-775-0703 / customerservice@kraususa.com Have the model number available and retain a copy of your receipt with purchase date for reference.
STOP Prior to Installation: · Make sure that you have all necessary parts by checking the parts list. If any part is missing or damaged, please contact Kraus Customer Service at 800-775-0703 for a replacement. R · Inspect the sink prior to installation to make sure that it has not been damaged during shipping. · Read all instructions and safety warnings and ensure you have all tools, parts, and equipment necessary for a safe installation. · Use the cut-out template provided by Kraus.
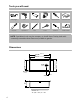
Tools you will need: Safety Goggles Drill Silicone Adhesive Jig Saw Phillips Screwdriver Cut Resistant Gloves Putty Knife Tape Measure Pencil Scissors Screwdriver Closed Toe Shoes NOTE: Specialized tools may be necessary to install Kraus Fireclay sinks with countertop materials other than wood, marble or granite. Dimensions 33 1/8" (842mm) (90mm) R 5/8" (15mm) 10" (254mm) 4 3/8" (112mm) KFDW1-33 33 1/8" x 19 1/2" x 10" 4 19 1/2" (497mm) 3 1/2" 17" (430.76mm) 15 3/4" (400.
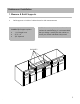
Undermount Installation 1. Measure & Build Supports Build supports on inside of cabinet based on sink measurements · Installer Tip: Support options · · · 1 1/4" Angle Irons (2) 2" x 4' NOTE: Due to the typical ±3mm side wall variance in manufacturing, it is recommended that you design / modify the sink cabinet to match your clients individual sink(s) need.
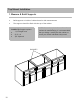
2. Install Sink 6 · Place sink in opening. The weight of sink should be sustained by the built supports.
3. Cut Countertop · · Kraus recommends providing the cabinet maker with the actual sink to be installed prior to the cabinet fabrication. It is recommended that the sink be installed with an approximately 1/8" positive reveal. It is further recommended that the installer(s) discuss this with the customer and agree that this finished appearance is the desired effect. ! CAUTION - To avoid the risk of personal injury, wear safety glasses and cut resistant gloves with non-slip grip when cutting.
4. Install Countertop · Use a bead of silicone (or preferred adhesive) around the rim of the sink. Check the alignment of the sink to the cutout in the countertop. Place countertop cutout hole over sink and press firmly. Silico ne A dhesi ve Installer Tip: Use acetone or denatured alcohol to remove any excess sealant.
5. Installing Plumbing and Fixtures · Connect drain, trap to drain and water supply connections to the faucet according to manufacturer's instruction. · Run water into sink and check for leaks.
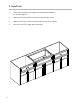
Top Mount Installation 1. Measure & Build Supports · Build supports on inside of cabinet based on sink measurements · The supports should be flush with the top of the cabinet Installer Tip: Support options · · · 1 1/4" Angle Irons (2) 2" x 4' 3/4" Plywood SUPPORTS 10 NOTE: Due to the typical ±3mm side wall variance in manufacturing, it is recommended that you design / modify the sink cabinet to match your clients individual sink(s) need.
2. Measure Sink Opening · Using the measurements of the sink, mark the countertop where it needs to be cut. NOTE: Make sure clearance is suitable for backsplash, faucet and plumbing for the sink.
3. Cut Countertop · Cut the opening in the countertop by carefully following the traced line. ! CAUTION - To avoid the risk of personal injury, wear safety glasses and cut resistant gloves with non-slip grip when cutting. NOTE: Please use the appropriate saw that best fits your countertop material.
4. Apply Silicone or Plumber's Putty Clean and dry the surface around the opening of the sink. · Turn the unit upside down to apply sealant. Apply silicone-based sealant (not included) underneath the edge of the sink.
5. Secure Sink to Countertop · · · 14 Insert the sink into the opening, check the alignment of the sink to the cutout in the countertop and press firmly. Remove excess silicone-based sealant. Allow sealant to set for 30-60 minutes.
Codes/Standards Applicable UP C C R Kitchen Sink - Lifetime Limited Warranty Kraus USA Plumbing, LLC (“Kraus”) extends this warranty to the original purchaser for personal household use of the Kitchen Sink when purchased from a Kraus authorized dealer and in the location of original installation. This warranty is non-transferable.
How to Make a Warranty Claim If you are a consumer purchaser, please contact a Kraus Customer Service Representative at: Kraus USA Plumbing, LLC 12 Harbor Park Drive Port Washington, NY 11050 Toll-free 800-775-0703 Customerservice@kraususa.com R If you are a plumbing contractor or trade professional, please contact a Kraus Pro Representative at: Kraus USA Plumbing, LLC 12 Harbor Park Drive Port Washington, NY 11050 516-801-8955 Proservice@kraususa.
IMPORTANT Register Your Kraus Product R Activate Your Warranty Access Premium Customer Support Get Product Information REGISTER TODAY http://www.kraususa.com/registration R www.kraususa.