
Installation Sheet


16
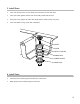
4. Install Sink
· Turn the sink upside down. Align the sink with the cutting line on the counter.
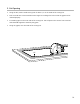
· Using a pencil, mark 10 spots around the frame at a distance of about 1/4” (6.4mm) from the edge
of the sink.
· For a solid installation, it is recommended that all 10 mounting clips are used.
· Use 15/64" drill bit to drill the fixation holes at a depth of 3/8” in the indicated location.
· Insert the brass inserts by tapping them into the holes, split end first.
· Thoroughly clean the top portion of the sink edge. Clean underneath the counter and around the
cutting line using denatured alcohol.
· Apply a small quantity of silicone-based sealant (not included) around the cutting line, 1/8” away
from the edge of the counter.
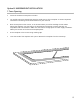
· Align the sink and fix the mounting clips as shown. Firmly tighten the screw into the brass insert.
· Once the sink is correctly installed, tighten the wing nuts to fix it into place.
· Complete the installation of the counter.
· Remove any excess sealant on the inside of the bowls.
UNDERNEATH THE COUNTER