INSTALLATION GUIDE Granite Kitchen Sinks KGD-410B / KGD-412B/ KGU-413B / KGD-430B / KGD-433B / KGU-431B / KGU-413B KGU-434B www.kraususa.com I Toll Free: 1.800.775.0703 I © 2017 Kraus USA Inc. I REV.
Congratulations on the purchase of your new Kraus plumbing fixture! Please keep teh box and packaging materials until your product is completely installed. If you have any questions, require technical assistance, or have any problems with your product: DO NOT RETURN TO STORE Please contact our Customer Service Team 1-800-775-0703 / customerservice@kraususa.com Have the model number available, and retain a copy of your receipt with purchase date for reference.
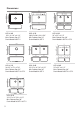
Please note: • KGUs can be installed undermount only (Option B) • KGDs can be installed topmount & undermount (Option A) Prior to Installation: • Make sure that you have all necessary parts by checking the parts list.
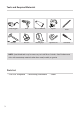
Tools and Required Materials Adjustable wrench J Safety Goggles Drill Hammer Hole Saw Silicone Sealant Silicone Adhesive Masking Tape Phillips screwdriver Jig Saw Tape Measure Hex wrench Pencil Screwdriver NOTE: Specialized tools may be necessary to install Kraus Stainless Steel Undermount I sinks with countertop materials other than wood, marble, or granite D Parts List • Cut-Out Template 3 • Mounting Hardware • Drain
Hardware (included) Important • Instructions may vary depending on countertop material. Read all instructions carefully, and ensure that counters are compatible with sink installation before proceeding. • Follow the plumber’s code and builder’s code effective in your area. • Shut off water valves prior to installation. • Open sink packaging and verify that the sink is in perfect condition. Put sink back into packaging to protect it until time of installation.
mm: 559 x 838 x 241 (362 x 362) in: 22 x 33 x 9.50 (14.23 x 14.23) mm: 510 x 780 x 220 in: 20.07 x 30.70 x 8.66 mm: 559 x 838 x 241 (362 x 362) in: 22 x 33 x 9.50 (14.23 x 14.23) mm: 510 x 780 x 220 in: 20.07 x 30.70 x 8.66 24” 610mm 22” 559mm 22” 559mm 9-1/2” 241mm 9-1/2” 241mm KGD-412B 30 3/4”x 20 1/8”x 8 5/8” Min Cabinet Size: 33” Drain Model #: BST-2 mm: 481 x 824 x 241 in: 18.93 x 32.45 x 9.5 mm: 481 x 824 x 241 in: 18.93 x 32.45 x 9.
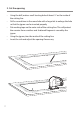
Option A: DROP-IN INSTALLATION 1. Trace Opening • • • • • • • • • Locate the drop-in template in the box Cut carefully along the dotted lines. Keep the inside portion of the template. It contains important information concerning care and maintenance for your new sink Place the template on the counter, in the location where you will be installing the sink. When placing the template, note the location of cabinet doors and panels to ensure that they are compatible with sink installation.
2. Cut the opening • • • • • 7 Using the drill, make a small starting hole of about ½” on the inside of the cutting line Drill a second time in the same hole with a larger bit to enlarge the hole so that the jigsaw can be inserted properly Put masking tape on the outer side of the cutting line.
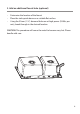
3. Add an additional faucet hole (optional) • • • Determine the location of the faucet Place the sink upside down on a suitable flat surface Using the 32mm (1 ¼”) diamond hole saw at high power (1500tr. per min), break through in the desired location CAUTION: This procedure will cause the metal to become very hot.
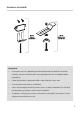
4. Install Sink • • • • • • • • 9 Clean and dry the surface around the opening of the sink Verify that the sink fits correctly in the opening. The edge of the sink must sit on the counter Turn the unit upside down to apply sealant.
5. Drains installation 5. Install Drain· Insert the metal strainer into the rubber seal, • • • • and then into the straining hole. · Install the rubber gasket and the main drain body underneath the sink. Insert the metal thetherubber seal, and intostrainer the drain hole · Usingstrainer the screw, into tighten main drain body andthen the metal into place. Insert the rubber gasket theofmain drain body underneath the sink · Install the basketand on top the drain installation.
Option B - UNDERMOUNT INSTALLATl ON 1. Trace Opening a. Locate the undermount template in the box b. Cut carefully along the dotted lines. Keep the inside portion of the template. It contains important information concerning care and maintenance for your new sink c. Place the template on the counter, in the location where you will be installing the sink. When placing the template, note the location of cabinet doors and panels to ensure that they are compatible with sink installation.
3. Add Additional Faucet Hole (optional) a. Determine the location of the faucet b. Place the sink upside down on a suitable flat surface c. Using the 32mm (1 ¼”) diamond hole saw at high power (1500tr. per min), break through in the desired location CAUTION: This procedure will cause the metal to become very hot.
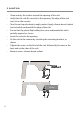
4. Install Sink • • • • • • • • • • • 13 Turn the sink upside down. Align the sink with the cutting line on the counter Using a pencil, mark 10 spots around the frame at a distance of about 1” (25.4mm) from the edge of the sink For a solid installation, it is recommended that all 10 mounting clips are used Drill ¼” fixation holes at a depth of 3/8” in the indicated location Insert the brass inserts by tapping them into the holes, split end first Thoroughly clean the top portion of the sink edge.
4.
5.
6. Install Pipes a. Install the faucet following the manufacturer’s instructions b. Make proper water and waste pipe connections 4 ST-2 BST-2 Maintenance Clean your sink on a regular basis with warm soapy water. Rinse the sink after using cleaning products. Wipe the sink surface with a soft cloth to remove any liquid residue. Do not cut food directly on the surface of the sink. Do not leave sharp objects on the surface of the sink for an extended period of time.
Codes / Standards Applicable: Kitchen Sink Warranty Kraus products are manufactured and tested to the highest quality standards by Kraus USA Inc. (“Kraus”). Kraus extends this warranty to the original purchaser for personal household use of the “Kitchen Sink” in its original location. The warranty is non-transferable. Kraus warrants the structure and finish of the product to be free from defects in material and workmanship under normal usage for the lifetime of the product.
Commercial Warranty Kraus extends the above warranty for a period of one (1) year to purchasers of products for industrial, commercial, and business use. All incidental or consequential damages are specifically excluded. No additional warranties, express or implied are given, including but not limited to, any implied warranty of merchantability or fitness for a particular purpose.
IMPORTANT Register Your Kraus Product Activate Your Warranty Access Premium Customer Support Get Product Information REGISTER TODAY http://www.kraususa.com/registration www.kraususa.