
Instructions / Assembly


9
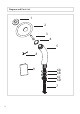
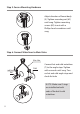
Step 5: Secure Mounting Hardware
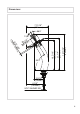
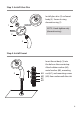
Step 6: Connect Waterlines to Main Valve
Adjust direction of faucet body
(5). Tighten mounting nut (6C)
until snug. Tighten mounting
screws (6D) to nut with a
Phillips head screwdriver until
snug
Connect hot and cold waterlines
(7) to the angle stops. Tighten
with a wrench until snug. Turn
on hot and cold angle stops and
check for leaks
6A
6B
6C
6D
6A
6B
6C
6D
5
5
1
1
2
5
blue Line
Cold
red Line
Hot
Open
Hot
Cold
6A
6B
6C
6D
6A
6B
6C
6D
5
5
1
1
2
5
blue Line
Cold
red Line
Hot
Open
Hot
Cold
6A
6B
6C
6D
6A
6B
6C
6D
5
5
1
1
2
5
blue Line
Cold
red Line
Hot
Open
Hot
Cold
NOTE: Make sure O-rings
are installed on both
ends of the hot & cold
waterlines