
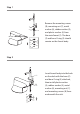
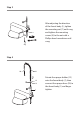
Installation Guide
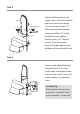
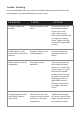


Usage
Sprayer:
How to operate the handle:
1. Raise the lever handle to turn on
the water. Push down to turn o.
2. Turn the lever handle to the left
to increase hot water ow, turn
to the right to increase cold ow.
1. To activate sprayer, turn on
water with lever and squeeze
sprayer.
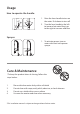
Care & Maintenance
*To keep the product clean & shining, follow the
steps below:
1. Rinse with clean water & dry with a soft cloth
2. Do not clean with soaps, acid, polish, abrasives, or harsh cleaners
3. Do not use a cloth with a coarse surface
4. Unscrew the aerator and clean when necessary
*This installation manual is subject to change without further notice.
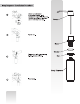
1
10
279
10 31/32”
Minimum distance 90mm
~3.5”
~3.5”
Less than 90mm
Cold Water
Hot Water
Ø35~Ø38
1
2
3
10
9
11
12
13
1
Hexagon Nut
Hot
Water
Cold
Water
2 3
1
4
5
7
6
8
4
5
6
7
8
Ø1 3/8”~
Ø1 1/2”
32 3/32”
815
194
7 5/8”
Ø1 3/8~Ø1 1/2”
30˚
10
11
Close
Open
Left
Hot Water
Push
25˚
90˚
12
13
8
7
Ø35~Ø38
Max35
217
8 17/32”
Max1 3/8”
9
11
12
15
14
13
2
3
4
5
6
7
8
1
10
279
10 31/32”
Minimum distance 90mm
~3.5”
~3.5”
Less than 90mm
Cold Water
Hot Water
Ø35~Ø38
1
2
3
10
9
11
12
13
1
Hexagon Nut
Hot
Water
Cold
Water
2 3
1
4
5
7
6
8
4
5
6
7
8
Ø1 3/8”~
Ø1 1/2”
32 3/32”
815
194
7 5/8”
Ø1 3/8~Ø1 1/2”
30˚
10
11
Close
Open
Left
Hot Water
Push
25˚
90˚
12
13
8
7
Ø35~Ø38
Max35
217
8 17/32”
Max1 3/8”
9
11
12
15
14
13
2
3
4
5
6
7
8