
Installation Guide


11
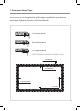
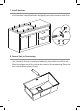
7. Install Anchors
• Insert anchors into drilled holes and lightly tap with a hammer until ush
Flushed/Zero Reveal
3/8“ Positive Reveal
1/8“ Negative Reveal
DETERMINE REVEAL TYPE
Step1
Step2
Step3
Step4
Step6
Step5
Step7
Step8 Step9
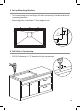
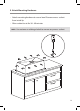
Determine location for mounting brackets; space
1/2"
(13mm)
3/8
1/2
Centerline
3/8”POSITIVE
1/8”NEGATIVE
FLUSHED/ZERO
Flushed/Zero Reveal
3/8“ Positive Reveal
1/8“ Negative Reveal
DETERMINE REVEAL TYPE
Step1
Step2
Step3
Step4
Step6
Step5
Step7
Step8 Step9
Determine location for mounting brackets; space
1/2"
(13mm)
3/8
1/2
Centerline
3/8”POSITIVE
1/8”NEGATIVE
FLUSHED/ZERO
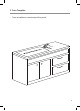
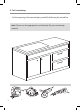
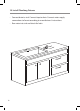
8. Secure Sink to Countertop
• Use a bead of silicone (or preferred adhesive) around the rim of the sink.
Check the alignment of the sink to the cutout in the countertop. Place sink
over cutout hole and press rmly
Flushed/Zero Reveal
3/8“ Positive Reveal
1/8“ Negative Reveal
DETERMINE REVEAL TYPE
Step1
Step2
Step3
Step4
Step6
Step5
Step7
Step8 Step9
Determine location for mounting brackets; space
1/2"
(13mm)
3/8
1/2
Centerline
3/8”POSITIVE
1/8”NEGATIVE
FLUSHED/ZERO