
Installation Guide


10
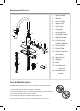
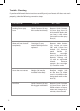
Replacement Part List
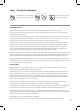
Care & Maintenance
*To keep the product clean & shining, follow the steps below:
*This installation manual is subject to change without further notice.
1. Rinse with clean water & dry with a soft cloth
2. Do not clean with soaps, acid, polish, abrasives, or harsh cleaners
3. Do not use cloth with a coarse surface
4. Unscrew the aerator and clean when necessary
1
10
279
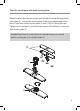
10 31/32”
Minimum distance 90mm
Less than 90mm
Cold Water
32 3/32”
Ø35~Ø38
1
2
3
10
9
11
12
13
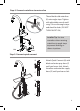
Hexagon Nut
Hot
Water
Cold
Water
2 3
1
4
5
7
6
8
4
5
6
7
8
Ø1 3/8”~
Ø1 1/2”
815
194
7 5/8”
Ø1 3/8~Ø1 1/2”
30˚
10
11
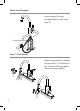
Close
Open
Left
Hot Water
Push
25˚
90˚
12
13
8
7
Ø35~Ø38
Max35
217
8 17/32”
Max1 3/8”
9
11
12
13
2
3
4
5
6
7
8
1. Spray Head
2. Washer
3. Hose Guide
4. Spout Clip
5. Set Screw
6. Catridge
7. Locking Nut
8. Catridge Cover
9. Metal Handle
10. A Set Screw
B Index Button
11. Cover Plate
12. Putty Plate
13. Quick Connect
Assembly
14. Spray Hose
15. Weight
16. Base
17. Hex Wrench
(2.5mm)
18. Hex Wrench
(4mm)
1
2
3
5
4
6
7
8
9
10A
10B
13
14
15
11
12
16
17
18