POCKET HOLE SYSTEMS Instruction Manual Mini Kreg Jig® (Models MKJ and MKJ Kit) RocketTM Jig (Models R1 and R2) US Pat. # 5,676,500 Kreg Jig® ProPack (Models K2000 and K2000-PP) US Pat.
1 Table of Contents Warnings and Cautions 2 Parts Identification 3-4 “Quick-start guide” to building your first Pocket Hole joint 5-6 The K2000 Kreg Jig® 7-10 The RocketTM Jig 11-12 The Mini Kreg Jig® 13-14 Selecting the correct Pocket Hole screw 15-18 Joinery Guide Face Frames Leg and Rail Miters Angles and Curves Edgebanding Edgejoining Plugging a Pocket Hole 19-20 21-22 23-24 25-26 27 28 29 FAQ’s 30-33 Warranty and Contact Information 34
Warnings and Cautions Thank you for your purchase! Kreg Tool Company is proud to manufacture top quality tools and accessories that are surpassed only by our commitment to customer service. If after reviewing this manual you still have a question or concern that you would like addressed please visit our website at www.kregtool.com, call 800-447-8638 or email customerservice@kregtool.com. This manual covers the basics of pocket hole joinery including the Mini Kreg Jig®, RocketTM Jig and the K2000 Kreg Jig®.
3 Parts Identification -- indicates what is included in package Mini Kreg Jig® (MKJ) 3/8” Step Drill Bit (KJD) 3”-#2 Square Driver Bit (D3) 6”-#2 Square Driver Bit (D6) Standard Face Clamp (SFC) Allen Wrench - 1/8” (AW18) Depth Collar (KJDC) 75 Pack 1-1/4” Coarse Screws (SML-C125) 75 Pack 1-1/4” Fine Screws (SML-F125) 25 Pack 1-1/4” Fine Screws (SML-F125) (2) Support Wings Plastic Carrying Case (K2000 Case) Mini Kreg Jig® Kit (MKJ KIT) RocketTM Jig (R1)
4 RocketTM Jig Kit (R2) K2000 Kreg Jig® (K2000) Kreg Jig® ProPack (K2000-PP)
5 Three Steps to Your First Pocket Hole Joint Ready to jump in and start building? Here is a quick-start guide to creating your first pocket hole joint. Before you start... a few Pocket Hole Joinery Facts • You only need to drill a pocket hole into ONE of the workpieces to be joined. No pre-drilling of the second workpiece is required with the use of self-tapping screws. • The step drill bit forms both a pocket hole for the screw head and a guide hole for the screw shank in one motion.
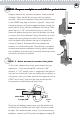
6 2 STEP 2 - Prepare workpieces and drill the pocket holes. Prepare materials by squaring the pieces to be joined on all edges. Place the drill bit into your drill and tighten securely. Place one workpiece to be joined onto the base of the K2000 Kreg Jig® as shown in Figure 3. Adjust the clamping pressure of the the toggle clamp by turning the plastic pad to firmly hold the workpiece into the jig.
7 Setting up -- K2000 Kreg Jig® The K2000 Kreg Jig® consists of 5 main components; the upright (A), base (B), K2000 riser block (C), step block (D) and two indentical support wings (ProPack only) (E). (C) (A) (E) (D) (B) Before drilling any holes you must first assemble the 1/4” hex nut into the base of the jig. Turn the jig over so that the toggle clamp faces away from you, next place the 1/4” hex nut loosely into the hex recess on the base of the jig.
8 Using the K2000 Kreg Jig® The K2000 Kreg Jig® is designed with standard settings that allow one to easily join 1/2”, 3/4” and 1-1/2” thick material. These three material thicknesses account for approximately 90 percent of the materials commonly used today in woodworking. If your material thickness falls between one of the standard settings, for example 1-1/4" stock, simply use the setting closest to your material thickness or build your own spacer block as shown on page 10.
Using the K2000 Kreg Jig® 9 Adjusting the K2000 Kreg Jig® for Material Width Spacing pocket holes across the width of a workpiece is important in maximizing the strength of a joint. When framing most woodworking projects, it is recommended to place two pocket holes across the width of a rail to keep the workpiece from twisting once it has been assembled.
K2000 Kreg Jig® Tips and Tricks 10 TIP Pocket Hole Placement Tip! Although the K2000 Kreg Jig® is designed to work with three of the most common material thicknesses, a homemade spacer can always be added to the base of the jig to position a pocket hole in any thickness of material. Just remember that a 1/8” change in spacer height will move the exit point of the screw 1/24” on the workpiece. Always check the amount of screw travel in a scrap piece of material. Spacer Using the K2000 Kreg Jig® portably.
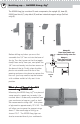
11 TM Setting up the Rocket Jig The Rocket Jig consists of 3 main components; the upright (A), base plate (B) and Rocket riser block (C). Two (2) 3/4” screws and two (2) 2-1/2” screws are included to assemble the 3 components in different configurations for drilling. (A) (B) (C) RocketTM Sliding Base Plate The RocketTM Jig utilizes a sliding base plate which allows the Kreg Face ClampTM to slide into the recess on the back of the jig and secure it to the workpiece while drilling the pocket holes.
12 TM Using the Rocket Jig The RocketTM jig is similar to the K2000 Kreg Jig® in that it allows you to maximize joint strength across a wide range of material dimensions by adding modular blocks to the base of the jig. These blocks adjust the exit point of the screw to easily work with 1/2", 3/4" and 1-1/2" thick material. 1/2To join 1/2” thick material. 1. Attach base plate to upright with step facing up and towards the drill guides as shown at right.
13 Setting up the Mini Kreg Jig® The single drill guide Mini Kreg Jig® is our most positionable pocket hole tool. The jig is designed without an alignment fence which allows it to be clamped at virtually any angle or orientation to the edge of a workpiece. Great in situations where the project is already assembled and in need of an extra pocket hole or in repair applications such as tightening a chair or table rail to the leg.
14 Using the Mini Kreg Jig® Positioning the Mini Kreg Jig® to center a screw in various material thicknesses is accomplished by setting the base of the jig a given distance from the edge of the workpiece. (Be sure to clamp the jig to the workpiece before drilling) 1/2 To join 1/2” thick material. 1. Clamp the workpiece to be drilled to a stationary object such as a workbench. 2. Set depth collar to 3-5/16” from the STEP of the drill bit. 3.
15 Selecting the Correct Screw KREG self-tapping screws are specially designed for pocket hole joinery. They feature a self-tapping auger point that eliminates pre-drilling and a flat head that seats flushly in the bottom of the pocket hole. All of our screws utilize a #2 square drive recess. The deep recess of the square drive provides positive driver engagement to reduce cam-out. Like every KREG product, our screws are manufactured from the highest quality materials.
16 Head Styles The washer head (SML) screw is our most popular head style as it provides the largest amount of surface area to seat firmly in the bottom of the pocket. Available in both fine or coarse thread, this head style is highly recommended if the material the pocket is drilled into is soft such as plywood or pine. The large washer head assures that the screw is not overdriven in the bottom of the pocket. Figure (23) The second available head style is the pan head (SPS).
17 Screw Penetration by Jig Setting This chart illustrates the amount of screw penetration that will occur into the second workpiece in a given position of any Kreg Jig®. **Always test in scrap material before driving final screws)** - (1/2” material setting of any Kreg Jig®) 1/2” Setting Depth Collar set to 3-5/16” from the step of the drill bit.
Self-Tapping Screw FAQs. 18 What screw type (thread) should I use in hardwoods, softwoods? It is recommended to use a fine thread screw in hardwoods such as oak, maple, walnut, cherry, hickory, etc. Use a coarse thread screw in softer materials such as pine, plywood, melamine, MDF and particle board. What screw length should I be using? As a general rule, when joining 3/4" stock to 3/4" stock you will use a 1-1/4" screw.
Face Frames Frames are common to many types of woodworking projects from cabinets to entertainment centers, doors and more. The thread that ties all of these applications together is that the workpieces are assembled in a flat plane. Frames are commonly assembled from material as thin as 1/2” up to 2” thick. For cabinets, 3/4” thick material is the standard.
20 2. Layout and mark your workpieces. We recommend that you layout your cut workpieces on a workbench and mark each piece on the side that will receive the pocket holes. Measure corner to corner for square. Rail Story Stick Stile Rail Stile 3. Drill pocket holes in both ends of rails. Prepare the jig you will be using to center the screw in the material thickness being joined and set your depth collar accordingly (see jig instructions).
21 Leg and Rail The Leg and Rail joint is a standard with table and chair assembly. Design options include either a set-back or flush rail. Use corner braces or a gusset to stiffen the joint. Pocket holes can also be drilled upwards into the rail to attach the table top at a later time. Leg and Rail Components A. Leg – The main vertical support that extends all the way to the floor. Can be turned, square, rectangular or tapered. B. Rail – Horizontal members that are screwed into the Leg. C.
22 Set-back Rail A rail that is set-back from the edge of the leg to highlight a reveal is a very common way to dress up a table or chair and give the design depth and sophistication. This set-back is very easy to achieve with pocket hole joinery. Cut a piece of material to the thickness of your desired set-back (1/4” plywood works well). Secure the leg to a workbench with a clamp. Butt the 1/4” plywood, or desired material, up against the leg at the location to be joined.
23 Mitered Joints This section relates to mitered joints that are assembled in a flat plane such as a picture frame. This is probably one of the most challenging types of joints to produce with pocket hole joinery. Understanding how the orientation of the pocket hole and the width of the stock being joined varies will allow you to join frames more easily. Miter Components A. Miter toe – The outside point of a mitered workpiece. B. Miter heel – The inside corner of a mitered workpiece. C.
24 Steps to Building a Miter joint 1. Plane material to uniform thickness, rip to width and rout rabbet if desired. 2. Cut desired miter on workpiece and position to drill pocket holes. There are a few different ways to join mitered pieces with pocket hole joinery. This example below focuses on joining two 45 degree mitered pieces by placing two pocket holes across the workpiece perpendicular to the edge of the miter as shown in the image at right.
25 Angled Joints/Curves Angles and curves are a great application for pocket hole joinery. With other methods of joinery an angled joint must by held in alignment for a substantial amount of time with bar clamps. Uneven pressure along the joint line can result in bowing, gaps or misalignment. The pocket hole joint solves this by putting constant pressure along the joint line in the form of screws that pull the two flat surfaces tightly together. Two 22-1/2 deg. pieces.
26 Steps to Building an Angled Joint 1. Plane stiles to same thickness, rip to width and cut square to length. Place desired angle on inside edge of one stile. 2. Build an assembly jig from scrap stock. We recommend that you first cut a plywood base 8” by 12”. Next laminate two 3/4” x 4” x 12” hardwood pieces together with glue and then cut the block on an angle that 3/4" x 4" x 12" before will complement your desired ripping at 45 deg. assembly angle. Mount this 3/4" x 4" x 12" before ripping at 45 deg.
27 Edgebanding Edgebanding, or placing a solid wood edge piece onto plywood or melamine to hide the unfinished edge is a great application for pocket hole joinery. Typically used for countertops, tabletops and shelves. In the past this process would be completed by either brad nailing the solid wood onto the plywood which would require time consuming filling and sanding of the brad holes, or simply gluing the solid wood onto the plywood and holding it in place overnight with bar clamps.
28 Edgejoining Edgejoining, or assembling workpieces edge to edge such as for a solid wood tabletop is easily accomplished with pocket hole joinery. In traditional edgejoining, the workpieces are only glued together and then pipe clamped overnight to allow for the glue to set-up. With pocket hole joinery one simply glues and screws to assemble one layer at a time. This process can be immediately followed by sanding and trimming to size without delay.
29 Plugging a Pocket Hole Normally pocket holes are placed on the backside or underside of a project where they are hidden from view. From time to time however, you may find the need to place one in a visible location. In this event, KREG manufactures solid wood pocket hole plugs that can be glued in over the head of the screw and sanded flush to conceal the hole. These plugs are available in a variety of wood species.
General FAQ Why do I need to use a 2,000+ rpm drill to make the pocket holes? What brand do you recommend? A drill that is rated at 2,000 RPM or above is considered a woodworking drill. RPM’s below that are normally seen in metal-working drills. The higher the RPM, the cleaner the hole and the longer the drill bit lasts. A 1,500 RPM drill will do the trick, but you will see slightly more wear on the bit over time. Most of the major tool manufacturers produce a drill above 2,000 RPM.
31 General FAQ What is the recommended pocket hole spacing across a panel? We suggest that you place pocket holes every 6-8 inches across the length of a workpiece for adequate strength. Feel free to place them closer or further apart as the application warrants. I am experiencing wood movement as I screw my joint together. How can I eliminate this? First and foremost, the use of our Face Clamps will eliminate most wood movement while driving a screw.
32 How strong is a pocket hole joint compared to a mortise and tenon joint? This is a question we get asked quite often. An independent lab completed testing a few years back that showed that a pocket hole joint failed at 707 pounds when subjected to a shear load while a mortise and tenon joint failed at 453 pounds (approximately 56% stronger). Pocket hole joints are tremendously strong for a couple of reasons.
33 General FAQ How can I get the longest life out of my drill bit? We suggest following a few simple guidelines to get the longest life out of your drill bit. 1. Use a corded drill rated at 2,000 rpm or above (this is normally characterized as a woodworking drill, a metal-working drill is usually rated under 1,500 rpm). 2. Place the bit into the drill guide before starting the drill. 3. Make sure the drill is up to full rpm before plunging it into the workpiece.
Warranty and Contact Information What type of warranty do the pocket hole jigs carry? We are confident that you will enjoy your KREG products. The Mini Kreg Jig®, Rocket™ Jig and K2000 Kreg Jig® all carry a lifetime warranty on their hardened steel drill guides when used with the KREG KJD drill bit. All of our tools also carry a 30-day complete satisfaction guarantee.
POCKET HOLE SYSTEMS Kreg Tool Company 201 Campus Drive Huxley, IA 50124 Phone: 515-597-2234 Toll Free: 800-447-8638 Fax: 515-597-2234 www.kregtool.