
Use and Care Manual


Angled Joints/Curves
2525
2525
25
Angles and curves are a great application
for pocket hole joinery. With other
methods of joinery an angled joint must
by held in alignment for a substantial
amount of time with bar clamps. Uneven
pressure along the joint line can result in
bowing, gaps or misalignment. The
pocket hole joint solves this by putting
constant pressure along the joint line in
the form of screws that pull the two flat
surfaces tightly together.
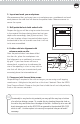
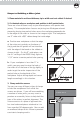
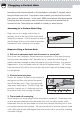
A typical 45 degree angle such as what
you might find on an angled cabinet face
frame front is traditionally made by joining
two 22-1/2 degree pieces. With pocket
hole joinery this joint is constructed by
cutting the entire 45 degrees on one
workpiece and leaving the other piece as
a 90 degree. These two workpieces are
then aligned flush on their inside edges
which leaves an overhang on the front
side which can be taken off with a jointer,
sander or hand plane once assembled (if
you don’t have a jointer, you can tip your table saw blade to 45 degrees, cut it
close and then finish with a belt sander).
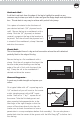
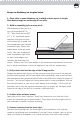
The result of this assembly method is that once the overhang is taken off the
joint line is in effect “shifted” around the corner and hidden from view. The
resulting solid wood corner is more resistant to wear and abuse because the
mitered edges are no longer exposed on the edge. This same concept can be
adapted to any angled joint application.
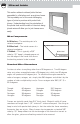
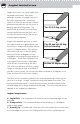
Angle Components
A. Angled Stile – The workpiece that contains the entire desired angle cut on
one edge.
B. 90 degree Stile – The second workpiece to be joined cut at a 90 degree
angle on both edges.
C. Assembly Jig – A homemade fixture you will want to build that will help hold
the inside edges of the two stiles aligned while the screws are being driven.
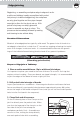
Two 22-1/2 deg. pieces.
One 90 and one 45 deg.
before trimming.
Finished 45 degree angle.