"rilE I--EAr’~ER IN AUCIIO ENCtINEERINO HomeTheater Standard Surround Preamp/Processor Instructions for Use Owner’s Reference
HomeTheater Standard SurroundPreamp/Processor Instructionsfor Use v 01.2 Krell Industries,Inc. 45 Connair Road Orange, CT 06477-3650 USA TEL 203-799-9954 FAX203-891-2028 E-MAILkrell@krellonline.com WEBSITE http://www.krellonline.com This productcomplieswith the EMC directive (89/336/EEC) andthe low-voltagedirective (73/23/EEC). WARNINGS TheHome TheaterStandardmustbe placedon a firm level surfacewhereit is not exposed to dripping or splashing.
Contents INTRODUCTION DEFINITION OF TERMS UNPACKING PLACEMENT ACPowerGuidelines GETTING STARTED ReadThis First An Introduction to SystemSetup FRONTPANELDESCRIPTION BACKPANEL DESCRIPTION REMOTECONTROLDESCRIPTION BatteryInstallation andRemoval CONNECTINGTHE HOMETHEATERSTANDARD TO YOURSYSTEM First: Connect AnalogandDigital Sources Next: ConnectVideo Sources Last: Connect Amplifier(s) SYSTEMSETUPAND CONFIGURATION OVERVIEW SYSTEMSETUPAND CONFIGURATION Navigatingthe Menu Accessingthe Main Menu Configure Speakers
Illustrations FIGURE 1 The HomeTheater Standard Front Panel FIGURE 2 The HomeTheater Standard Back Panel FIGURE 3 The HomeTheater Standard RemoteControl iV Page 7 13 17 Krell Home Theater Standard
Introduction Thank you for your purchase of the .Krell HomeTheater Standard Surround Preamp/Processor. The HomeTheater Standard provides optimum music and cinema soundtrack reproduction quality through Krell Current Mode,discrete Class A direct-coupled circuitry, and balancedoutputs on all six channels. Broadcastquality switching and circuitry--including componentvideo, S-video, and composite video--ensure unmatchedvideo performance.
Definition of Terms,continued Multi-channel (DB-25) A balanced input or outputcircuit that allowsfor the simultaneous connection of all audiooutputsplus one5 VDC(5 Volt trigger) via a single cable. DB-25inputs and outputs are becomingpopular for connectingan audio/video surroundsoundprocessor andpoweramplifiers, simplifying the integration of the two components into your system. Single-ended A two-wireinput or output circuit.
Unpacking Openthe box and removethe top.layer of foam. You see these items: 1 HomeTheater Standard 1 IEC connector (AC power) cord 1 HomeTheater Standard handheld remote control 1 CR2025lithium battery 1 T-15 Torx wrench(small "L" type) 1 T-10 Torx wrench(small "L" type) 1 12 VDCoutput (12 V trigger) cables 1 packet containing the owner’s reference manual, the RS-232Port developer’s reference,the "read this first" insert, andthe warrantyregistration card.
Placement Beforeyou install the Home TheaterStandardinto your system,reviewthe following guidelinesto choosethe location for the component. This will facilitate a clean, troublefree installation. TheHome TheaterStandarddoesnot require any type of special rack or cabinet for installation. For the dimensionsof your Home TheaterStandardsee Specifications, on pages 59-60.
Getting Started READ THIS FIRST Performthe following steps to makethe On-Screen Display (OSD)viewableon your video monitor. Thevideo format and video signals of the Home TheaterStandardand the video monitorneedto matchbefore the OSDis viewable. Thevideo format of the video signal canbe set to either NTSC or PAL.
4. Verify that the video monitor’s video signal input correspondsto the HomeTheater Standardvideo signal output. Press the menukey on the remote control to verify that the OSDis nowviewable on the video monitor. The system configuration main menuappears whenthe video format and video signals between the HomeTheater Standard and your video monitor are compatible. If you haveany questions regarding the selection of the video format, please call your authorizedKrell dealer, distributor, or Krell.
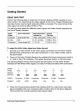
Figure 1 TheHome TheaterStandardFront Panel 10 5 11 6 12 7 13 8 14 9 15 16 22 18 19 20 21 I I SAT -00 --00 -C) VOR --00 Home Theater STEREO --0 Standard MUSlO1 ----O "© AUX1 AUX2 ----00 ----00 ZONE 00---- MUSICB PRO LOGIC ---O O-- USER STAND-BY POWER -----0 HTS 3 2 23 BasicOperation 1 PowerButton 2 Power LED 3 Stand-by LED 4 Infrared Sensor Input DeviceSelection Buttonsand LEDs 5 DVDButton and LEDs 6 LD Button and LEDs 7 SATButton and LEDs 8 VCR1Button and LEDs 9 TVButton and LEDs
Front Panel Description See Figure 1 on page7 The HomeTheater Standard front panel provides poweron and off; input, zone, and processing modeselection; monitoring and display of processor status; and balance and volumecontrol. The front panel componentsare described below. Basic Operation 1 Power Button The power button switches the HomeVideo Standard from the stand-by to the operational mode. Note Whenyou poweroff while zone 2 is se/ected, on/y zone 2 turns off.
Front PanelDescription,continued 6 LD Button and LEDs Usethis button to select the laser disc device. 7 SAT Button and LEDs Usethis button to select the satellite feed device. 8 VCR1 Button and LEDs Usethis button to select the VCRdevice. 9 TV Button and LEDs Usethis button to select the television device. 10 CD Button and LEDs Usethis button to select the compactdisc device. 11 Tuner Button and LEDs Usethis button to select the AM/FM tuner device.
Front Panel Description, continued 17 Infrared Emitter Emits the HomeTheater Standard remote operation code to a learning remote, which can be programmedto operate the HomeTheater Standard. See Program Remote, on page 48. Processing Mode Buttons and LED$ 18 Stereo Button and LED Usethis button to select the stereo decodingmode,which allows you to listen to a stereo recording in two channel(left and right) mode.Thered LEDilluminates whenthis modeis activated.
Front Panel Description, continued 23 Front Panel Display Thefront panel display provides status messages for Home TheaterStandard operations, including volumeandbalancelevel, decodingmode,andzoneinformation. In addition, whena newdeviceis selected, the physicalinputs are displayed.The displayturns off after five seconds of inactivity.
Front Panel Description, continued 30 Level Downand Up Buttons Usethe volumelevel buttonsto adjust the outputfor the entire systemas well as balanceandindividual levels for the center speaker,rear speakers,andsubwoofers. Thevolumelevel is shownin the front panel display. SeeSystemSetupand Configuration, on page26. 31 Recall Button Usethis button to recall previouslystored systemconfigurationsettings. SeeSaving Setup, Recalling Setup, and Restoring FactoryDefault SystemConfiguration Settings, on page52.
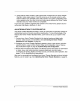
Figure 2 The HomeTheater Standard Back Panel 32 35 46 42 45 51 52 DIQITAL AUDIO INPUTS 0 o RIQH’I" LEFT o oOO 33 34 39 40 37 36 AnalogAudioOutputsandInputs 32 BalancedAnalogAudioOutputs 33 Single-endedAnalogAudioOutputs 34 Multi-ChannelAudioOutputConnector 35 B-1Left andB-1 Right Inputs 36 TapeIn Left andRight 37 TapeOutLeft andRight In Left andRight 38 VCR1 VCR1 Out Left and Right 39 40 Zone2 Out Left and Right 41 S-1, S-2,S-3, S-4, S-5Left andRightInputs 41 44 43 47 49 Digital AudioInput
BackPanel Description SeeFigure 2 on page13 The back panel of the HomeTheater Standard provides all input and output connections, remote control inputs and outputs, poweron and off, and power connection. The back panel functions are described below. Analog Audio Outputs and Inputs 32 Balanced Analog Audio Outputs The HomeTheater Standard is equipped with six balanced analog audio channel outputs, with XLRconnectors,for the left, center, right, left rear, right rear, and subwoofer.
BackPanelDescription,continued 39 VCR1Out Left and Right The HomeTheater Standard is equipped with one set of single-ended outputs with RCA connectors, for a VCRaudio source. 40 Zone 2 Out Left and Right The HomeTheater Standard is equipped with one set of single-ended zone 2 audio outputs with RCAconnectors. 41 S-l, S-2, S-3, S-4, S-5 Left and Right Inputs The HomeTheater Standardis equippedwith five sets of single-ended audio inputs with RCAconnectors.
48 CompositeVideo Inputs The Home TheaterStandardis equippedwith four RCAcompositevideo inputs with RCAconnectors. 49 ComponentVideo Outputs The Home TheaterStandardis equippedwith one set of component video outputs with RCAconnectors. Component video uses three wires (labeled Y, Cr, and Cbon back panel) to conveythe video signal, including the OSD. 50 Component Video Inputs TheHome TheaterStandardis equippedwith two sets of component video inputs.
Figure 3 The HomeTheater Standard RemoteControl PowerFunctions 56 Amp Key 57 HTS Key ZoneSelection 58 Main Key 59 Z2 Key DeviceSelection Keys 60 DVDKey 61 LD Key 62 SAT Key 63 TV Key 64 CD Key 65 Tuner Key 66 Auxl Key 67 Aux2 Key 68 VCRKey 69 TapeKey ProcessingMode Keys 70 Stereo Key 71 M1 Key 72 M2 Key 73 Pro Logic Key 74 PreampKey Control Function Keys 75 Bal Key 76 Cntr Key 77 Rear Key 78 Sub Key 79 Prey Key 80 Level Keys 81 MenuKey 82 Mute Key 83 Enter Key 84 THXKey Krell HomeTheater Standard Power
RemoteControl Description See Figure 3 on page17 The HomeTheater Standardremote control provides on and off, input selection, processing modeselection, speaker volumeand balance adjust, and mutefunctions, as well as access to the SystemSetup and Configuration menu. To send operational instructions directly into the HomeTheater Standardusing an RS232 based external control device, see RS-232 Port: Sending Commands and Interpreting Data, the developer’s reference shipped with the HomeTheater Standard.
RemoteControl Description, continued HomeTheater Standard remote control keys and their functions are described below. Power Functions 56 Amp Key Usethis key to poweron/off a Krell remotecontrol amplifier. 57 HTS Key Use this key to switch the HomeTheater Standard unit betweenthe stand-by modeand the operational mode. Note Whenyou poweroff while zone 2 is selected, only zone 2 turns off. Press the power button or the/-/TS key a secondtime to poweroff the main zone.
Remote Control Description, continued 66 Auxl Key Usethis key to select the auxiliary device, such as phono,tape, or an additional DVD, LD, CD, or VCR. 67 Aux2 Key Usethis key to select a secondauxiliary device, such as phono,tape, or an additional DVD,LD, CD, or VCR. 68 VCR Key Usethis key to select the VCRdevice. 69 Tape Key Usethis key to select the output from an analog tape recorder connectedto the tape inputs.
RemoteControl Description, continued 73 Pro Logic Key Usethis key to engageDolby Pro Logic circuitry for use with all Dolby Surround encodedmaterial, including laser discs, videotapes, television broadcasts, and compact discs. Note This modeis selected automatically whenDolby Digital source material is encodedfor Pro Logic. If you wish to turn off this mode,press the Pro Logic button.
RemoteControl Description, continued 81 MenuKey Usethis key to accessthe SystemSetupand Configuration on-screenmenus. 82 Mute Key Usethis key to mutethe Home TheaterStandard’soutput. VOLUMEMUTE appearsin the front paneldisplay. 83 Enter Key Usethis key to select menuitemsor to display the current systemconditions. 84 THX Key This key is reservedfor future use, for units equippedwith THXprocessing.
Connectingthe HomeTheater Standard to Your System This section provides information about connecting your HomeTheater Standard to analog and digital sources, video sources, and amplifiers. The HTSis equippedwith balanced and single-ended inputs, and a multi-channel (DB-25) connector. Krell recommends using balanced interconnect cables. Balancedinterconnect cables not only can minimize sonic loss but also are immuneto induced noise, especially for installations using long cables.
Connectingthe HomeTheater Standard to Your System, continued NEXT: CONNECTVIDEO SOURCES Note SeeReadThis First, on page5, for information on makingthe on-screen display visible on your video monitor. 1. Connectthe output of your video componentsto the appropriate video input of the HomeTheater Standard. 2. Connectthe video outputs of the HomeTheater Standard to the inputs of video recordersor additional video monitors, if desired.
SystemSetup and Configuration Overview This pageoutlines the SystemSetupand ConfigurationMenus.Theseeasy-to-follow, step-by-step menuslet you set up your HomeTheaterStandardfor optimum performance. Detailed instructions beginon page26. Krell recommends that youconfigure your component in the following order: 1. CONFIGURE SPEAKERS ConfigureSpeakersSetuplets you select speakersthat are in your systemand configuretheir bassrange. 2.
System Setup and Configuration Theremotecontrol is the maininput device for the Home Theater Standard. All initial setup and subsequent system configuration adjustments must be madethrough the remotecontrol, or via the RS-232port. For maximumperformance, the HomeTheater Standard must be configured for each systemdevice, its capabilities, andspeakerpositions in the listening room.Krell recommends configuring your system, step-by-step, in sequential order.
4. Useeither the front panelpowerbutton(1) or the remotecontrolHTSkey(57) poweron the Home TheaterStandard.Theblue powerLED(2) on the front panel illuminates. TheHome TheaterStandardis nowin operationalmode andreadyto be configured. IMPORTANT Makesure that any sourcedevicesare off whenyouconfigurethe HTS.Signals from sourcedevicescaninterfere with remotecontrol operation. 5. Pressthe remotecontrolmenu key(81).
Bass Range The speakersetup screen also showsthe bass ranges for the front, center, and rear speakers. Options available are not bass limited (FULL-RANGE)or bass limited (LIMITED). The option you select dependson the low frequency capabilities of each speakerin your system. See Modify SpeakerSettings, below. Note The speaker setup screen showsthe default settings for each speaker. If your system correspondsto the default settings, select OKat the bottomof the menuscreen, then press enter (83).
After selectingthe appropriateoption for yourspeakers,pressenter (83), highlight OK, andpress enter (83) again. Youreturn to the speakersystemsetup menu.Theonscreenphrasefor the selected speakernowreads LIMITED or FULL-RANGE. 2. LISTENING ROOMSETUP The secondmainmenuscreen, listening roomsetup, allows you to tell the Home TheaterStandardthe exact location of eachspeakerin your system,so that the Home TheaterStandardcancalculate the properarrival anddelaysettings.
Note Any speaker not configured in the speaker system setup menudisplays N/A (not available) for the distance specification. 3. CALIBRATE VOLUME The third menuoption, calibrate volume, allows you to calibrate HomeTheater Standard’s internal noise generator. each channel using the Note A sound pressure level (SPL) meter is required for this procedure.
Thefollowing screenappears: KRELL HTS -CALIBRATE VOLUMELEFT CENTER 0 dB ~ 0 dB RIGHT 0 dB L REAR 0 dB R REAR 0 dB SUB 0 dB Auto Noise Sequence Set the SPLmeterto C weightingandslowresponse.After initializing, the LEFTchannel dBsetting blinks, andyouhearband-limitedwhite noisethroughthe left speaker.This noise continuesfor two secondsandthen movesclockwiseto the next speakerin the system. Note Theadjustmentmustbe madewhile the channelis blinking.
Program Material Theprogram materialoptionusesthe samescreenas manualnoisesequence, but with externalmaterialsuchas a test disc. Thesourceplays,simultaneously, fromall configured speakers.This allowsyouto individuallyadjustspeakerbalances basedon yourlistening preferences ratherthanSPLreadings. Theprogram materialoptionusessurround mode.If all channels are not presentin the source material,theywill not be heardduringthis process. 4.
After selectingthe device(the example usedis DVD) that youwantto configure,press enter (83). TheCONFIGUREDVDscreenappears: KRELL HTS -CONFIGUREDVD CONFIGUREVIDEO CONFIGUREAUDIO CONFIGURE MODE CONFIGURETRIG OK Configure Video Input Pressenter83) to selectthis option.
Assign Video Format KRELL HTS -ASSIGNVIDEO FORMATDVD NTSC OK PRESS ENTER AND USE1" $ TO SWITCH BETWEENNTSC AND PAL After selectingthe appropriatevideoformat,select OKandpressenter (83) to return the ASSIGN VIDEOINPUTscreen.Select OKandpressenter (83) to return to the CONFIGURE DEVICES screen. Note See your video device’s operating manual.You mustselect the correct format for the video device to function properly with the HomeTheater Standard.
Note If the selected devicehas both digital and analogoutputs, use the digital outputs for the main zone, and the analog outputs for zone 2. To use an analoginput only, set the digital input to UNASSIGNED. If both analogand digital are unassigned,the last settings will stay selected whenyou switch to this device.
Assign Digital Input If youselectDIGITAL, the ASSIGN DIGITAL INPUT screenappears: KRELL HTS -ASSIGNDIGITAL INPUTDVD I,I, COAX1~ OK PRESS ENTER AND USE1" $ TO SWITCH BETWEENDIGITAL INPUTS When youenterthis screen,youseethe blinkingcursorat COAX1. Toselect another digital input option (COAX1, COAX2, COAX3,COAX4,COAX5, COAX6,OPT1, OPT2, UNASSIGNED),followdirectionsat the bottom of the screen.Selectthe UNASSIGNED digital inputoptionif the selecteddevicedoesnot usea digital output,for example, an analog VCR.
When you enter this screen,yousee the blinking cursor at MOVIE. Selecting MOVIE directs the Home TheaterStandardto select DolbyDigital or DTSprocessingif oneof thesesignals is present; otherwiseDolbyPro Logic is engaged.To assign another modeoption (STEREO, MUSIC1, MUSIC2, UNASSIGNED,PREAMP), press enter (83), then use the 1" ,1. keys(80) to select the desiredmode.Pressenter(83) to confirmthe setting. Select OKandpressenter (83) to return to the CONFIGURE DEVICES screen.
Select Trigger Mode Usethe 1" 4. keys(80) to movethe blinking cursorto the MODEfor the desiredtrigger, andpress enter (83). TheSELECT A TRIGGER MODE screenap 3ears: KRELL HTS -SELECT A TRIGGERMODE- 0 ALWAYS OFF 1 MAIN AND ZONE2 2 MAIN ONLY 3 ZONE2 ONLY OK TriggerMode 0: This trigger is not activated whenthe configureddeviceis selected. Trigger Mode1: Thetrigger activates whenthe configureddevice is selectedfor main or zone2 listening.
Configuring Additional Inputs Thescreenprocessaboveuses DVDas the selected device. For any of the other devicesavailable (LD, SAT, VCR1, TV, CD, TUNER, AUX1, AUX2, TAPE),usethe same process. When all deviceshavebeenselected andconfigured, select OKon the CONFIGURE DEVICES screenandpress enter (83). Youreturn to the SELECT DEVICE screen.Select andpressenter (83) to return to the mainmenu. 5. CONFIGURE LEVEL ADJUSTMENT Thefifth mainmenuoption, CONFIGURE LEVEL ADJUSTMENT, allows you to set trims.
When you select CONFIGURELEVEL ADJUSTMENTon the main menu, the ADJUSTMENTSscreen appears: LEVEL KRELL HTS -LEVEL ADJUSTMENTSMODETRIM DEVICE TRIM ANALOGINPUT TRIM OK Select Mode Trim Modetrim increasesor decreases the volumeautomaticallywhenyouchangedecoding modes (DOLBY DIGITAL, DTS, DOLBYPRO LOGIC, STEREO,MUSIC1, MUSIC2) to match listening levels betweenmodes. Select MODE TRIM andpressenter (83). TheSELECTMODEscreenappears: KRELL HTS -SELECT MODESTEREO OK PRESS ENTER AND USE1" ,1.
When youenterthis screen,youseethe blinkingcursorat STEREO. Toselect another option(DOLBYDIGITAL, DTS, DOLBYPROLOGIC, STEREO,MUSIC1, MUSIC2) pressenter(83), thenuse$ $ keys(80) to scroll through the options. Selectthe desiredmode,andpressenter (83). TheTRIMADJUSTMENT screenappears: KRELL HTS -STEREO TRIM ADJUSTMENTH, 0 dB ~ OK PRESS ENTER AND USE1" 4, TO CHANGE MODETRIM Theblinkingcursoris onthe 0 dB.Pressenter(83). Use1" $ keys(80) to select appropriate trim adjustment (rangeis from-15 dBto +15dB).
When youenterthis screen,youseethe blinkingcursorat DVD.Toselectanotheroption (LD, SAT, VCR, TV, CD, TUNER,AUX1, AUX2, TAPE), pressenter(83), thenuse1" $ keys(80) to scroll throughthe options.Pressenter(83). TheDVD TRIM ADJUSTMENT screen appears: KRELL HTS -DVD TRIM ADJUSTMENTI’ 0dB~ OK PRESSENTER AND USE1" $ TO CHANGE DEVICETRIM Theflashingcursoris onthe 0 dR.Pressenter(83), thenuse1" $ keys(80) to select appropriate trim adjustment (rangeis from-15 dBto +15dR). Pressenter(83) to the selection.
Input Gain Youcanboostweakersignals by increasingthe input gain valueat the bottomleft of this screen(in 3 dg, 6 dg, and9 dg gain increments). Tomaximize your system’ssignal to noiseratio for a particular input, the input gain valueappliedto the signal shouldbe increased(if needed)to maintaina signal strength closeto 0 dBgain. Theoptimalsignalgain valueis 0 dB. Anti Clip Setting anti clip to ONengages automaticdistortion protection.
6. OPERATION Thefinal option,OPERATION, allowsyouto choose background color for yourvideo display,configureon-screen displayandfront paneldisplaybrightness, choose serial controlformat,~elect musicmodes, program a learningremotecontrolto operatethe Home TheaterStandard,andprogram user buttonsetupandDTSautoswitch. KRELL HTS -MAIN MENUCONFIGURE SPEAKERS LISTENING ROOMSETUP CALIBRATE VOLUME CONFIGURE DEVICES CONFIGURE LEVEL ADJUSTMENT OPERATION Usethe 1" 4, keys(80) to select OPERATION andpressenter(83).
Background Color To changethe backgroundcolor for your video menudisplay, select BACKGROUND COLOR and )ress enter (83). The MENU BACKGROUND COLOR screen appears: KRELL HTS -BACKGROUNDCOLORI,I, MENUBACKGROUND COLOR~ BLACK BLUE GREEN RED OK Theblinking cursor appearsat MENU BACKGROUND COLOR. Usethe 1" $ keys (80) to move the cursorto the desiredcolor (black is the factory default). Press enter (83). background menucolor changesimmediately.Select OKand press enter (83) to return to the operation menu.
To changethe line numberon whichthe display appears,use the 1" $ keys(80) to move to LINENUMBER. With the blinking cursor next to LINENUMBER, pressenter (83), then use 1" $ keys(80) to select the screenline. Therangeis 0 (top line of screen)through (bottomline of screen). A doublearrowon the right side of the screenmovesup and down,indicating line position. Pressenter (83) to set the selection. SelectOKandpress enter (83) to return to the operationmenu.
Configure Music Thenext item in the OPERATION menu,CONFIGURE MUSIC,allowsyouto determinewhich musicmodes youwant. Select CONFIGURE MUSIC andpressenter (83). TheMUSIC MODE SETUP screenappears: KRELL HTS -MUSIC MODESETUPMUSIC1 MUSIC2 OK USE1" $ TO SELECT A MUSIC MODE AND PRESS ENTER Followthe on-screen directions,choosing MUSIC1 or MUSIC2. Youenterthe selectmusictypescreen.When youenter this screen,youseea blinking cursor.
Virtual AcousticEnvironments ON STAGE L/R/C/S/RR .FRONT ROW L/R/S/RR GENERALADMISSION L/R/S/RR ORCHESTRA L/R/C/S/RR MEZ.ZANINE L/R/C/S/RR FULL RANGEAND SUB L/R/S MONO C/S ENHANCED STEREO L/R/C/S PARTY L/R/C/S/RR L=Left Speaker S=Sub Speaker R=Right C=Center Speaker Speaker RR=Rear Speaker(s) After the desiredoptionsare selected,selectOKandthenenter(83) in the MUSIC MODE SETUP SCREEN to return to the operationmenu.
KRELL HTS -PROGRAMREMOTEMODEONLY ~’AND,J, SAVEAND RECALL ARE ALLOWED ON FRONT PANEL. REMOTE INPUT IS INACTIVE. PRESSENTER TO CONTINUE OK Note Theinfrared sensoron the front panelis renderedinactive until programming is complete. 1. Usethe 1" 4. keys (80) to select START on the PROGRAM REMOTE screenandpress enter(83). (commands appears 2. Pressthe front panel level buttons (30) to select a command the front paneldisplay). 3. Place the programmable remotein programmode(see learning remote user manual).
Configure More Usethis menuto select dynamicrangecbmpression modeswith the user button or to changethe DTSautoswitch setting. KRELL HTS - CONFIGUREMOREUSER BUTTON SETUP DTS AUTOSWITCH User Button Setup This function allows youto either deactivatethe user buttonor select fromthree dynamicrange compressionmodesusing the programmable user button (24) on the front panel. KRELL HTS -USERDYN RANGE TOGGLE NONE OK 1.
When the user button (24) is enabledto adjust the dynamicrangeof the HTS,you canpressandreleasethe user button on the front panelto scroll throughthe following dynamicrange choices: 11 dB of compression NORMAL no compression MAX 22 dB of compression NIGHT DTS A utoswitch DTSAUTOSWITCH OFF keeps your Home Theater Standardoperating in DTSmode,even if the bit streamis interrupted.
SavingSetup, Recalling Setup, and RestoringFactory Default SystemConfigurationSettings SAVING SETUP SETTINGS To savethe settings that youhaveentered,pressandhold the savebutton (29) for approximatelyfour seconds.Thefront panel displays SAVING SETUP while the settings are being stored in the Home TheaterStandard’snonvolatile memory. RECALLING SETUP SETTINGS Todetermineyour system’scurrent settings, pressandhold the recall button(31) for approximatelyfour seconds.
Operating the HomeTheater Standard After the Home TheaterStandardis connectedto sourcedevicesandamplifiers, and systemsetup configured, the Home TheaterStandardis ready for operation. ON/OFF/STAND-BY 1. Insert the ACpowercord into the IECpowerconnector(55) on the Home Theater Standard.Insert the other endinto the ACwall receptacle. 2. Movethe backpanelpowerswitch (54) into the up (on) position. 3. Thered stand-byLEDon the front panel illuminates.
Operating the HomeTheater Standard, continued Notes ~ Thetape output functions only with analog sources. Whenchangingsources, lower the volumeto off or mutethe output. This ensures that the next source played does not damageyour systemwith a high output transient. MAIN ZONE AND ZONE 2 OPERATION The HomeTheater Standard has two audio zones, main and zone 2. The main zone consists of the mainviewing or listening area, and zone2 consists of anotherlistening area.
Play Either Zone Main Zone 1. With the HomeTheater Standard in the operational or stand-by mode,press the HTS key (57) to activate the mainzone. 2. Select the device you wish to play. 3. Press HTSkey again to turn off the main zone. Zone 2 1. With the HomeTheater Standardin the stand-by mode,press the Z2 key (59). 2. Select a device; it will play in zone2 only. 3. Press the Z2 key again to turn off zone2.
To keep the monitor on and turn on the CDplayer, follow these steps: 1. Pressthe TV button (9) or key (63) to ~select the device. Beginplaying the device. 2. Press the prev key (79). 3. Pressthe CDbutton (10) or key (64). Beginplaying the device.
Warranty ThisKrell producthasa limited warrantyof five yearsfor partsandlaboroncircuitry. Should this product.failto performat anytimeduringthe warranty, Krell will repair it at nocost to the owner,exceptas set forth in this warranty. Thewarrantydoesnot apply to damage causedby acts of Godor nature. Thewarranty onthis pageshall bein lieu of anyotherwarranty, expressed or implied,including,but not limited to, anyimpliedwarranty of merchantability or fitness for a particular purpose.
ReturnAuthorization Procedure If you believe there is a problemwith your component,ple&secontact your dealer, distributor, or the Krell factory to discussthe problembefore you return the component for repair. To expediteservice, you maywish to complete and e-mail the Service Request Formin the Service Section of our website at: http://www.krellonline.com To contactthe Krell ServiceDe)artment TEL FAX E-MAIL 203-799-9954 Monday-Friday 9:00 AMto 5:00 PMEST 203-799-9796 service@krellonline.com WEBSITE www.
Specifications SIGNALTO NOISERATIO "A" WEIGHTED TOTALHARMONIC DISTORTION (THD) UNWEIGHTED INPUTS ANALOGAUDIO 93 dB 20 Hz-20kHz, -88 dB 1 pair balancedvia XLRconnectors 5 pairs single-endedvia RCAconnectors DIGITALAUDIO 6 coaxial via RCAconnectors 2 EIAJoptical via TosLinkconnectors VIDEO 4 S-videovia DINconnectors 4 compositevia RCAconnectors, 2 componentvia RCAconnectors ANALOGTAPE 1 pair single-endedvia RCAconnectors OUTPUTS ANALOGCHANNEL (oneper channel) (oneper channel) 6 balancedvia XLRconnec
Krell Industries,Inc. 45 Connair Road Orange, CT 06477-3650 USA TEL 203-799-9954 FAX203-891-2"028 E-MAILkrell@krellonline.com WEBSITE http://www.krellonline.com HomeTheater Standard Surround Preamp/Processor v 01.