KCT THE LEADER IN AUDIO ENGINEERING Krell Current Tunnel CAST Preamplifier Instructions for Use Owner’s Reference
KCT Krell Current Tunnel CAST Preamplifier v 01.0 Krell Industries, Inc. 45 Connair Road Orange, CT 06477-3650 USA TEL 203-799-9954 FAX 203-891-2028 E-MAIL krell@krellonline.com WEBSITE http://www.krellonline.com This product complies with the EMC directive (89/336/EEC) and the low-voltage directive (73/23/EEC). WARNINGS The preamplifier must be placed on a firm, level surface where it is not exposed to dripping or splashing.
Contents Page INTRODUCTION 1 DEFINITION OF TERMS 1 REVOLUTIONARY KRELL CAST TECHNOLOGY 3 UNPACKING 5 PLACEMENT 5 AC Power Guidelines 5 QUICK START 6 FRONT PANEL DESCRIPTION 9 BACK PANEL DESCRIPTION 12 REMOTE CONTROL DESCRIPTION 15 Battery Installation and Removal CONNECTING THE KCT PREAMPLIFIER TO YOUR SYSTEM Input and Output Connections 15 18 18 KRELL LINK CONNECTIONS AND OPERATION 19 TAPE INPUT AND OUTPUT 20 OPERATING THE KCT PREAMPLIFIER 21 On/Off and Stand-by Operation 21
Contents, continued Page AC Mains Menu 30 Program Remote Menu 31 Input Trigger Setup 31 Setup Memory 32 Krell Link 32 Trigger Delay Setup 33 Exit Menu 33 QUESTIONS AND ANSWERS 34 WARRANTY 35 RETURN AUTHORIZATION PROCEDURE 36 SPECIFICATIONS 37 List of Illustrations Figure 1 The KCT Front Panel 8 Figure 2 The KCT Back Panel 11 Figure 3 The KCT Remote Control 14 iv Krell Current Tunnel
Introduction Thank you for your purchase of the Krell Current Tunnel (KCT) CAST Preamplifier. The KCT features Krell Current Tunnel topology and Krell CAST technology, which work together to reproduce music with unparalleled sound quality. The KCT has dual zone capability for listening to music from different input devices at the same time, or listening to one input device while recording another. Each zone has its own volume and balance control.
INPUT AND OUTPUT CONNECTIONS Balanced A symmetrical input or output circuit that has equal impedance from both input terminals to a common ground reference point. The industry standard for professional and sound recording installations, balanced connections have 6 dB more gain than single-ended connections and allow the use of long interconnect cables. Balanced connections are completely immune to induced noise from the system or the environment.
Revolutionary Krell CAST Technology Current Audio Signal Transmission, termed CAST, is a revolutionary method of connecting analog audio components for unparalleled sonic performance. Innovative engineering combines the new Krell CAST circuitry with existing Krell Current Mode technology to create entire CAST systems that reproduce music with incredible range, tonality, and precision.
The Best Musical Performance When you operate a CAST system, you will hear significant improvements in every performance area: speed, precision, dynamic range, depth and width of the sound stage, transient impact, tonal balance, harmonic distortion, and more. The goal for CAST is the same company goal used for all Krell products. Krell strives for the delivery of the best performance of a musical event for you, using the full expression of technology to date.
Unpacking 1. Open the box and remove the top layer of foam. You see these items: 1 Krell Current Tunnel (KCT) CAST Preamplifier 1 power cord 1 12 VDC (12 Volt trigger) cable 1 remote control 2 batteries for remote control 1 T-10 Torx wrench for remote control 1 packet of information containing the Owner’s Reference and the Warranty Registration Card 2. Carefully remove the unit and accessories from the box. Remove the foam end caps and protective plastic wrap from the unit.
Quick Start To access the full array of available features for the KCT preamplifier, please read the entire owner’s reference manual. The abbreviated procedures in this Quick Start section will allow you to connect and operate the KCT quickly and enjoy its basic features before you read the entire manual. Numbers in parentheses refer to Figure 1 on page 8, Figure 2 on page 11, and Figure 3 on page 14. Connecting the KCT Preamplifier 1. Neatly organize the wiring between the KCT and all system components.
Use care when setting high playback levels. Always lower the volume level at the first sign of loudspeaker distress. 1. With the KCT preamplifier in the stand-by mode (red stand-by LED [2] illuminated), switch to the operational mode by pressing the front panel power button (1) or power key (32) on the remote control. The blue power LED (3) illuminates and there is an audible click. The KCT is ready for operation. 2.
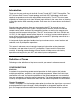
1 2 6 4 Figure 1 The KCT Front Panel 10 11 12 9 Power 1 Power Button 2 Stand-by LED 3 Power LED Remote Control Functions 4 Infrared Sensor 5 Infrared Transmitter LED 1 7 8 CLASS A Preamplifier Functions 6 Input Select Buttons 7 Tape Button 8 Mute Button 9 Phase Button 10 Zone Button 11 Main Zone LED 12 Zone 2 LED KCT 3 Display 13 Front Panel Display Level Control 14 Level Control Knob Menu Functions 15 Menu Button 16 Enter Button 13 15 5 16 14
Front Panel Description See Figure 1 on page 8 The KCT preamplifier front panel provides power on, input and zone selection, level control, menu functions, and status display. Front panel features and their descriptions follow. Power 1 Power Button Use this button to switch the KCT between the stand-by and the operational modes. 2 Stand-by LED The red stand-by LED illuminates when the KCT is plugged into a standard AC wall receptacle, indicating that the KCT is ready to be switched to the operational mode.
9 Phase Button Use this key to invert the absolute polarity of the variable output 180 degrees for the selected input. The front panel display (13) shows INVERT for the negative phase; the display remains blank for the positive phase. 10 Zone Button Use this button to select the main zone (the main listening or viewing area) or zone 2 (another listening area). 11 Main Zone LED The red main zone LED illuminates when the main zone is activated. Zone status is also shown in the front panel display (13).
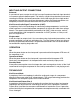
17 18 19 20 Inputs 17 B-1 and B-2 Left and Right Balanced Inputs 18 S-1, S-2, and S-3 Left and Right Single-ended Inputs 19 Tape Left and Right Inputs 20 C-1 and C-2 Left and Right CAST Inputs Figure 2 The KCT Back Panel 22 23 Tape Output 21 Tape Output Main (Zone) Outputs 22 Preamp Left and Right Outputs 23 CAST Preamp Outputs Zone 2 Outputs 24 Balanced Left and Right Outputs 25 Single-ended Left and Right Outputs 21 25 30 28 Back Panel Remote Control Inputs and Outputs 26 Krell Link In and Ou
Back Panel Description See Figure 2 on page 11 The KCT preamplifier back panel provides all input and output connections, remote control inputs and outputs, and power connection. Back panel features and their descriptions follow. Inputs 17 B-1 and B-2 Left and Right Balanced Inputs The KCT is equipped with two pairs of balanced analog source inputs with XLR connectors.
25 Single-ended Left and Right Outputs The KCT is equipped with one pair of single-ended outputs with RCA connectors. Back Panel Remote Connections 26 Krell Link In and Out The KCT is equipped with a Krell Link communications input and output data port. Krell Link allows synchronized remote power on and off of other components connected with Krell Link. See Krell Link Connections and Operation, on page 19.
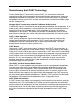
Figure 3 The KCT Remote Control 32 34 33 35 36 38 37 39 40 42 41 43 44 45 47 46 48 49 Power 32 Power Key Amplifier Functions 33 Amp Pwr Key 34 Amp Sel(ect) Key 14 Preamplifier Functions 35 Mute Key 36 Phase Key 37 Main Zone Key 38 Z2 Key 39 Input Select Keys 40 Tape Key Menu Functions 41 Menu Key 42 Enter Key Level Control 43 Bal(ance) Key 44 Level Keys Compact Disc Functions 45 Pause Key 46 Stop Key 47 Play Key 48 Track Forward and Back Keys 49 Search Forward and Back Keys Krell Current Tunne
Remote Control Description See Figure 3 on page 14 BATTERY INSTALLATION AND REMOVAL The KCT remote control uses two AAA-size 1.5 Volt batteries. Batteries are included with the shipment. To install the batteries: 1. Remove the remote control backplate, using the supplied T-10 Torx wrench. 2. Install the batteries, following the battery position diagram on the plastic battery receptacle. 3. Replace and secure the backplate. Replace batteries when remote control function becomes intermittent.
37 Main Zone Key Use this key to select the main zone (the main listening or viewing area). The red main zone LED (11) on the front panel illuminates when the main zone is activated. 38 Z2 Key Use this key to select zone 2. The green zone 2 LED (12) illuminates when zone 2 is activated. Note Both zones can play simultaneously.
Compact Disc Functions The compact disc keys on the KCT remote control are functional with all Krell compact disc players. 45 Pause Key Use this key to temporarily suspend playing the current compact disc track. To resume playing the track at the point pause was engaged, press pause again or press the play key (47). 46 Stop Key Use this key to end compact disc playback. 47 Play Key Use this key to begin compact disc playback.
Connecting the KCT Preamplifier to Your System See Figure 2 on page 11 INPUT AND OUTPUT CONNECTIONS Krell recommends using its proprietary Krell CAST system for unparalleled sonic performance between the KCT and other CAST-equipped components. The KCT also offers conventional balanced operation. The circuitry and connections associated with balanced operation not only can minimize sonic loss but also are immune to induced noise, especially for installations using long cables.
Krell Link Connections and Operation Krell Link in/out connectors on the KCT back panel allow you to synchronize remote control operation for systems that include multiple amplifiers and associated components. When the Krell Link in/out connectors are used, the remote capabilities of the linked components are controlled from one amplifier or preamplifier, called the control component. The linked components respond to stand-by and operational mode commands from the control component via MIDI cables.
Tape Input and Output The KCT preamplifier has a discrete tape input and output. The tape output is used to channel a signal from a C-1, C-2, B-1, B-2, S-1, S-2, or S-3 input to a recording device or processor. You can use the tape feature in two ways: 1. Use the tape input to compare the output signal of a three-head analog tape recorder to the output signal of an audio source, when making a recording.
Operating the KCT Preamplifier The KCT preamplifier is easy to install and operate. Instructions follow for on/off and stand-by operation, and zone operating options. IMPORTANT Always mute or fully attenuate the preamplifier level when switching between active sources (such as a CD player, tape monitor, or VCR). Do not change the input connections to the preamplifier while the preamplifier is on. Use care when setting high playback levels.
MAIN ZONE AND ZONE 2 OPERATION The KCT preamplifier’s two-zone operation offers a number of listening options. Play Both Zones This option allows you to play one input device through both zones or play a different device through each zone simultaneously, and adjust volume levels for each zone. 1. Press the power button (1) or power key (32) to switch the KCT from the stand-by to the operational mode.
Zone 2 Only 1. With the KCT in the stand-by mode, press the zone button (10) or Z2 key (38). The front panel display (13) shows zone 2 is active. 2. Press the input select key (39) to select the device you wish to play in zone 2. The KCT will switch to the operational mode and the device will play in zone 2 only. 3. Press the zone button (10) or Z2 key (38) again. Zone 2 stops playing and the KCT switches back to the stand-by mode.
To stop recording: 1. Press the zone button (10) or Z2 key (38) to select zone 2. 2. Press the tape button (7) or key (40).
Troubleshooting System Noise When you mix and match high-performance audio components, each with its own ground potential, a low frequency hum may occur in one or both loudspeakers. If this happens when you place the KCT preamplifier into your system, follow these simple troubleshooting steps. 1. Check that all input and output connections are of sound construction. 2. With the preamplifier off, remove the interconnect cables, then turn the preamplifier on.
Customizing the KCT Preamplifier The KCT preamplifier’s easy-to-use menu options allow you to select and set preferred operating options for balance, inputs, trims, Theater Throughput mode, display brightness, mute, trigger setup and delay, tape output, AC mains, remote programming, setup memory, and Krell Link. The instructions below follow the menu order on your KCT. IMPORTANT You do not need to press enter to set a selection. The last selection chosen is the one entered in the system.
4. Use the level control knob (14) or level keys (44) to select the desired input from the list (S-1, B-1, C-1, tape, etc.). 5. Press the enter button (16) or key (42) to access the submenu. 6. Use the level control knob (14) or level keys (44) to scroll through the list of naming options (phono, aux, etc.). The front panel display (13) will show the new input name when you exit the menu. 7. To name another input, press the enter button (16) or key (42) to return to the input name menu. 8.
3. Press the enter button (16) or key (42). The front panel display (13) shows INPUT BALANCE TRIM and S-1 (the default). 4. Use the level control knob (14) or level keys (44) to select the desired input (S-1, B-1, tape, etc.). 5. Press the enter button (16) or key (42). The front panel display (13) shows the current balance of the selected input. 6. Use the level control knob (14) or level keys (44) to scroll through the list of available balance offsets from 0 to +6 dB, right and left, in .5 dB increments.
8. Repeat steps 4 through 6. 9. Press the menu button (15) or key (41) to exit the menu mode. BRIGHTNESS This option allows you to adjust the front panel display brightness. 1. Press the menu button (15) or key (41) to access the main menu. 2. Use the level control knob (14) or level keys (44) to select BRIGHTNESS. 3. Press the enter button (16) or key (42). The front panel display (13) shows HIGH (the default). 4.
4. Use the level control knob (14) or level keys (44) to select the desired trigger (1, 2, or 3). 5. Press the enter button (16) or key (42) again. The front panel display (13) shows ALWAYS OFF (the default). 6. Use the level control knob (14) or level keys (44) to select the desired trigger option (ALWAYS OFF, ON FOR ZONE 1, ON FOR ZONE 2, ON FOR BOTH ZONES, ALWAYS ON). 7. To configure another trigger, press the enter button (16) or key (42) to return to the output trigger setup menu. 8.
PROGRAM REMOTE MENU This option allows the KCT to send its remote control commands to a learning or programmable remote control. Note You must place the programmable remote in front of the KCT infrared sensor to send remote control commands. 1. Press the menu button (15) or key (41) to access the main menu. 2. Use the level control knob (14) or level keys (44) to select PROGRAM REMOTE MENU. 3. Press the enter button (16) or key (42). The front panel display (13) shows S1 SELECT (the default). 4.
SETUP MEMORY This option allows you to save or recall new settings, or reset all settings to the factory defaults. Remember, to exit the setup memory without altering the settings, select exit and press the enter button (16) or key (42). You return to the main menu. 1. Press the menu button (15) or key (41) to access the main menu. 2. Use the level control knob (14) or level keys (44) to select SETUP MEMORY. 3. Press the enter button (16) or key (42).
TRIGGER DELAY SETUP This option allows you to customize the number of seconds (from 0 to 5) before a trigger activates. 1. Press the menu button (15) or key (41) to access the main menu. 2. Use the level control knob (14) or level keys (44) to select TRIGGER DELAY SETUP. 3. Press the enter button (16) or key (42). The front panel display (13) shows TRIGGER 1. 4. Use the level control knob (14) or level keys (44) to select the trigger (1, 2, or 3) that you wish to configure. 5.
Questions and Answers Q. Should I leave my KCT on at all times? A. Yes, Krell recommends that you leave your KCT preamplifier in the stand-by mode when it is not playing music. Turn your system off only if it will not be used for a long period of time. Q. When I turn on the KCT there is a loud hum through the loudspeakers. What should I do? A. When a new component is introduced into your system, a low frequency hum may occur in one or both loudspeakers.
Warranty To register your product for warranty benefits, please complete and return the Warranty Registration Card enclosed in the shipping box within 15 days of purchase. Thank you. This Krell product has a limited warranty of five years for parts and labor on circuitry. Should this product fail to perform at any time during the warranty, Krell will repair it at no cost to the owner, except as set forth in this warranty. The warranty does not apply to damage caused by acts of God or nature.
Return Authorization Procedure HOW TO EXPEDITE SERVICE If you believe there is a problem with your component, please contact your dealer, distributor, or the Krell factory to discuss the problem before you return the component for repair. To expedite service, you may wish to complete and e-mail the Service Request Form in the Service section of our website at: http://www.krellonline.
Specifications Inputs 2 pr. CAST (Lemo) 2 pr. Balanced (XLR) 3 pr. Single-ended (RCA) Main Outputs 2 pr. CAST (Lemo) 1 pr. Balanced (XLR) 1 pr. Single-ended (RCA) Zone 2 Outputs 1 pr. Balanced (XLR) 1 pr. Single-ended (RCA) Tape Loop 1 pr. Single-ended Inputs (RCA), 1 pr. Single-ended Record Outputs (RCA), Buffered, with Programmable Zone Control Inputs 1 RS-232 Input (9-pin D-subminiature Connector) 1 RC-5 Input (1/4-inch Coaxial Connector) 1 12V Trigger Input (3.
Frequency Response 0.4 Hz-220 kHz ±0.1 dB (Main Zone) 0.1 Hz-1.5 MHz ±3 dB (Main Zone) 0.9 Hz-100 kHz ±0.1 dB (Zone 2) 0.4 Hz-400 kHz ±3 dB (Zone 2) THD+Noise <0.005% 20 Hz-20 kHz Balanced or Single-ended <0.004% 20 Hz-20 kHz CAST Residual Noise <-95 dB, wideband, unweighted <-109 dB, “A”-weighted AC Mains Requirements 100, 120, 200, 220, or 240 V AC; 50 or 60 Hz; 60 W Dimensions 19w x 4.5h x 14.5d in. 48w x 11.5h x 36.5d cm Weight Shipping Unit Only 38 23 lb., 10.5 kg 19 lb., 8.
Krell Industries, Inc. 45 Connair Road Orange, CT 06477-3650 USA TEL 203-799-9954, FAX 203-891-2028 E-MAIL krell@krellonline.com WEBSITE http://www.krellonline.com KCT Krell Current Tunnel CAST Preamplifier v 01.