HomeTheater Standard Instructions for Use Owner’s Reference
Home Theater Standard SurroundSoundPreamplifier/Processor Instructionsfor Use v. 99.3 KrellIndustries, Inc. 45 ConnairRoad Orange, CT 06477-3650USA TEL203-799-9954 FAX203-891-2028 E-MAIL krell @krellonline.com WEBSITE http.’/Jwww.krellonline.com This productcomplieswith the EMC directive’ (89/336/EEC) andthe low-voltagedirective (73/23/EEC), WARNINGS TheHome TheaterStandardmustbe placedon a firm level surfacewhereit is not exposed to drippingor splashing.
Contents INTRODUCTION DEFINITION OF TERMS UNPACKING PLACEMENT _. ACPowerGuidelines GETTING STARTED ...
Illustrations FIGURE 1 The HomeTheater Standard Front Panel F~GURE 2 The HomeTheater Standard Back Panel FIGURE 3 The HomeTheater Standard RemoteControl iv Page 6 12 16 Krell HomeTheaterStandard
Introduction Thankyou for your purchaseof the Krell Home TheaterStandardSurroundSound Preamplifier/Processor. The HomeTheater Standardprovides optimummusicand cinemasoundtrack reproductionquality throughKrell C.urrentMode,discrete ClassA direct-coupled circuitry, andbalanced outputson all six channels.Broadcast quality switchingand circuitrywincluding component video, S-video, andcompositevideo---ensure unmatched video p~fformance.
Unpacking Openthe box andremovethe top layer of foam. Yousee these items: 1 HomeTheater Standard 1 IECconnector(ACpower)cord 1 HomeTheater Standardhandheldremote control 2 AAA-size1.5 Volt batteries 1 T-15Torx wrench~small"U’ type) 1.T-10Torx wrench(small "L" type) 2 12 VDCoutput (12 V trigger) cables 1 packetcontaining the owner’sreferencemanual,the RS-232Port developer’s reference,the "readthis first" insert, andthe warrantyregistrationcard Carefully removethe unit andaccessoriesfrom the box.
Placement Beforeyouinstall the Home TheaterStandardinto your system,reviewthe following guidelinesto choose the locationfor the component. This will facilitate a clean,troublefree installation. TheHome TheaterStandarddoesqot require any type-of special rack or cabinetfor installation. For the dimensions of your Home TheaterStandardsee Specifications, on pages56-57.
Getting Started READ THIS FIRST Performthe following steps to makethe On-Screen Display (OSD)viewableon your video monitor. Thevideo format andvideo signals of the Ho_me TheaterStandardand the video monitorneedto matchbeforethe OSDis viewable.Thevideo format of the videosignal canbe set to either NTSC or PAL. Thefollowing table details the different videosignalsand.
4. Verify that the video monitor’svideo signal input corresponds to the Home TheaterStandard’svideo signal output. Pressthe menukey on the handheld remotecontrol to verify that the OSDis nowviewableon the video monitor. The systemconfiguration mainmenuappearswhenthe video format and video signals betweenthe Home Theater Standardandyour video monitor are compatible. If youhaveanyquestionsregardingthe selectionof the.videoformat, pleasecall your authorized Krell dealer,distributor,6r Krell.
5 321 6 7 8 9 10 4 11 18 12 19 13 20 14 16 15 21 11 TunerButton and LED 12 Auxl Button and LED 13 Aux2Button and LED 14 Tape/VCR2 Button and LED 15 MainZoneandZone2 Button 16 Main Zoneand Zone2 LEDs input Device Selection ButtonsandLEOs 17 I~fraredEmitter 5 DVDButton and LED ProcessingModeButtonsandLEDs 6 LDButton and LED 18 Stereo Button and LED 7 SATButton and LED 19 Music1Button and LED 8 VCR1Button and LED 20 Music2Button and LED 9 TVButton and LED 21 Pro Logic Button and LED 10 CDButton
Front Panel Description SeeFigure I on page6 The HomeTheater Standardfront panel provides poweron and off; input, zone, and processingmodeselection; monitoring and display of processorstatus; and balance and volumecontrol.. The front panel components are described below. Basic Operation ’1 PowerButton .... The powerbutton switches the HomeVideo Standard from stand-by to operational mode. Note Whenyou poweroff while zone2 is selected, only zone 2 turns off.
Front Panel Description, continued 6 LD Button and LEDs Usethis buttonto select the laser disc device. 7 SAT Button and LEDs Usethis buttonto selectthe satellite feeddevice. _. 8 VCR1Button and LEDs Usethis buttonto sele.c.t the VCR device. 9 TV Button and LEDs Usethis buttonto selectthe television device. 10 CDButton and LEDs Usethis button to selectthe compact disc device. 11 Tuner Button and LEDs Usethis button to select the AM/FM tuner device.
FrontPanelDescription, continued 17 Infrared Emitter Emits the Home TheaterStandardremoteoperation codeto a learning remote.See ProgramRemote,on page 45. A learning remotecontrol canbe programmed to o.per.ate the Home TheaterStandard via the infrared emitter. SeeProgram Remote, on page46. ProcessingMqd.eButtons and LEDs 18 Stereo Buttonand LED Usethis buttonto select the stereodecoding mode,whichallowsyouto listen to a stereo recordingin two channel(left andright) mode.
FrontPanelDescription,continued 22 Front PanelDisplay Thefront panel display provides status messages for Home TheaterStandard operations,including volumeandbalancelevel, decodingmode,andzoneinformation. In addition, whena newdeviceis selected,the physica~inputs are displayed. 23 User Button Usethis button to select oneof three available dynamicrangecompression modes: max(imum),normal, or~night. SeeUser Button Setup,_.onpage47. , 24 BalanceButton Pressthis buttonto adjust the mainleft/right speakerbalance.
Front Panel Description, continued 29 Level Downand Up Buttons Usethe volumelevel buttons to adjust the output for the entire systemas well as balanceand individual levels for the center speaker, rear speakers, and subwoofers. Thevolumelevel is shownin the front panel display. Thevolumelevel buttons are also used to scroll through menuselections. See SystemS~tup and Configuration, on page 24. 30 Recall Button ....... , Usethis button to recall current systemconfiguration settings.
31 32 33 31 4144 34 32 37 38 39 3635 AnalogOutputsandInputs 31 BalancedAnalogAudio Outputs 32 Single-endedAnalogAudioOutputs 33 Multi-ChannelAudioOutputConnector 34 B-1 Left and B-1 Right 35 TapeIn Left andRight 36 TapeOutLeft andRight 37 VCR1 I.
BackPanel Description SeeFigure 2 on page12 Thebackpanelof the Home TheaterStandardprovidesall input andoutput connections,remotecontrol inputs andoutputs, poweron andoff, andpower connection.Thebackpanelfunctions are describedbelow. AnalogAudioOutputsand Inputs 31 BalancedAnal0-gAudioOutputs -.TheHome TheaterStandardis equippedwith six balancedanalogaudio channel outputs,with XLRconnectors, for the left, center,right, left rear, right rear, and subwoofer.
BackPanelDescription,continued 38 VCR1Out Left and Right TheHome TheaterStandardis equippedwith oneset of single-endedoutputs with RCA connectors,for a VCRaudio source. 39 Zone2 Out Left and Right -TheHome TheaterStandardis equippedwith one set of single-endedzone2 audio outputs with RCAconnectors. 40 S-1, $-2, S-3, S-4, S-5 Left andRight Inputs ’ TheHome TheaterStandardis equippedwith five sets of single-endedaudioinputs with RCAconnectors.
Back Panel Description, continued 48 Component Video Outputs TheHome TheaterStandardis equippedwith oneset of component video outputs with RCAconnectors.Component video uses three wires (labeled Y, Cr, andCbon back panel) to conveythe video signal, including the OSD. 49 Component Video Inputs TheHome Theater$.t.a. ndardis equipped ~withtwo sets of component videoinputs.
56 57 6O 61 ’59 ’58 63 62 67 66 69 65 68 73 72 .
RemoteControl Description SeeFigure3 onpage16 TheHome TheaterStandardremotecontrol provideson andoff, input selection, processingmodeselection, speakervolumeandbalanceadjust, andmutefunctions, as well as accessto the SystemSetupa.nd Configurationmenu. To sendoperationalinstructions directly into the Home TheaterStandardusing an RS232basedexternal ~;.o.ntrol device, see RS-232Port: SendingCommands and Interpreting Data, the developer’sreferenceshippedwith the Home TheaterStandard.
Remote ControlDescription,continued ZoneSelection 58 Main Key Usethis keyto select the mainzonefor a device. 59 Z2 Key Usethis key to select zone.2 for a device. SeeMainZoneandZone2 Operation,on .’. Note TheHome TheaterStandarddefaults to the mainzone. To activate a devicein zone2, youmustpressthe remotecontrol Z2 button (59) beforeselecting a device, Device Selection Keys 60 DVDKey Usethis keyto select the digital videodiscdevice. 61 LD Key Usethis key’ to selectthe laser disc device.
Remote ControlDescription,continued 69 Tape Key Usethis key to compare the outputfrom an analogtape recorderto the original source while makinga recording. Note Oncea deviceis selected, pressthe deviceselection key againto changethe tape output sourcebusto the zonecurrently selected. SeeTapeInput andOutput,on page Processing ModeKeys TheHome TheaterStandardautomatically engagesthe appropriate decodingformat, DolbyDigital or DTS;if oneof these,signalsis present.
Remote ControlDescription,continued Control FunctionKeys 74 Bal Key Pressthis keyto convertthe volumelevel controls to balan_c,e controls. SeeBalance Button (24), on page10. Usethe Center, Rear, andSubkeys to changetaste trims (maketemporaryspeaker output adjustmentsof -~1.:10 dB). Thesetemporarycha_,ngesrevert to 0 dBwhena newdevice is selected, or the systemis powereddown.For more., information on taste trims andmaster(programmable) trims, seeConfigureLevel Adjustment, on page 36.
Connectingthe HomeTheater Standard to Your System This section providesinformation about connectingyour Home TheaterStandardto analoganddigital sources,videosources,andamp.lifier.s. Krell recommends using balancedinterconnectcables. Balancedinterconnectcables not only canminimizesonic loss but also are immune to inducednoise, especially for installations using1(Sr~gcables.Balanced connections have 6 dBmoregain than single-endedconnections.When level matchingis critical, keep this specificationin mind.
Connecting the Home Theater Standard to Your System, continued TheHomeTheater Standardis also equippedwith four S-video inputs and four compositevideo inputs. S-video cables transmit the color and luminancecomponentsof the video signal separately. Thecombfilter within the sourceunit performsthis separation. If the source’scombfilter is superior to the onewithin the video monitor, use the S-video connections, Otherwise, use compositevideoinput.
SystemSetup and Configuration Overview This pageoutlines the SystemSetupandConfigurationMenus.Theseeasy-to-follow, step-by-step menuslet you set up your Home TheaterStandardfor optimum performance. Detailedinstructions beginon page24. Krell recommends that youconfigure your component in the following order: 1". CONFIGURE SPEAKERS ConfigureSpeakersSetuplets youselect speakersthat are in your systemand configuretheir bassrange. 2. LISTENING ROOMSETUP. ListeningRoom Setuplets you.
SystemSetup and Configuration Theremotecontrol is the maininput devicefor the Home TheaterStandard.All initial setup andsubsequentsystemconfiguration adjustmentsmust.bemadethroughthe remotecontrol, or via the RS-232 port. For maximum performance,the Home Theater Standardmustbe configured for each systemdevice,its capabilities, andspeakerpositionsin the listening room.Kreil recommends configurin~g..yoursystem,step-by-step,in sequentialorder.
button(1) or the remote controlHTSkey(57) 4. Useeither the front panelpower poweronthe Home TheaterStandard.Theblue powerLED(2) on the frent panel illuminates.TheHome TheaterStandard is nowin operationalmode andreadyto be configured. 5. Pressthe remotecontrolmenu key(81). TheMAINMENUscreenappears: KNELL HTS .... -MAIN MENUCONFIGURESPEAKERS LISTENING ROOMSETUP CALIBRATE VOLUME CONFIGUREDEVICES CONFIGURELEVEL ADJUSTMENT OPERATION 1.
Bass Range Thespeakersetupscreenalso showsthe bassrangesfor the front, center, andrear speakers.Optionsavailableare not basslimited (FUL..L-RANGE) or basslimited (LIMITED). Theoption youselect depends on the low frequencycapabilities of eachspeakerin your system.SeeModify SpeakerSettings, below. _. Note Thespeakersetupscreen.shows the defau/t settings for eachspeaker.If your system corresponds to the default settings, select OKatthe bottomofthe menuscreen,then pressenter (83).
After selectingthe appropriateoptionfor yourspeakers,pressenter(83), highlight oK, andpressenter (83).again. Youreturn to the speakersystemsetup menu.Theonscreenphrasefor the selectedspeakernowreadsLIMITED or FULL-RANGE. -2. LISTENING ROOMSETUP Thesecondmainmenuscreen,the listening roomsetup, allows you to tell the Home TheaterStandardthe exact location of eachspeakerin your system,so that the Home TheaterStandard cancalculatethe pr.operarrival anddelaysettings.
Note Anyspeakernot configured in the speakersystem setupmenu displaysN/A(not available)for the distance specification. 3. CALIBRATEVOLUME Thethird menu option,calibratevolume/allows youto calib~.te eachchannel usingthe Home TheaterStandard’s internal noisegenerator. Note ~ ".:. A sound pressure level (SPL)meteris requiredfor this procedure.
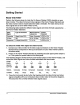
Thefollowingscreenappears: KRELL HTS -CALIBRATE VOLUMELEFT CENTER 0 dB ~ 0 dB RIGHT 0 dB LREAR 0 dB R .REAR 0 dB SUB 0 da Auto Noise Sequence Set the SPLmeterto C weightingandslowresponse.After initializing, the LEFT channel dBsetting bl!nks, andyouhearbar~ded white noisethroughthe left speaker.This noise continuesfor two secondsandthen movesClockwiseto the next speakerin the system. Note Theadjustmentmustbe madewhile the channelis blinking.
Program Material Theprogram materialoptionusesthe samescreenas manual noisesequence, but with externalmaterial.Thesourceplays,simultaneously, fromall configured speakers. This allowsyouto individuallyadjustspeaker balances based onyourlisteningpreferences rather thanSPLreadings. 4. CONFIGURE DEVICES Thefourth mainmenu option, configuredevices,allowsyou to configureinputs, modes, andtriggersfor eachdevicein the system.First, select a devicethat youwantto configure.
After selectingthe device(the example usedis DVB)that youwantto configure,press enter (83). TheCONFIGURE DVDscreenappears: KNELLHTS -CONFIGUREDVD ~ CONFIGUR~ VIDEO~ CONFIGURE AUDIO CONFIGURE CONFIGURE TRIG .... MODE .... OK Configure Video Input Pressenter83) to selectthis option.TheASSIGN VIDEO INPUT screenappears: KRELL PITS -ASSIGNVIDEOINPUTDVD ~’ COMPOSITE1 44 OK PRESSENTERAND USE ~" .I, TOSWITCH BETWEEN VIDEOINPUTS When youaccessthis screen,youseethe blinkingcursorat COMPOSITE1.
Assign Video Format KNELL HTS -ASSIGN VIDEO FORMATOVO NTSC OK PRESS ENTERAND USE1",], TOSWITCH BETWEENNTSC AND PAL Afterselectingthe appropriate videoformat,selectoKandpressenter(83) to return the ASSIGN VIDEO INPUT screei3.SelectOKandpressenter(83) to returnto the CONFIGUREDEVICES screen. Note Seeyourvideodevice’soperatingmanual Youmustselectthe correctformatfor the videodeviceto functionproperlywiththe Home TheaterStandard. Configure Audio Thenextoptiononthe CONFIGURE DEVICES menu is CONFIGURE AUDIO.
Assign Analog Input .If youselectANALOG, the ASSIGN ANALOG INPUT screenappears: KRELLHTS -ASSIGN ANALOG INPUTDVD 1~ S-1 <~ ’ , OK PRESS ENTER AND USE1" $ TOSWITCH BETWEENANALOGINPUTS When this screenappears,youseethe blinkingcursorat s-1. Toselectanotheranalog deviceoption(s-1, s-2, s~3,s-4, s-5, TAPE, VCR1, UNASSIGNED, B-l) followdirections at bottom of screen.Selectthe UNASSIGNED analoginputoptionif the selecteddevicedoes not useananalogoutput,for example, a CDplayer.
When youenter this screen,youseethe blinking cursor at COAX1. To select another digital input option (COAX1, COAX2,COAX3, COAX4,COAXS,COAX6,OPT1, OPT1, UNASSIGNED), follow directionsat bottomof screen.Selectthe UNASSIGNED digital input option if the selecteddevicedoesnot usea digital output, for example,an analogVCR. Pressenter(83) to confirmthis setting.. Select OKandpressenter (83) to return .to the CONFIGURE A~IOINPUT screen. Select OKandpressenter (83) again, to return to the CONFIGURE DEVICES screen.
The CONFIGURE 12 V TRtGGERscreen appears: KRELLHTS -CONFIGURE 12 V TRIGGERDVD TRIGGER1-. TRIGGER2 TRIGGER3 TRIGGER4 )l, MODE ,N 0 0 0 0 DELAY 1SEC. 1 SEC. 1 SEC. 1 SEC. OK Select Trigger Mode Use the 1" ,I, keys (80) to movethe blinking cursor to the MODE for the desired trigger, and press enter (83).
Usethe 1" ,], keys(80) to selectthe desiredtrigger mode andpressenter(83) to select. Youreturn to the CONFIGURE 12 VTRIGGER screen,whichnowreflects the changeyou just entered. Adjust Trigger Delay Onthe CONFIGURE 12 V TRIGGER scree.n, usethe ~ key to movethe blinking cursor to DELAYandpressenter (83). Usethe 1" ,I, keys(80) to increaseor decrease the number of seconds (rangeis from0 to 30).
TheHome TheaterStandardusestwo types of trims: mastervolumetrims andtaste trims. Mastervolumetrims (mode,device, andanaloginput) changethe volumesof all speakersat once, are programmed, and do not changeunless reprogrammed through the menu.Tastetrims adjust individual speakers usingthe individual channelandlevel buttons(29). Tastetrims are not programmed andare temporary. Note Themastervolumecontrol hasa numericalrangefrom0 to 152, with 34 as the Do~by referencelevel.
When youenterthis screen,youseethe blinkingcursorat STEREO. To selectanother option(DOLBYDIGITAL, DTS, DOLBYPROLOGIC, STEREO,MUSIC1, MUSIC2) press enter (83), thenuse$ ,1, keys(80) to scrollthrough theoptions. Selectthe desiredmode,andpressenter (83). TheTRIMADJUSTMENT screenappears: KRELL HTS -STEREO TRIM ADJUSTMENT.... ~OdB~ OK PRESSENTERAND. USE1:.,I. TOCHANGE MODETRIM Theblinking cursoris onthe 0 dB.Pressenter(83). Use1" ,i, keys(80) to select appropriate trim adjustment (rangeis from-15 dBto +15dB).
When youenterthis screen,youseethe blinkingcursorat DVD.Toselectanotheroption (LD, SAT, VCR, TV, CD, TUNER,AUXl, AUX2, TAPE), pressenter(83), then use 1" $ keys(80) to scroll through the options.Pressenter(83). TheDVDTRIM ADJUSTMENT screenappears: KRELL HTS -DVD TRIM ADJUSTMENT~" OdB~ OK PRESSENTERAND’ USE1",1, TOCHANGE DEVICETRIM Theflashingcursoris onthe0 dR.Pressenter(83), thenuse1" ,], keys(80) to select appropriate trim adjustment (rangeis from-15 dBto +15dB). Pressenter(83) to the selection.
Input Gain Youcanboostweakersignals by increasingthe input gain valueat the bottomleft of this screen(in 3 dE},6 dE},and9 dBgainincrements). To maximize yoursystem’ssignal to noiseratio for a particular input, the input gain valueappliedto the signal shouldbe increased(if ne.eded)to maintaina signal strength closeto o dE}gain. Theoptimalsignal~ainvalueis o dE}. Anti Clip Setting anti clip to ONengages automaticdistortion protection.
6. OPERATION Thefinal option,OPERATION, allowsyouto choose background colorfor yourvideo display,configure on-screen displayandfront paneldisplaybrightness, choose serial controlformat,selectmusicmodes, program a learningremotecontrolto operatethe Home TheaterStandard,andprogram.user buttonsetupandDTSautoswitch. KRELL HTS -MAIN MENUCONFIGURESPEAKERS LISTENING ROOMSETUP CALIBRATE VOLUME CONFIGUREDEVICES CONFIGURELEVEL ADJUSTMENT 1~ OPERATION~ Usethe "~ $ keys(80) to selectOPERATION andpressenter(83).
Background Color To .changethe background color for your video menu display, select. B/kCKGROUND COLOR and press enter (83). TheMENU BACKGROUND COLOR screen ap pears: KRELLHTS -BACKGROUN£~ COLOR- -" MENUBACKGROUND COLOR BLACK BLUE GREEN RED OK Theblinking cursor appearsat MENU BACKGROUND COLOR. Usethe 1" $ keys(80) to move the cursorto the desiredcolor (blackis the factory default). Pressenter(83). background menucolor changesimmediately.Select OKandpress enter (83) to return to the operationmenu.
To changethe line number on whichthe display appears,usethe 1" $ keys(80) to move to LINENUMBER. Withthe blinking cursornext to LINENUMBER, pressenter (83), then use ~ .], keys(80) to select the screenline. Therangeis 0 (top line of screen)through (bottomline of screen).A doublearrowon the right side of the screenmoves up and down,indicating line position. Pressenter(83) to set the selection.SelectOKandpress enter (83) to return to the operationmenu.
Configure Music Thenextitemin the OPERATION menu,CONFIGURE MUSIC, allowsyouto determine which musicmodes youwant. Select CONFIGURE MUSIC andpressenter (83). TheMUSIC MODE SETUP screenappears: KRELL’HTS -MUSIC MODESETUPMUSIC1 MUSIC2 OK USEl"J, TOSELECT A MUSIC MODE AND PRESS ENTER Followthe on-screen directions,choosing MUSIClOr MUSIC2. Youenterthe selectmusictypescreen.When youenterthis screen,youseea blinking cursor.
Virtual AcousticEnvironments ON STAGE L/R/C/S/RR FRONT ROW L/R/S/RR GENERALADMISSION L/.R/S/RR L/R/C/S/RR UR/C/S/RR LIWCISIBR ORCHESTRA MEZZANINE BALCONY MONO ENHANCEDSTEREO PARTY L=Left Speaker R=Right Speaker S=Sub Speaker RR=Rear Speaker(s) C/S L~R/CIS L/R/C/S/RR C=Center Speaker After the desiredoptionsare selected,selectOKandthenenter(83) in the MUSIC MODE SETUP SCREEN to return to the operationmenu.
KRELL HTS -PROGRAMREMOTEMODEONLY I"ANO,I, SAVEAND RECALL ARE ALLOWED ON FRONT PANEL, REMOTE I,.N_P. UTIS INACTIVE.PRESS ENTER -’ TO CONTINUE OK Note Theinfrared sensoron the front panelis renderedinactive until programming is complete. on the PROGRAM REMOTE screenandpress 1. Usethe "i’ $ keys(80) to select START enter(83). 2. Pressthe front panel level buttons (29) toselect a command (commands appears the front paneldisplay). 3. Place the programmable remotein programmode(see learning remoteuser manual).
Configure More Usethis menuto select dynamicrangecompression modeswith the user button or to changethe DTSautoswitchsetting. KRELL HTS - CONFIGUREMOREUSERBU’I-rON SETUP DTS AUTOSWITCH User Button Setup This function allows you to select from three dynamicrangecompression modesusing the user’button(23) on the front panel,or the userkey(79) on the remotecontrol. KREI/L HTS -USERDYN RANGE TOGGLE NONE OK i. Usethe I" $ keys~80] ’ ’ on the remotecontrol to select MORE on ’~’^ ,,,~ OPERATION menu screen,.
DTS Autoswitch DTSAUTOSWITCH ONkeepsyour Home TheaterStandardoperating in DTSmode,even if the bit streamis interrupted. Bit streaminterruption--whichcanoccurin somedevices whenyoupressandreleasefast forward,track back/forward,or scanbuttonsfor a compact disc, digital videodisc,or laser disc--cancause_potentially damaging bursts of noise. This menu allows youto select whetherthe DTSautoswitchis turnedon or off. However, Krell recommends that youleave the DTSa. utoswitchsetting on.
SavingSetup, Recalling Setup, and RestoringFactory Default SystemConfigurationSettings SAVING SETUP SETTINGS Tosavethe settings that youhaveentered,pressarid l~ld the savebutton(28) for approximately four seconds.Thefront paneldisplays SAVINGSETUPwhile the settings are being stored in the Home TheaterStandard’sno.nvolatile memory. ", RECALLING SETUP SETTINGS Todetermine yoursystem’scurrentsettings," pressandhold the recall button(30) for approximately four seconds.
Operating the HomeTheater Standard After the Home TheaterStandardis connectedto sourcedevicesandamplifiers, and systemsetupconfigured, the Home Theater.Standard is ready for operation. ON/OFF/STAND-BY -. Theater 1. Insert the ACpowercord into the IECpowerconnector(55) on the Home Standard.Insert the_otherendinto the ACwall receptacle. 2. Movethe back panel powerswitch (54) into the up (on) position. WAIT, 3. Thered powerLEDon the front panel illuminates.
Operating the HomeTheater Standard, continued MAIN ZONE AND ZONE 2 OPERATION The HomeTheater Standard has two audio zones, main and zone 2. The main zone consists of the mainviewing or listening area, andzone2 consists of anotherlistening area. Youcan select a multi-channelaudio, digital or analogaudio, or a video devicefor mainzone listening. Zone2 can only be used with an analog audio device. To configure a device that has both..d..igital andanalogoutputs, see ConfigureDevices,on page30.
Play Either Zone Main Zone 1. With the Home TheaterStandardin operational or stand-bymode,press the HTSkey (57) to activate the mainzone. 2. Selectthe deviceyouwishto play. 3. PressHTSkey againto turn off the mainzone. Zone 2 1. With the Home TheaterStandardin stand-bymode,press the Z2 key (59). 2. Pressthe HTSkey(57) andselect a device;it will play in zone2 only. 3.
1. Pressthe TVbutton(9) or key (63) to select the device.Beginplayingthe device. 2. Pressthe prev key (78). 3..Pressthe CDbutton(10) or key(64). Beginplayingthe device. If youwishto keepplayingthe TVbut listen to the radioin_s.tead: 1. Pressthe prev key(78). 2. Pressthe tunerbutto_n_. (11)or key(65). TheHome TheaterStandardwill hold the trigger settings, while keepingthe TVon. The CDwill turn off, andthe tunerwill activate.
Warranty ThisKrell producthasa limited warrantyof five yearsfor parts.andlaboroncircuitry. Should this product fail to performat anytimeduringthewarranty,Krell will repair it at no costto the owner,exceptas set forth in this warranty. Thewarrantydoesnot apply to damage causedby acts of Godor nature. Thewarrantyonthis pageshall bein lieu of anyotherwarranty, expressed or implied,including,but not limited to, anyimpliedwarranty of memhantability or fitness for a particular purpose.
ReturnAuthorization Procedure If youbelievethere is a problemwith your component, pleasecontactyour dealer, distributor, or the Krell factory to discussthe problembeforeyoureturn the component for repair. Toexpediteservice, youmaywishto completeande-mail~-the Service Request Formin the ServiceSectionof our website at: http://www.krellonline.com TEL FAX E-MAIL 203-799-9954 Monday-Friday 9:00 AMto 5:00 PMEsT 203-799-9796 service@krellonline.com WEBSITE www.kreilonline.
Specifications SIGNAL TO -NOISE RATIO "A" WEIGHTED 93 dB TOTAL HARMONIC DISTORTION (THD) UNWEIGHTED 20 Hz-20kHz, -88 dB INPUTS ANALOGAUDIO 1 pair balancedvia XLRconnectors DIGITAL AUDIO 5 pairs si~ngle-ended via RCA connectors 6 coaxial via RCAconnectors VIDEO ANALOGTAPE OUTPUTS ANALOGCHANNEL ANALOGTAPE DIGITAL. VIDEO ZONE2 REMOTECONTROL 2 EIAJoptical via TosLink.
DECODINGMODES SURROUND ENHANCEMENT MODES DIMENSIONS WEIGHT SHIPPING UNIT ONLY DolbyPro Logic DolbyDigital DTSDigital SurroundSound 9 Kreil MusicSurroundModes 19.0wx 6.0 h x 15.0d in. 48.3wx 15.3hx 38’.1 d cm 25lb. 16lb. Krell Home TheaterStandard 11.34kg. 7.