
Operation Manual


English
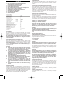
1 ON/OFF switch with full wave electronic control
and adjusting wheel for speed selection
2 Holding button for continuous operation
3 Reversing switch
4 Switching from normal drilling to percussion drilling
5 Mechanical 2-speed selector
6 Mains cable with patent quick-release lock
7 Lock for mains cable
8 Quick-change chuck
9 Auxiliary handle
Technical data
Input 750 W
Output 380 W
Full wave electronic control T
Rotation right/left T
No. of speed ranges 2
No-load speed r.p.m. 1st speed 0–1300
2 nd speed 0–3100
Load speed r.p.m. 1st speed 745
2 nd speed 1780
Percussion rate p.m. n x 16
Max. drill dia. into steel mm 13
Max. drill dia. into wood mm 30
Max. percussion Ø drill dia into concrete mm 16
Max. screwing Ø into wood mm 8
Max. screwing Ø into sheet metal mm 6.3
Collar diameter, mm 43
Corner measure Ø mm 25
Chuck dia., mm 13
Spindle thread 1/2" x 20 UNF
Weight kg 2.13
Use
This drill is universally suitable for percussion drilling in
rock, for drilling and as a screwdriver with wood, metal and
plastic and for cutting threads.
You should use 1st gear of the mechanical drive when
using the device for stirring and drilling holes with large
diameters.
Safety instructions and prevention of accidents
Before operating the machine, please read through the
operating instructions completely, follow the Safety In-
structions in this manual as well as the general Safety In-
structions for Power Tools in the accompanying booklet
.
Caution!
● Pay attention to the jamming moment of the
machine, e. g. if the drill jams or if the drill hits
concrete reinforcing steel and jams!
● Before fitting tools in the chuck or drill spindle dis-
connect the machine from the power supply, or re-
move the mains cable with patent quick-release
lock (6) from the grip using the locking device but-
ton (7)!
● Do not work with materials which contain as-
bestos!
● Outside power sockets must be protected with re-
sidual-current-operated circuit-breakers (r.c.c.b.).
● Do not drill holes into the housing to label the
machine. The protective insulation will be bridged.
Please use self-adhesive labels.
● Always lead cables away towards the back of the
machine.
Double Insulation
Our equipment is designed in accordance with European re-
gulations (EN standards) for the utmost safety of the user.
Machines with double insulation always carry the internatio-
nal symbol. The machines do require earthing. A two-core
cable is sufficient.
The machines are interference-suppressed in accordance
with EN 55014.
Initial operation
Before the first operation check that the mains voltage cor-
responds to that given on the machine nameplate.
Trigger switch with button for continuous operation
The machine is set in operation by pressing in the handle
switch (1). The holding button (2) on the side of the switch
can be pressed for continuous operation. To release the
continuous operation merely depress the switch, which
makes the holding button spring back automatically.
Electronic speed control
This machine has an integrated full wave electronic control
circuit built into the switch. The required speed may be se-
lected with the adjusting wheel (e.g. for serial screw drilling or
for cutting threads). The switch is lockable in every position.
Position A = lowest speed
Position G = highest speed
Ensure that the drill is not allowed to jam for longer
than 2–3 seconds. Longer jamming can lead to motor
damage.
Important!
Continuous operation under strong load and low speed
can overheat the motor.
Allow the motor to cool down in no-load when set at a
high speed!
Changing direction of rotation
(main rotation – clockwise)
Direction of rotation of the drill spindle is changed using
the reversing switch (3).
R = Clockwise (Right)
L = Anticlockwise (Left)
Important!
Press the reversing switch until it reaches the respec-
tive end position at the housing, i. e. until it can be felt
to engage!
The reversing switch is easiest to operate by using the
thumb and index or middle finger from both sides.
Attention!
Change direction of rotation only when the motor has
ceased turning! When using the drill as a screwdriver,
the percussion mechanism must be switched off.
Switch-over by means of the sliding switch (4).
When in middle position, the reversing switch pre-
vents the accidental activation of the full wave elec-
tronic switch (1), for example when changing tools or
assembling/disassembling the drill chuck.
Percussion drilling device
The machine has an integrated percussion mechanism and
can be switched from normal drilling to percussion drilling.
The sliding switch (4) allows switching from normal drilling
to percussion drilling or vice-versa while the machine is in
operation.
Normal drilling position:
Move switch (4) to the right in direction of normal drilling.
Percussion drilling position:
Move switch (4) to the left in direction of percussion
drilling.
Mechanical 2-speed selector
The speed is selected by turning the selector dial (5).
Position 1 = low speed
Position 2 = high speed
2-speed gearing gives the percussion drill added versatil-