Owner’s Manual Tektonix and Volcanix
Congratulations on choosing Krix setup in brief The following setup procedure will help you achieve the best performance from your subwoofer: 1. controls and features Familiarise yourself with the controls and features of your subwoofer. 2. positioning Determine a suitable location for your subwoofer unit. 3. connection and calibration Connect your subwoofer to your system, adjust the settings on your subwoofer to integrate its sound with your speakers and room.
controls and features Volume -30dB menu items current menu settings current menu settings up/down power LED menu back/forward blue - on red - standby Use the back/forward arrows to access the following menus Volume Power Mode Adjusts the subwoofer’s output level. Can be set to auto sense or 12V trigger. Low Pass When set to auto sense the subwoofer will automatically switch on when a signal is present. The auto sense circuit monitors both the speaker level or line level inputs.
controls and features 12V trigger When a 12V signal is a applied to the trigger input the subwoofer will switch on from standby and the red active LED will illuminate. Use a 3.5mm mono lead to make the connection to an AV amp/receiver equipped with a trigger output. (5-15V DC or AC may be used to trigger the subwoofer, polarity is not critical). line in Line level stereo input with summing function. high level inputs High level inputs with summing function, for use with amplifier speaker outputs.
controls and features Krix Tektonix and Volcanix innovation front panel controls Unlike conventional subwoofers with hard to reach rear controls, the Tektonix and Volcanix feature a front panel with precision digital adjustment. There is no longer any need to pull your subwoofer out of a cabinet or away from a wall to set up your system, all functionality is accessible via the front panel interface. The front panel display is backlit to aid viewing in low light conditions.
positioning The most ‘obvious’ position for your subwoofer is not always the best The bass produced by a subwoofer is omnidirectional and very hard for your ears to localise. Therefore a subwoofer can be placed virtually anywhere in your listening room and provide the impression that the bass is radiating from your main speakers. The quality of bass however is affected by position of your subwoofer due to complex acoustic interactions with your listening room.
connection & calibration - AV receiver connection and defaults It is recommended that you use Line Level RCA connections for home theatre applications. • Ensure the mains power switch is off and connect the mains power cord. • Connect the subwoofer pre-out (SW) on your receiver/processor to the line in L/LFE input on your subwoofer (see advanced connection methods p.9 for alternatives). • Switch on mains power switch (rear panel). • Check volume on your subwoofer is set to the default level, -20dB.
connection & calibration - stereo system connection and defaults Connect the Tektonix or Volcanix subwoofer to a stereo amplifier either via the high level speaker inputs or the line level inputs. • Ensure the mains power switch is off and connect the mains power cord. • Connect subwoofer to your stereo amplifier using one of the methods on this page. Using both connection methods simultaneously is not recommended.
advanced connection methods one subwoofer - stereo connection If your receiver has a stereo L & R subwoofer output feature, connect both L & R outputs to your subwoofers L & R line inputs. two (or more) subwoofers - mono connection Using multiple subwoofers can be useful in large or troublesome installations where more uniform bass coverage is desired. If your receiver has only one subwoofer output, use a RCA Y-connector to connect both subwoofer L/LFE inputs to the one mono SUB output.
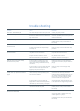
trouble shooting symptom cause treatment Power LED - double flashing red Low mains voltages or brown-out in your area. Contact your power provider. Power LED - flashing red Amplifier over-temperature condition. May be the result of continual use of the subwoofer at high volume levels. Subwoofer will resume normal operation when unit cools. If problem persists contact your Krix retailer or Krix directly. Power LED - flashing blue Amplifier overcurrent condition.
specification warranty Tektonix: specifications 5 year warranty applies to the cabinet and speaker. Drivers Bass Driver 2 year warranty applies to the amplifier and related internal electronics. (Refer to the details on the warranty card supplied) queries If you have any queries regarding the Tektonix or Volcanix setup procedure or any other Krix product, please contact your nearest Krix retailer or Krix directly. Contact details are on the back cover of this booklet.
Krix Loudspeakers Pty Ltd 14 Chapman Road Hackham SA 5163 Australia T 61 8 8384 3433 F 61 8 8384 3419 listen@krix.com Rev #10001 krix.com Please read these important safety instructions before you plug in this equipment. Please retain these instructions for future reference. This equipment is manufactured to a very high standard and it should give you many years of reliable service.