
User Manual

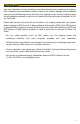
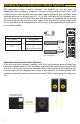

Audio Input
10k Ohms Balanced
Pin 2 + Tip = High
Pin 3 + Ring = Low Pin
Pin 1 + Sleeve = Ground
Connecting Your System
IMPORTANT: All connections should be made, all fader and
controls should be set at their minimum levels, and all other
equipment should be powered prior to powering up your
KRK10s subwoofer. If you are connecting the sub’s Line Outs to
your monitors, turn monitor power on after the subwoofer.
NOTE: Ensure that the voltage indicator found in the voltage selector is
set to the correct voltage setting for your local supply, and the appropri-
ate fuses are being used (See Specifications on page 18).
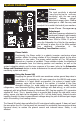
Powering On
The power On/Off switch is located on the rear panel. The triangle in the
KRK logo on the rear plate illuminates when power is applied. If a red LED
is seen instead of green, this means the unit must be serviced by an au-
thorized KRK service technician (see page 16 for more information).
ON
O
FF
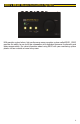
Unbalanced
XLR
Connectors
TRS 1/4”
Connectors
RCA Inputs
Balanced
6
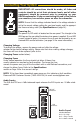
Changing Voltage
To change the voltage, remove the power cord and slide the voltage
selector to the desired voltage setting. Please note that when making voltage changes,
the fuses will have to be replaced (refer to the
Changing Fuses section below).
Changing Fuses
Under normal operation the fuses should not blow. A blown fuse
usually indicates an overload or fault condition. To change the fuse,
remove the power cord, pry off the fuse block with a small flathead screwdriver, and
change the blown fuses. Refer to the Specifications
section on Page 18 for fuse current ratings.
NOTE: If the fuses blow immediately upon power up, this indicates a fault condition.
Please call KRK Customer Service (1-800-444-2766) or email service@gibson.com.
Audio Inputs
The XLR and TRS are +4 dBu balanced inputs whereas the RCA inputs are -10 dBu unbal-
anced.