
User Manual
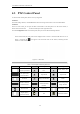
Table Of Contents
- OLE_LINK86
- OLE_LINK85
- OLE_LINK64
- OLE_LINK118
- OLE_LINK117
- OLE_LINK9
- OLE_LINK10
- OLE_LINK60
- OLE_LINK141
- OLE_LINK140
- OLE_LINK21
- OLE_LINK20
- OLE_LINK131
- OLE_LINK130
- OLE_LINK44
- OLE_LINK40
- OLE_LINK46
- OLE_LINK45
- OLE_LINK38
- OLE_LINK19
- OLE_LINK5
- OLE_LINK4
- OLE_LINK55
- OLE_LINK170
- OLE_LINK190
- OLE_LINK177
- OLE_LINK33
- OLE_LINK32
- OLE_LINK153
- OLE_LINK152
- OLE_LINK24
- OLE_LINK22
- OLE_LINK195
- OLE_LINK197
- OLE_LINK196
- OLE_LINK191
- OLE_LINK35
- OLE_LINK34
- OLE_LINK15
- OLE_LINK14
- OLE_LINK194
- OLE_LINK193
- OLE_LINK43
- OLE_LINK42
- OLE_LINK8
- OLE_LINK13
- OLE_LINK3
- OLE_LINK2
- OLE_LINK1
- OLE_LINK18
- OLE_LINK17
- OLE_LINK28
- OLE_LINK25
- OLE_LINK36
- OLE_LINK31
- OLE_LINK92
- OLE_LINK78
- OLE_LINK169
- OLE_LINK163
- OLE_LINK160
- OLE_LINK70
- OLE_LINK69
- OLE_LINK68
- OLE_LINK67
- OLE_LINK115
- OLE_LINK109
- OLE_LINK108
- OLE_LINK7
- OLE_LINK66
- OLE_LINK65
- OLE_LINK88
- OLE_LINK124
- OLE_LINK134
- OLE_LINK133
- OLE_LINK582
- OLE_LINK597
- OLE_LINK596
- OLE_LINK590
- OLE_LINK589
- OLE_LINK588
- OLE_LINK587
- OLE_LINK595
- OLE_LINK594
- OLE_LINK593
- OLE_LINK99
- OLE_LINK100
- OLE_LINK284
- OLE_LINK283
- OLE_LINK145
- OLE_LINK144
- OLE_LINK176
- OLE_LINK173
- OLE_LINK172
- OLE_LINK168
- OLE_LINK57
- OLE_LINK56
- OLE_LINK50
- OLE_LINK49
- OLE_LINK52
- OLE_LINK51
- OLE_LINK104
- OLE_LINK103
- OLE_LINK94
- OLE_LINK91
- OLE_LINK97
- OLE_LINK110
- OLE_LINK93
- OLE_LINK105
- OLE_LINK111
- OLE_LINK106
- OLE_LINK155
- OLE_LINK154
- OLE_LINK59
- OLE_LINK58
- OLE_LINK54
- OLE_LINK53
- OLE_LINK102
- OLE_LINK101
- OLE_LINK149
- OLE_LINK148
- OLE_LINK298
- OLE_LINK137
- OLE_LINK136
- OLE_LINK566
- OLE_LINK565
- OLE_LINK568
- OLE_LINK567
- OLE_LINK6
- OLE_LINK11
- OLE_LINK580
- OLE_LINK579
- OLE_LINK584
- OLE_LINK583
- OLE_LINK585
- OLE_LINK574
- OLE_LINK573
- OLE_LINK26
- OLE_LINK23
- OLE_LINK576
- OLE_LINK575
- OLE_LINK572
- OLE_LINK571
- OLE_LINK578
- OLE_LINK577

User Manual of Network Video Recorder
65
5.2 Configuring Recording Schedule
Purpose:
Set the recording schedule, and then the camera automatically starts/stops recording according to the configured
schedule.
Steps:
1. Enter the Record Schedule interface.
Menu > Record > Schedule
2. Configure Record Schedule
1) Select Record Schedule.
Figure 5. 6 Record Schedule
Different recording types are marked in different color icons.
Continous: scheduled recording.
Event: recording triggered by all event triggered alarm.
Motion: recording triggered by motion detection.
Alarm: recording triggered by alarm.
M/A: recording triggered by either motion detection or alarm.
M&A: recording triggered by motion detection and alarm.
2) Choose the camera you want to configure.
3) Select the check box after the Enable Schedule item.
4) Click Edit button or click on the color icon under the edit button and draw the schedule line on the
panel.
Edit the schedule:
I. In the message box, you can choose the day to which you want to set schedule.