
User's Manual


19
18
STARTING OPERATION
1. Push the power button on the front panel or on the remote controller.
If power plug is inserted into an AC outlet, the stand-by indicator will be red.
2. Select the channel you want to watch by CH
/ button or 10 digit keys.
Channels can be selected directly by using 10 digit keys.
For example, to select channel 5, press “0” first, then press “5”.
For channel 120 in CATV mode, press 100 button first, then press “2”, then “0”.
3. Adjust the volume of sound.
NOTE : Certain channels have been pre-set at the factory.
It may be necessary to add or delete some channels.
See “MENU / SETUP / ANTENNA / AUTOPROGRAM” on page 29 for adding
channels in memory.
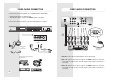
VIDEO /AUDIO CONNECTION
4. S-VHS IN : At either video 2 or video 3 mode, insert S-VHS cable from set-top box or
VCR into S-VHS terminal.
And the display will change from video 2 to S-VHS 2 or video 3 to S-VHS 3.
S-VHS input has priority over video 2 input.
5. DVD IN : Insert A/V cables from DVD player. Be Careful in connecting the jacks for
Y,CB,CR.
6. L,R : In case of DVD, RGB or PC mode, input the audio signals into this L,R JACKS if
necessary.
7. RGB IN : Insert A/V cables from DVD player or set-top box.
8. PC IN : Connect personal computer to the TV set via a D-SUB connector.
Set PC with 640
480 mode.
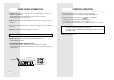
9. YOU CAN ALSO CONNECT A HOME VCR TO TV.
Connect the antenna lead-in cable from antenna to the RF IN socket of VCR.
and then connect the coaxial cable from the RF OUT socket of the VCR to the antenna
socket of TV set.
ANTENNA To "RF IN"
To antenna socket
To "RF OUT"
Coaxial cable
NOTE : The SYNC signal is on G SIGNAL and the input frequency is 15.734KHZ.