www.kucht.com BE A PRO IN YOUR KITCHEN REFRIGERATOR INSTALLATION GUIDE AND USER MANUAL APPLICABLE MODEL: K748FDS F741-2(영).
INSTALLATION GUIDE AND USER MANUAL Disposal of Used Electrical & Electronic Equipment The meaning of the symbol on the product, its accessory or packaging indicates that this product shall not be treated as household waste. Please, dispose of this equipment at your applicable collection point for the recycling of electrical & electronic equipments waste. In the European Union and Other European countries there are separate collection systems for used electrical and electronic product.
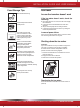
INSTALLATION GUIDE AND USER MANUAL Be sure to keep for safety! Read these safety instructions thoroughly and carefully before using. Please keep this user guide on hand for future reference. Indicates the possibility of danger of death or serious injury. Indicates the possibility of risk of personal injury or material damage. Other Signs DO NOT remove or disassemble! Be sure to unplug from outlet/mains! NO. DO NOT... Be sure to keep and follow! Caution 1.
INSTALLATION GUIDE AND USER MANUAL Do not move or remove compartment shelves/pockets while foods and containers are on them. Hard containers (of glass, metal etc.) can fall to hurt you and can break glass shelf and interior parts. Never repair, disassemble or amend the refrigerator on your own. There is a risk of personal injury or damage to the refrigerator. It is recommended that any service be carried out by a qualified person. Never store any flammable gas or liquid in the refrigerator.
INSTALLATION GUIDE AND USER MANUAL Installation Guide Read these safety instructions carefully before use and follow precautions for your safety. Precautions in installation and power connection To prevent fire, electric shock or leakage Never install the refrigerator on a wet, watery floor or where water can gather easily. Check the following before power connection. Connect power plug only to a grounded wall socket (an earthed mains).
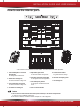
INSTALLATION GUIDE AND USER MANUAL Control Panel 1. Ice Maker button Press to turn Ice Maker On or Off. If you do not intend to use any ice cubes for longer than one week (e.g. because you are going on holiday), shut down the ice maker. Initial status: Ice Maker On (LED off) Press Ice Maker button: Ice Maker OFF (LED on) ) / Quick Refrigerator ( 5. Quick Freezer ( Illuminates when quick function is on. ) 6.
INSTALLATION GUIDE AND USER MANUAL Temperature Control Note When changing control settings, wait 24 hours before making additional adjustments. The controls are set correctly when milk or juice is as cold as you would like and when ice cream is firm. If the temperature in either compartment is too cold or too warm, change the setting one increment at a time. Wait 24 hours for the change to stabilize before adjusting again.
INSTALLATION GUIDE AND USER MANUAL How to use the interior parts 10 1 1 5 5 3 3 5 5 2 2 6 2 6 7 2 4 11 8 9 * This instruction manual refers to several models. The real features are model dependent. 1. Covered Dairy Bin or Covered Storage Bin for storing butter and cheese. 2. Gallon door storage bin for items of medium to large size. 5. Adjustable glass shelf for items of medium to large size. 9. Lower freezer basket for general freezer storage 6.
INSTALLATION GUIDE AND USER MANUAL Food Storage Tips Wash food before storing. Icemaker In case the icemaker doesn’t work If the ice maker doesn’t work, check the following: Divide and separate food into smaller pieces. Place watery food or food with a lot of moisture in front shelves (close to door side). If they are placed close to the cold air spout, they can be frozen. Warm or hot food should be cooled down enough before storing to reduce power consumption and to enhance refrigeration performance.
INSTALLATION GUIDE AND USER MANUAL Automatic Icemaker Caution The first ice and water dispensed may include particles or odor from the water supply line or the water tank. Throw away the first few batches of ice. This is also necessary if the refrigerator has not been used for a long time. Never store beverage cans or other items in the ice bin for the purpose of rapid cooling. Doing so may damage the ice maker if the containers burst.
INSTALLATION GUIDE AND USER MANUAL Care & Cleaning Be sure to unplug first * Features may vary according to model. Ice Storage Bin Cleaning: Empty the ice cube bin and clean with lukewarm water. Thoroughly dry the bin and screw conveyor to prevent new ice cubes from sticking together. Freezer & Refrigerator Bins Refrigerator Shelves To remove a shelf: Lift up on front of shelf with one hand and with other hand push up on back of shelf to release attachment hooks from attachment slots.
INSTALLATION GUIDE AND USER MANUAL Vegetable case & Wide case Pull out the cases as far as possible. Lift up the front of the cases and pull them out. Insert the cases into the rail and aapush towards the back. How to Clean Interior Parts Use cloth with water and mild detergent to clean. Freezer case Pull out the case as far as possible. Pull out the clips on both sides and lift up the front of the freezer case. Freezer drawer Lift the freezer drawer up and out.
INSTALLATION GUIDE AND USER MANUAL Before You Call for Service... Problem Please check the following troubleshooting tips before you call for service! Problem It never gets cold inside. Freezing & refrigerating is not so good. Checkup Point Is the refrigerator unplugged? Is the temperature set to [Low Mode]? Is the refrigerator under direct sunlight or is a heat appliance placed near it? Is the space between the refrigerator back and the wall too close? Strange sounds from the refrigerator.
INSTALLATION GUIDE AND USER MANUAL Something strange ? Don’t worry. Here is the answer. Case Heat Door is sticky Explanation Front and side of refrigerator feels warm or hot. Pipes (refrigerant vessel) are placed beneath the surface to prevent moisture forming on it. Doors do not open easily. When you close the door and then open again immediately, the door is not easy to open because warm air rushes in and creates the pressure difference. In this case wait for a minute, then it will open easily.
INSTALLATION GUIDE AND USER MANUAL Installation Preparation Check if the refrigerator can pass a doorway or enter a door first. Dimensions (including Door Handles) (Width*Depth*Height) 906 mm x 735 mm x 1,770 mm If the refrigerator can not pass through a door during installation, follow these steps. This instruction manual refers to several models. The real features are model dependent.
INSTALLATION GUIDE AND USER MANUAL Removing right refrigerator door 1. Turn top hinge fastener counterclockwise and remove the top hinge. (After the hinge is removed the door can fall down forward. Be careful!) 2. Lift up the door and remove it. (The same as step 4, step 5 in removing the left refrigerator door.) Removing freezer door 1 Open freezer door as far as possible, pull up freezer case and freezer drawer. 4 Push and assemble another gear rail on opposite side of the rail.
INSTALLATION GUIDE AND USER MANUAL Aligning the refrigerator doors Front Cover After installation and/or door leveling, fasten front cover with screws. (Remove the screws on the front bottom panel first. Click and screw the cover.) Caution Risk of electric shock! Before removing top hinge cover 1. Shut off the water supply to the appliance. 2. Unplug the appliance or switch off the fuse. If the refrigerator doors are not properly aligned.
INSTALLATION GUIDE AND USER MANUAL Foldaway door bar (mullion bar) Water Connector - When closing the left refrigerator door, the mullion bar folds behind the right refrigerator door, forming a seal between the refrigerator doors. - When opening the left refrigerator door, the mullion bar folds back to the left door automatically. (mullion bar folds back O) (mullion bar folds away X) - The mullion bar may become damaged if you attempt to close the left refrigerator door with mullion bar folded out.