www.kucht.com BE A PRO IN YOUR KITCHEN RANGE HOOD INSTALLATION GUIDE AND USER MANUAL APPLICABLE MODEL: KRH3001U, KRH3601U, KRH4801U, KRH3002U, KRH3602U, KRH4802U, KRH3003U, KRH3603U, KRH3004U, KRH3604U, KRH3005U, KRH3605U, KRH4805U.
INSTALLATION GUIDE AND USER MANUAL Safety Notice Models approved for residential use only. Please read these instructions completely before starting. The installation of the appliance must respect all codes. Important: Save these instructions so that you can provide the electrical inspector in your area. Safety Warning: Turn off the circuit in the electrical panel and lock the front panel to connect the cord of this unit. Power requirement: 110V-120V/60HZ CAUTION: USE THIS PRODUCT FOR GENERAL FAN ONLY.
INSTALLATION GUIDE AND USER MANUAL 6. When cutting or drilling into wall or ceiling, be sure not to damage electrical wiring or other access to public service. 7. Always evacuate outside the conduit system. To reduce the risk of fire and to properly exhaust air, be sure that the pipe is leading outside, do not exhaust air into the space between the walls, ceilings, attics, crawl spaces or garages. Warning: TO REDUCE THE RISK OF FIRE, USE ONLY METAL DUCT.
INSTALLATION GUIDE AND USER MANUAL Operative Mode Always leave safety grills and filters in place. Without the presence of these blowers hair, fingers or clothing could catch. The manufacturer is not liable if the suggested steps detailed in this manual for installation info, maintenance and proper use of the product are not observed. The manufacturer declines all responsibility for any injury caused by negligence. This product is manufactured for internal use. Do not use this appliance outdoors.
INSTALLATION GUIDE AND USER MANUAL Before installing the hood 1. To ensure the most efficient ventilation possible, install the pipe in a straight line or with the least elbows possible. CAUTION: The output of the vent pipe should give to the outside. 2. Two people are required for installation. 3. Supplied hardware can secure the hood to most walls and ceilings, consult a qualified installer to ensure that the hardware provided is suitable for your type of wall or cabinet. 4.
INSTALLATION GUIDE AND USER MANUAL FOR MORE DETAILS AND INFORMATION, PLEASE VISIT OUR WEBSITE WWW.KUCHT.
INSTALLATION GUIDE AND USER MANUAL Do not cut a joist or stud unless it is absolutely necessary to do so. If you need to cut a joist or stud, you must build a support Framework, hardware supplied can secure the hood to most walls and ceilings. However, you should ask a qualified technician to check the strength of materials depending on the type of wall or ceiling. Before cutting, make sure there is enough clearance in the ceiling or wall for the outlet pass.
INSTALLATION GUIDE AND USER MANUAL Clearance Training Caution: When install the hood, the height should not be too high or too low. Before the installation, please inspect the maximum height of your ceiling and bonnet.Too high, will affect the efficiency of the hood; too low, stove temperature will damage some parts of the hood.
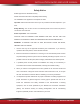
INSTALLATION GUIDE AND USER MANUAL Installation If possible, unplug the stove and move it in order to have better access to the rear wall. Otherwise, place a thick blanket on the counter and the cooking surface to protect it from damage and dirt. Select a flat surface for assembling the device. Then put the debris of the cover and hardware on to the protective cap. Determine and mark the center line on the wall where you installed the canopy hood.
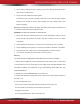
INSTALLATION GUIDE AND USER MANUAL indicating the height of the bottom of the system, the circle of a conduit hole 7 - ½ "in diameter (the hole may be enlarged for the passage of the elbow). Necessary Tools FOR MORE DETAILS AND INFORMATION, PLEASE VISIT OUR WEBSITE WWW.KUCHT.
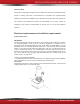
INSTALLATION GUIDE AND USER MANUAL 03 Series range hood Walled mounted fixed plated FOR MORE DETAILS AND INFORMATION, PLEASE VISIT OUR WEBSITE WWW.KUCHT.
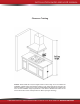
INSTALLATION GUIDE AND USER MANUAL Overview size : FOR MORE DETAILS AND INFORMATION, PLEASE VISIT OUR WEBSITE WWW.KUCHT.
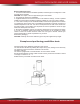
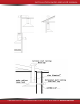
INSTALLATION GUIDE AND USER MANUAL Installation dimension figure of 04 series range hood as below: FOR MORE DETAILS AND INFORMATION, PLEASE VISIT OUR WEBSITE WWW.KUCHT.
INSTALLATION GUIDE AND USER MANUAL 04 series range hood FOR MORE DETAILS AND INFORMATION, PLEASE VISIT OUR WEBSITE WWW.KUCHT.
INSTALLATION GUIDE AND USER MANUAL FOR MORE DETAILS AND INFORMATION, PLEASE VISIT OUR WEBSITE WWW.KUCHT.
INSTALLATION GUIDE AND USER MANUAL 01 series, 02 series range hood FOR MORE DETAILS AND INFORMATION, PLEASE VISIT OUR WEBSITE WWW.KUCHT.
INSTALLATION GUIDE AND USER MANUAL 05 series 30 inch and 36-inch range hood FOR MORE DETAILS AND INFORMATION, PLEASE VISIT OUR WEBSITE WWW.KUCHT.
INSTALLATION GUIDE AND USER MANUAL 05 series 48-inch range hood FOR MORE DETAILS AND INFORMATION, PLEASE VISIT OUR WEBSITE WWW.KUCHT.
INSTALLATION GUIDE AND USER MANUAL 06 Series 30 and 36 inch range hood FOR MORE DETAILS AND INFORMATION, PLEASE VISIT OUR WEBSITE WWW.KUCHT.
INSTALLATION GUIDE AND USER MANUAL 06 Series 48 inch range hood FOR MORE DETAILS AND INFORMATION, PLEASE VISIT OUR WEBSITE WWW.KUCHT.
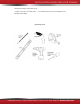
INSTALLATION GUIDE AND USER MANUAL Installation dimension figure of 01 series, 02 series 05 series and 06 series as below: Fix 6pcs screws( see figure 4) to the installation dead plate Fix the installation dead plate to the wall by screws( see figure 5) Use double-faced aluminum foil sealed-joint( see figure 6) Power line color (black to black, white to white, green to green) (see figure 7) Oil box of the hood (see figure 8) Installation of clapboard filter screen (see figure 9) Figure4 Figure5 FOR MORE
INSTALLATION GUIDE AND USER MANUAL FOR MORE DETAILS AND INFORMATION, PLEASE VISIT OUR WEBSITE WWW.KUCHT.
INSTALLATION GUIDE AND USER MANUAL Description orders for 01 Series, 03 Series and 04 series range hood Automatic activation control function of the sensor: There are 5 pieces sensor buttons,1pc remote control signal lamp(remote controller included), 2 pieces stainless steel grease boxes,2 pieces stainless steel baffle filters and 2 pieces led bulbs( 12V/1.5W). A0 button: Remote control signal lamp A1 button: Power( on/off) A2 button: LED bulb A3 button: Display screen A4 button: Time Delay.
INSTALLATION GUIDE AND USER MANUAL setting is 1minute,after that, will shut off automatically. During fan working, if you need to adjust time-delay function,press A4 button one time, will blink for a few seconds, press A6 button to increase delay-time, set the figure timers as the time you want, max delay-time is 15 minutes. If time-setting changes from A6 button to A5 button, during the process, speed changes,but does not affect count down.
INSTALLATION GUIDE AND USER MANUAL Time-delay Button: Power on, press any button of F2/F3/F4, fan starts and F5 light automatically but does not blink. Press F5 again, time-delay function starts, when F5 indicator light starts to blink, time-delay function unadjustable, default setting time is 5 minutes. Press F5 button again, time-delay and fan both close, LED light still on, which is independent switch.
INSTALLATION GUIDE AND USER MANUAL Don't s: - Use steel wool or stainless steel or any other scrapers to remove stubborn dirt. - Use any harsh or abrasive cleansers. - Allow dirt to accumulate. - Allow the plaster dust or any other construction residues reach the hood. Cover the hood while working to ensure no dust hood. To avoid when choosing a detergent - Any cleaners that contain bleach, because they attack stainless steel.
WE TRANSFORM A SIMPLE KITCHEN INTO A PRO ONE. THIS IS WHY WE CARE ABOUT MAKING VERY HIGH PERFORMANCE RANGES AND HOODS, TO MAKE YOU FEEL LIKE A PRO AND STYLISH COOKER. DESIGN: LONDON DC - WWW.LONDON-DC.