
Instruction Manual
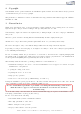

7 Using the coding interface
1
2
2 3
3
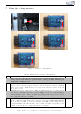
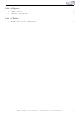
Figure 2: Using the coding interface
Table 1: Instructions to use the coding interface
No. Work step Note
!! Important note: For the mod els from model year 2019 (VW, Audi, Skoda,
Seat) - the bonnet must be opened before coding. It must r emai n open
during the coding process.
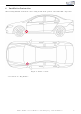
1 Turn on the ignition. Please note that the engine will not be started. Wait
approx. 30 seconds and plug the interface into t he diagnostic interface (OBD II
plug) of the vehicle. This interface is locat ed in the driver’s footwell on the left
above the foot rest.
2 Variation 1: If the dongle has one LED, the LED will glow re d continuously as
soon as the coding has begun. As soon as the LED goes out, the coding has finished
and the interface can be taken out again. Depe nd i ng on the vehicle or the retrofit,
the coding may take up to a minute.
3 Variation 2: If the dongle has two LEDs, a red and a green LED will glow as soon
as the coding has begun. Dur in g the coding process, the green LED flashes/flickers.
As soon as the red LED goes out and only the green LE D glows continuously, the
coding has finished and the interface can be taken ou t again. Depending on the
vehicle or the retrofit, the coding may take up to a minute.
Kufatec GmbH & Co. KG - Dahlienstr. 15 - 23795 Bad Segeberg - e-mail: info@kufatec.de 7