Installation Notes Soundbooster Remote Control v1.2 (09.05.2019) Kufatec GmbH & Co. KG - Dahlienstr. 15 - 23795 Bad Segeberg - e-mail: info@kufatec.
Contents 1 Liability Exclusion 3 2 Copyright 4 3 General notes 4 4 Safety Instructions 5 5 Requirements for the intended use 5 6 How to connect a cable to another 6 7 Note Cable Inscription/Color 7 8 Hinweis 8 9 Certificate of Conformity 8 10 Connection Receiver / handling 9 11 Remote Control Programming 10 12 Note 11 Kufatec GmbH & Co. KG - Dahlienstr. 15 - 23795 Bad Segeberg - e-mail: info@kufatec.
1 Liability Exclusion Dear Customer, Our cable sets are developed according to the connection- and circuit diagrams of the corresponding car manufacturers. Before the serial production, the cable sets will be adjusted and tested on an original vehicle. Therefore, the integration into the vehicle electronics follows the guidelines provided by the car manufacturer.
2 Copyright Our installation and operation instructions, installation plans, software and other written and/or pictured documentations are protected by copyright. The publication or distribution of these documentations is only permitted with a written approval of Kufatec GmbH & Co. KG. 3 General notes While developing this product, your personal safety combined with the best operating service, modern design and an up-to-date production technique was especially taken into account.
4 Safety Instructions The installation should only be performed by trained personnel. Only perform installations while in a voltage-free state. For example, disconnect the battery. Please pay attention to the instructions provided by the manufacturer. • Never use bolts or nuts form the car’s safety devices for installation. If bolts or nuts form the steering wheel, brakes or other safety devices are used for installation of the device, it may cause an accident.
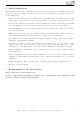
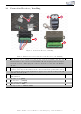
How to connect a cable to another 1 2 3 4 5 6 Figure 1: How to connect a cable to another No. 1 2 3 4 5 6 Table 1: How to connect a cable to another Work step Take the cable of the vehicle, to which you want to connect, (green marked here) and strip the insulation at one point with a suitable tool (cable stripper/cutter knife). Now take the cable of the cable set, which you want to connect, (yellow marked here) and strip the insulation at the end. Twirl the wires of the stripped cable together.
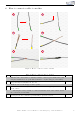
Note Cable Inscription/Color Figure 2: Cable Inscription If the cable set consists of colored cables, connect the cables according to the color. If all cables of the cable set have the same color, connect the cables according to the cable inscription. Kufatec GmbH & Co. KG - Dahlienstr. 15 - 23795 Bad Segeberg - e-mail: info@kufatec.
Hinweis Important Note for the Hardware • From Hardware 29/15 it could be that there is a Firmwareupdate required. The actual Firmwareupdate can be downloaded under the following URL: http://www.soundbooster.com/en/member.html • Is the Hardware lower then 29/15 only the function for switching the sound profiles are available. For this we offer a suitable Hardwareupdate under Item Number 41114. 9 Certificate of Conformity Important note for Certificate of Conformity • Hereby, Kufatec GmbH & Co.
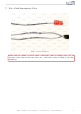
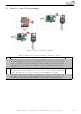
10 Connection Receiver / handling 2 3 1 4 4 Figure 3: Connection Receiver / handling No. 1 2 3 4 Table 2: Instruction for the Connection of the Receiver / the handling Procedure The Receiver can be installed by plug & play between the Kufatec Module and harness. Remove the connector from the Kufatec Module and plug it into the adapter from the receiver. Then plug the connector from the receiver into the Kufatec Module. By pushing approx.
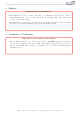
11 Remote Control Programming 2 1 3 Figure 4: Remote Control Programming Table 3: Instruction for the Programming of the Remote Control No 1 2 3 Procedure The delivered remote control is paired together with the receiver, so that you can use it immediately. If the remote control have lost the connection to the receiver, it can be reconnected as follows. At first looesen the 2 marked screws at the housing and remove the cover. The receiver must be completely installed in the vehicle to get power.
12 Note Troubleshooting • If the remote control does not work, please proceed as follows: • If it is not possible to change the mode (e.g. mode 5 to mode 6) via the remote control, Driveselect might be active. The module changes shortly to mode 6 and right back to mode 5 in that case. This can be fixed by deactivating Driveselect either through the Soundbooster-App or through the PC Software. • If Driveselect is not active, check if the remote control controls the module.
List of Figures 1 2 3 4 How to connect a cable to another Cable Inscription . . . . . . . . . . Connection Receiver / handling . . Remote Control Programming . . . . . . . . . . . . . . . . . . . . . . . . . . . . . . . . . . . . . . . . . . . . . . . . . . . . . . . . . . . . . . . . . . . . . . . . . . . . . . . . . . . . . . . . . . . . . . . . . . . . . . . . . . . . . . . . . . . . . . . . . . . . . . . . . . . . 6 . 7 . 9 .