Gebrauchsanleitung Instructions for use Instructions d’emploi Gebruiksaanwijzing Istruzioni per l’uso Istrucciones para el uso Wichtig: Unbedingt lesen und aufbewaren! Important: Read these instructions carefully and then store them in a safe place Important: Lire attentivement et ranger soigneusement ce mode d’emploi Belangrijk: Beslist lezen en bewaren Importante: È necessario leggere attentamente queste istruzioni e conservarle con cura Importante: Leerlas imprescindiblemente y guardarlas Integrierte Ei
Hinweise zur Benutzung der Gebrauchsanweisung Die folgenden Symbole erleichtern das Lesen der Gebrauchanweisung: D Sicherheitshinweise bezŸglich der Benutzung des GerŠtes RatschlŠge fŸr den korrekten Gebrauch und die optimale Ausnutzung des GerŠtes. Informationen zum Umweltschutz Sicherheitshinweise Bevor Sie Ihr neues KŠltegerŠt in Betrieb nehmen, lesen Sie bitte diese Gebrauchsanweisung aufmerksam durch. Diese sind Sicherheitshinweise.
Inhalt Sicherheitshinweise . . . . . . . . . . . . . . . . . . . . . . . . . . . . . . . . . . . . . . . . . . . . . . . . . . . . . . . . . . . . . . . . . . . . . .2 Entsorgung . . . . . . . . . . . . . . . . . . . . . . . . . . . . . . . . . . . . . . . . . . . . . . . . . . . . . . . . . . . . . . . . . . . . . . . . . . . . .3 Gebrauch Vor Inbetriebnahme / Bedienungsblende . . . . . . . . . . . . . . . . . . . . . . . . . . . . . . . . . . . . . . . . . . . . .
KŸhlabteil Inbetriebnahme ¥ Der Temperaturregler befindet sich oben am GerŠt auf der Bedienblende. Er ist zugleich der EIN/AUSSchalter. ¥ Zum Drehen des Temperaturreglers ist eine MŸnze erforderlich. ¥ Netzstecker in die Steckdose stecken. ¥ Temperaturregler von der Stellung ÇOÈ (STOP) aus im Uhrzeigersinn drehen. ¥ Das GerŠt ist eingeschaltet. Den Stillstand des GerŠtes erhŠlt man durch Drehen des Temperaturreglers auf das Symbol ÇOÈ.
KŸhlschrank-Betrieb verursachen, dabei kann sich eine Reif- oder Eisschicht an der hinteren Innenwand bilden. In diesem Falle den Thermostatknopf auf wŠrmere Temperaturen stellen, damit das automatische Abtauen, mit folglich geringerem Stromverbrauch, gewŠhrleistet werden kann. ¥ Keine warmen Speisen in das GerŠt stellen. Warme Speisen erst abkŸhlen lassen. ¥ TiefkŸhlgut zum Auftauen in den KŸhlraum legen. Die KŠlte im TiefkŸhlgut wird so zur KŸhlung im KŸhlraum genutzt. Markierung drehen bzw.
Wartung Vor jeder Reinigungsarbeit immer den Netzstecker aus der Steckdose ziehen. direkt unter das Ablaufloch stellen. Den Stšpsel wie in der Abbildung gezeigt entfernen. Dieses GerŠt erhŠlt im Kaltekreislauf Kohlenwasserstoff. Aus diesem Grund darf die Wartung und das NachfŸllen ausschlie§lich von autorisierten Fachpersonal durchgefŸhrt werden. Abtauen KŸhlraum ¥ An der RŸckwand des GerŠtes bildet sich im Betrieb eine Reifsicht, die in den Stillstandszeiten des Kompressors von selbst abtaut.
Innenbeleuchtung ¥ Vor dem Lampenwechsel GerŠt abschalten und den Netzstecker ziehen. 1. Lšsen Sie die Befestigungsschraube der Lampenabdeckung. 2. Heben Sie den beweglichen Teil ab, indem Sie wie in der Abbildung gezeigt darauf drŸcken. 3. Defekte Lampe durch eine neue Lampe gleicher Leistung auswechseln.
Technische Angabe Die technischen Angaben sind auf dem Typschild genannt, das auf der linken inneren Seite der Anlage liegt. Im Falle einer Stromunterbrechung wŠhrend der Lagerung von TiefkŸhlkost bzw. von eingefrorenen Lebensmitteln soll die TŸr des Gefrierfaches nicht gešffnet werden. Die TiefkŸhlkost verdirbt nicht, wenn es sich um eine kurze Unterbrechung handelt (12 Std.) und das GerŠt voll ist.
Elektrischer Anschluss Bevor Sie den Stecker in die Steckdose einstecken, ŸberprŸfen Sie bitte, dass die auf dem Typschild des GerŠtes angegebene Spannung sowie Frequenz mit dem Anschlusswert des Hauses Ÿbereinstimmen. Eine Abweichung von ±6% von der Nominalspannung ist zulŠssig. FŸr die Anpassung des GerŠtes an andere Spannungen muss ein Spartransformator angemessener Leistung vorgeschaltet werden. Wichtig Das GerŠt muss unbedingt vorschriftsmŠ§ig geerdet werden.
Instructions for the use of the instructions booklet t Notes which are important for your safety or for the proper functioning of the appliance Supplementary information regarding operation and practical applications of the appliance. Tips and notes concerning economical and environmentally sound use of the appliance Safety Instructions Please read these operating instructions carefully before installing the appliance. These warnings are provided in the interests of your safety.
Contents Safety Instructions . . . . . . . . . . . . . . . . . . . . . . . . . . . . . . . . . . . . . . . . . . . . . . . . . . . . . . . . . . . . . . . . . . . . . .10 Disposal . . . . . . . . . . . . . . . . . . . . . . . . . . . . . . . . . . . . . . . . . . . . . . . . . . . . . . . . . . . . . . . . . . . . . . . . . . . . . . .11 Use and Control Before Use / Control panel . . . . . . . . . . . . . . . . . . . . . . . . . . . . . . . . . . . . . . . . . . . . . . . . . .
Starting the appliance ¥ The temperature regulator is located at the top of the appliance on the control panel. It is also the ON/OFF switch. ¥ A coin is required to turn the temperature regulator. ¥ Insert the plug into the wall socket and turn the thermostat knob clockwise beyond position ÇOÈ (OFF). ¥ The interior lighting comes on. The compressor starts and then runs automatically. To switch off the appliance, turn the temperature regulator to position ÇOÈ.
the appliance is fully loaded, the compressor may run continuously, causing frost or ice to form on the evaporator. If this happens, turn the knob to a warmer setting (lower numbers) to allow automatic defrosting and so a saving in electricity consumption. ¥ Do not place warm foods inside the appliance. Allow warm foods to cool first. ¥ Put frozen food in the fridge to defrost. The cold in the frozen food will then be used to cool the fridge.
Maintenance Unplug the appliance before carrying out any maintenance operation. Warning This appliance contains hydrocarbons in its cooling unit maintenance and recharging must therefore only be carried out by authorised technicians. Defrosting Refrigerator compartment ¥ Defrosting the refrigerator compartment is automatic. The defrost water drains out through a trough into a container at the back of the appliance, above the motor compressor, where it evaporates.
Something not Working Problems may be due to causes which can easily be solved before calling the Technical Service. Please follow these instructions: SYMPTOM SOLUTION Door does not close Weight surpasses the storage limit of the door shelf so spread weight more evenly or take some products out. The appliance is not properly installed. Please look in the ÒBuilding-inÓ section. It is too warm inside the refrigerator Set a lower temperature.
Installation Take utmost care when handling your appliance so as not to cause any damages to the cooling unit with consequent possible fluid leakages. ¥ During normal operation, the condenser and compressor at the back of the appliance heat up considerably. Always ensure that there is adequate ventilation as a failure to do this will result in component failure and possible food loss. See installation instructions.
Building-in See ãInstallation InstructionsÒ supplied. Please check whether, after installing your appliance and especially after rehingeing the door, the door seal seals right round. An untight door seal may lead to heavy frosting and thereby to a higher power consumption. Warning! If the ambient temperature is cold (i.e. in Winter), the gasket may not fit perfectly to the cabinet.
Comment lire votre notice dÕemploi Les symboles ci-dessous vous guideront au long de la lecture de votre notice: F Instructions liées à la sécurité lors de l’utilisation de l’appareil. Conseils pour une utilisation correcte de l’appareil afin d’obtenir les meilleures performances. Informations liées à la protection de l’environnement. Avertissements importants Ce sont des avertissements de sŽcuritŽ. Nous vous prions donc de les lire attentivement avant dÕinstaller et dÕutiliser votre appareil.
Sommaire Avertissements importants . . . . . . . . . . . . . . . . . . . . . . . . . . . . . . . . . . . . . . . . . . . . . . . . . . . . . . . . . . . . . . .18 Elimination . . . . . . . . . . . . . . . . . . . . . . . . . . . . . . . . . . . . . . . . . . . . . . . . . . . . . . . . . . . . . . . . . . . . . . . . . . . .19 Utilisation Avant la mise en service / Bandeau de commande . . . . . . . . . . . . . . . . . . . . . . . . . . . . . . . . . . .
Compartiment rŽfrigŽrateur Mise en service ¥ Le thermostat se trouve en haut sur le bandeau de commande de l'appareil. Il sert en m•me temps d'interrupteur MARCHE/ARRET. ¥ Une pi•ce de monnaie est nŽcessaire pour tourner le thermostat. ¥ Branchez la prise de courant et ouvrez la porte. Tournez le bouton du thermostat dans le sens des aiguilles d'une montre au-delˆ de la position ÇOÈ (arr•t). ¥ L'appareil est ainsi en Žtat de fonctionnement.
ŽlevŽe et que l'appareil est plein, il est possible que le compresseur fonctionne en rŽgime continu. Dans ce cas, il y a un risque de formation excessive de givre sur la paroi postŽrieure ˆ l'intŽrieur de l'appareil. Pour Žviter cet inconvŽnient, placez le thermostat sur une position moins ŽlevŽe, de fa•on ˆ permettre un dŽgivrage automatique et, par consŽquent, des Žconomies de courant. ¥ Ne placez pas dÕaliments chauds dans lÕappareil. Attendez que les aliments refroidissent.
Entretien DŽbranchez opŽration. lÕappareil avant toute correspond ˆ lÕouverture de vidange, et retirez le bouchon, comme lÕillustre la figure; Attention Cet appareil contient des hydrocarbures dans son circuit rŽfrigŽrant; lÕentretien et la recharge ne doivent donc •tre effectuŽs que par du personnel qualifiŽ. DŽgivrage Compartiment rŽfrigŽrateur ¥ Le dŽgivrage s'effectue automatiquement, ˆ chaque arr•t du compresseur.
Changement de l'ampoule ¥ Avant de remplacer lÕampoule, mettez ˆ lÕarr•t lÕappareil et dŽbranchez-le. L'ampoule d'Žclairage dans le compartiment rŽfrigŽrateur est accessible en effectuant les opŽrations ci-dessous: 1. DŽvissez la vis de fixation du plafonnier. 2. DŽcrochez la partie mobile en exer•ant une pression sur celle-ci comme indiquŽ dans la figure. 3. Mettez une autre ampoule qui ait la m•me puissance. Si quelque chose ne va pas ...
CaractŽristiques Techniques Les donnŽes techniques figurent sur la plaque signalŽtique situŽe sur le c™te gauche ˆ lÕintŽrieur de lÕappareil. En cas de coupure de courant abstenez-vous dÕouvrir la porte. Si lÕinterruption est de courte durŽe (jusquÕˆ 12 heures) et si le congŽlateur est rempli, il nÕy a aucun risque dÕaltŽration pour les aliments.
Branchement Žlectrique Contr™lez, avant de brancher l'appareil, si le voltage et la frŽquence indiquŽs sur la plaque signalŽtique correspondent ˆ ceux de votre rŽseau. TolŽrance admise: 6% en plus ou en moins. Pour l'adaptation de l'appareil ˆ des voltages diffŽrents, l'adjonction d'un autotransformateur d'une puissance adŽquate est indispensable. Important VŽrifiez si la prise de courant murale est en bon Žtat et apte ˆ recevoir la fiche du cordon d'alimentation du congŽlateur.
Aanwijzing voor het gebruik van het instructieboekje N Met de waarschuwingsdriehoek en/of door signaalwoorden wordt de aandacht gevestigd op aanwijzingen die belangrijk zijn voor uw veiligheid of voor het juist functioneren van het apparaat. Na dit symbool wordt uitleg gegeven over de bediening en het praktisch gebruik van het apparaat. Tips en aanwijzingen voor een economisch en milieuvriendelijk gebruik van het apparaat.
¥ ¥ ¥ ¥ mogen, om gezondheidsredenen, niet wederom ingevroren worden. De vriezende binnenwanden of -vlakken in het apparaat bevatten koelmiddel. Plaats geen scherpe voorwerpen tegen zoÕn wand of vlak en schraap evenmin met metalen voorwerpen rijp of ijs af. Lekkage kan het gevolg zijn, hetgeen een onherstelbare schade aan het apparaat en bederf van de levensmiddelen veroorzaakt. Geen voorwerpen of methodes gebruiken om het ontdooiproces te versnellen die niet door de fabrikant zijn aangegeven.
Gebruik Voor ingebruikname Wacht, na het plaatsen van het apparaat, ten minste twee uuren alvorens de stekker in het stopcontact te steken. Daarmee geeft u de olie de gelegenheid in de compressor terug te vloeien. ¥ Voor u de kast in gebruik neemt, dient u de binnenkant met lauw water en een neutraal schoonmaakmiddel te reinigen om de typische geur van een nieuw apparaat weg te nemen. Droog vervolgens de wanden goed af.
Deurvakken Koelen ¥ De ruimte tussen de centraal deurvakken kan naar behoefte aangepast worden. ¥ Trek het vak geleidelijk naar de door de pijlen aangegeven richting totdat het loskomt. ¥ Verplaats daarna het vak naar de gewenste hoogte. ¥ Plaats geen warme of dampende spijzen of dranken in de koelruimte. ¥ Dek vooral sterk geurend voedsel af of verpak het. ¥ Plaats de levensmiddelen zo, dat de lucht vrij eromheen kan circuleren.
Tips Invriezen en bewaren ¥ Verdeel de levensmiddelen in handzame porties . Deze vriezen sneller in en bij later gebruik hoeft u slechts de benodigde hoeveelheid te ontdooien. ¥ Verpak de levensmiddelen in aluminium- of kunststoffolie. Sluit de pakjes goed en luchtdicht af. ¥ Zorg ervoor dat in te vriezen pakjes niet in aanraking komen met reeds ingevroren producten; de temperatuur van deze laatste zou daardoor kunnen stijgen.
Schoonmaken Vervangen van de lamp Geen schurende schoonmaakmiddelen gebruiken. Nooit metalen voorwerpen gebruiken om het apparaat schoon te maken; dit zou het apparaat kunnen beschadigen. Naar behoefte kunt u de buitenkant van de kast lappen met lauwwarm water en een neutraal huishoudschoonmaakmiddel, daarna afnemen met schoon water. Het verdient aanbeveling de buitenkant af en toe in de witte (auto-) was te zetten.
Technische gegevens Het typeplaatje met de technische gegevens vindt u aan de linker binnenzijde van het apparaat. Open de vriesvakdeur niet tijdens stroomuitval. Wij adviseren u om na een stroomuitval de diepvriesproducten in korte tijd te consumeren (een temperatuurstijging verkort de houdbaarheidsduur van de producten). De normale houdbaarheid wordt niet aangetast indien de stroomuitval kort was (minder dan 12 uur) en het vriesvak vol is.
Dit apparaat voldoet aan de volgende EU-richtlijnen: - 73/23 EG-richtlijn van 19/02/73 (Laagspanning) en opeenvolgende wijzigingen; - 87/308 EG-richtlijn van 2.6.87 met betrekking tot de radio-ontstoring; - 89/336 EG-richtlijn van 03/05/89 (Elektromagnetische compatibiliteit) en opeenvolgende wijzigingen. Attentie Het apparaat moet van de stroomvoorziening afgesloten kunnen worden; de stekker moet dus ook na de installatie bereikbaar blijven. Inbouw Zie meegeleverde montage-aanwijzing.
Guida allÕuso del libretto istruzioni I seguenti simboli guideranno nella lettura del libretto: I Informazioni legate alla sicurezza nellÕuso dellÕapparecchiatura Consigli per lÕuso corretto dellÕapparecchiatura e per ottenerne le migliori prestazioni Informazioni legate alla protezione dellÕambiente Sicurezza Vi preghiamo di leggere attentamente queste istruzioni prima dÕinstallare e utilizzare lÕapparecchiatura. Queste avvertenze sono state redatte per la Vostra sicurezza e per quella degli altri.
Indice Sicurezza . . . . . . . . . . . . . . . . . . . . . . . . . . . . . . . . . . . . . . . . . . . . . . . . . . . . . . . . . . . . . . . . . . . . . . . . . . . . . .34 Smaltimento . . . . . . . . . . . . . . . . . . . . . . . . . . . . . . . . . . . . . . . . . . . . . . . . . . . . . . . . . . . . . . . . . . . . . . . . . . .35 Uso Prima della messa in funzione / Pannello di comando . . . . . . . . . . . . . . . . . . . . . . . . . . . . . . . . . . . . . . .
Messa in funzione ¥ Il termostato • installato in alto sul pannello di comando dellÕapparecchio e funge contemporaneamente da tasto ON/OFF. ¥ Per girare la manopola del termostato • necessario utilizzare una moneta. ¥ Inserire la spina nella presa di corrente e ruotare in senso orario la manopola del termostato oltre la posizione di arresto ÇOÈ. ¥ Selezionare la posizione del termostato in funzione del freddo desiderato.
nellÕapparecchio, bens“ lasciare che prima si raffreddino. ¥ Sulle posizioni di massimo freddo, con temperatura ambiente elevata, ed una notevole quantitˆ di alimenti, il funzionamento pu˜ essere continuo, con formazione di brina o ghiaccio sulla parete posteriore della cella In tal caso • necessario ruotare la manopola su una posizione di minor freddo, in modo da consentire lo sbrinamento automatico e, di conseguenza, un minor consumo di energia elettrica.
¥ Non aprire troppo frequentemente la porta del vano congelatore e non lasciarla aperta pi• del necessario. ¥ Una volta scongelati, gli alimenti si deteriorano in breve tempo e non possono venir ricongelati. Manutenzione Staccare la spina dalla presa di corrente prima di eseguire qualsiasi operazione. Attenzione Questa apparecchiatura contiene idrocarburi nel circuito refrigerante; pertanto la manutenzione e la ricarica devono essere effettuate esclusivamente da personale autorizzato dall’azienda.
Pulizia Sostituzione della lampadina Si raccomanda di non impiegare utensili metallici per pulire onde evitare gravi danni all'apparecchio. Non impiegare mai delle sostanze detergenti graffianti. Non utilizzare prodotti spray per lo sbrinamento, poichŽ possono nuocere alla salute e/o contenere sostanze dannose per i materiali plastici. ¥ Pulire l'interno con acqua tiepida e bicarbonato di soda. Risciacquare e asciugare accuratamente.
Assistenza tecnica e ricambi Dopo le verifiche di cui sopra, se la disfunzione dovesse permanere, • bene consultare la Vostra cartolina di garanzia e chiamare il Centro di Assistenza Tecnica pi• vicino. Per un sollecito intervento • importante, all'atto della chiamata, indicare il tipo di difetto e provvedere sempre le seguenti informazioni relative allÕapparecchiatura: ¥ Modello ¥ Prod. No. (PNC) ¥ Ser. No. (S-No.
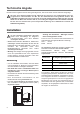
La tabella successiva mostra quali temperature ambientali sono state assegnate alla classificazione climatica: Classificazione climatica per temperature ambientali di SN da +10 fino a +32¡C N da +16 fino a +32¡C ST da +18 fino a +38¡C T da +18 fino a +43¡C Quando la temperatura ambiente non rientra nelle fasce indicate per le classi dellÕapparecchiatura, la temperatura di conservazione allÕinterno dellÕapparecchiatura stessa non • garantita.
Como leer estas instrucciones de servicio Indicaciones importantes para su seguridad personal y para la capacidad funcional del aparato frigor’fico. E Informaciones adicionales para el manejo y la aplicaci—n pr‡ctica del aparato frigor’fico. Informaciones para la aplicaci—n rentable y ecol—gica del aparato frigor’fico. Seguridad Es muy importante conservar este libro de instrucciones junto al aparato por si fuera necesario consultarlo.
Indice Seguridad . . . . . . . . . . . . . . . . . . . . . . . . . . . . . . . . . . . . . . . . . . . . . . . . . . . . . . . . . . . . . . . . . . . . . . . . . . . . .42 Eliminaci—n . . . . . . . . . . . . . . . . . . . . . . . . . . . . . . . . . . . . . . . . . . . . . . . . . . . . . . . . . . . . . . . . . . . . . . . . . . . .43 Uso Antes de la puesta en servicio / Panel de mando . . . . . . . . . . . . . . . . . . . . . . . . . . . . . . . . . . . . . . . . . .
Puesta en marcha ¥ El regulador de temperaturas se encuentra en el panel de mando en la parte superior del aparato y es al mismo tiempo el interruptor ON/OFF. ¥ Para girar el regulador de temperaturas hay que aplicar una moneda. ¥ Introducir el enchufe en la toma de corriente. Girar el mando del termostato en sentido horario hasta una posici—n distinta de la posici—n ÇOÈ (parada). ¥ El aparato se pone en marche. El funcionamiento del aparato se interrumpe al girar el mando en la posic’on ÇOÈ (parada).
¥ ¥ ¥ ¥ y una gran cantidad de alimentos, el funcionamento puede ser continuo, con consiguiente formaci—n de escarcha en la parte posterior del compartimiento; en tal caso es necesario girar el mando a una posici—n de menor fr’o, a fin de consentir la eliminac’on autom‡tica de la escarcha y, como consecuencia, obtener un consumo menor de energ’a elŽctrica. Dejar la puerta abierta solamente el tiempo requerido. No colocar platos calientes en el aparato frigor’fico. Antes hay que dejarlos enfriar.
¥ No consumir nunca los cubitos de hielo reciŽn sacados del congelador ya que podr’an provocar quemaduras de fr’o. ¥ Es aconsejable indicar en cada confecci—n, la fecha de congelaci—n para poder controlar el tiempo de conservaci—n. ¥ El transporte desde la compra a la colocaci—n en el compartimento debe ser breve. ¥ No introducir en el congelador bebidas gaseosas, ya que pueden explotar. ¥ Una vez descongelados los alimentos se deterioran en breve tiempo y no pueden ser congelados nuevamente.
Limpieza L‡mpara de iluminaci—n No emplear detergentes abrasivos. No utilizar nunca objectos met‡licos para limpiar el aparato porque podr’a ser da–ado. Limpiar el interior con agua templada y bicarbonato y las partes exteriores esmaltadas. Enjuagar y secar cuidadosamente. ¥ Hay que desconectar el aparato y desenchufarlo antes de efectuar el cambio de bombilla. 1. Desatornillar el tornillo de fijaci—n del cubrel‡mpara. 2.
Caracteristicas tŽcnicas Los datos tŽcnicos se indican en la placa de serie situada en el lado izquierdo dentro del aparato. En caso de falta de corriente, los alimentos en el congelador no sufrir‡n alteraciones si la interrupci—n tiene una breve duraci—n (12 horas) y si el congelador estar‡ lleno. En todo caso, no abrir la puerta. En el caso de que los alimentos empezaran a descongelarse, ser‡ necesario consumirlos rapidamente.
Importante Es indispensable conectar el aparato a una toma de tierra eficaz. El enchufe del cable de alimentaci—n est‡ dotado de un adecuado contacto. Si la toma de corriente de la instalaci—n domŽstica no estuviera conectada a tierra, conectar el aparato a una instalaci—n de tierra, conforme a las leyes en vigor, consultar con un tŽcnico especializado. El fabricante declina toda responsabilidad en el caso que esta norma no sea respetada.
KÜPPERSBUSCH HAUSGERÄTE AG Postfach 10 01 32, D-45801 Gelsenkirchen, Küppersbuschstr. 16, D-45883 Gelsenkirchen Telefon: (02 09) 4 01-0, Telefax: (02 09) 4 01-3 03 www.kueppersbusch.de Küppersbusch Ges. m. b. H. Eitnergasse 13, 1231 Wien, Telefon: 01 / 8 66 80-0, Telefax: 01 / 8 66 80 72 www.kueppersbusch.at · e-Mail: verkauf@kueppersbusch.