SMART The Ultimate 2-in-1 Tablet for Students User manual
Table of Content Content -------------------------------------------------------------------------------------- 2 Features & Functionality-------------------------------------------------------------------- 2 Safety Precautions-------------------------------------------------------------------------- 3 Listening Cautions--------------------------------------------------------------------------- 5 Basic Connections--------------------------------------------------------------------------- 6 First Setup -----
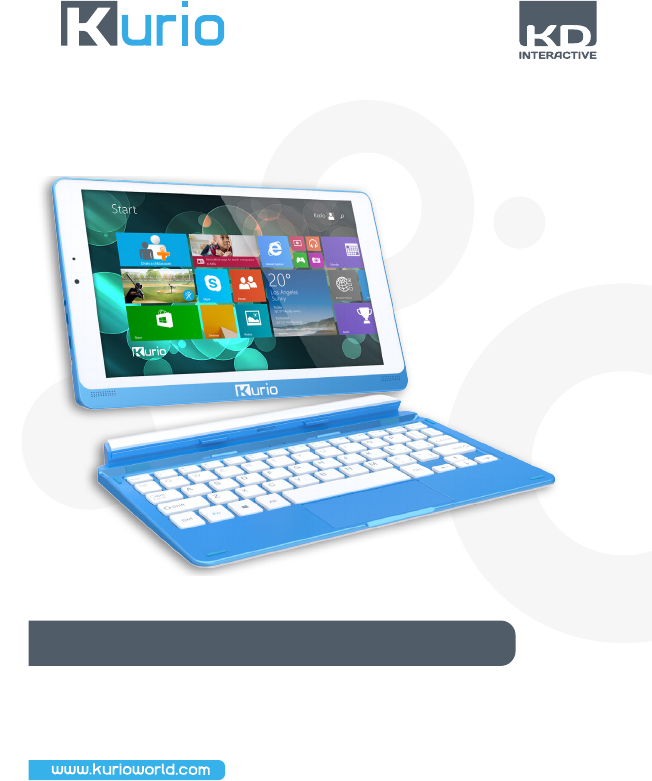
CONTENT When you get your tablet, be sure to check the following items are enclosed: • Main Unit • Keyboard • AC Adaptor • User Manual Features & Functionality FEATURE 1. Power button 2. Volume+/- buttons 3. Windows button 4. Microphone 5. Micro SD card slot 6. Charging port 7. Micro HDMI port 8. Micro USB port 9. Audio port (3.5 mm) FUNCTIONALITY Press and hold to turn the tablet on or off. Press to turn the display on or off. Press to increase/decrease volume. Press to open the Windows Start screen.
10. Charging indicator 11. Front-facing camera 12. Speaker 13. Sustaining port (female) 14. Pogo pin connector (female) 15. Rear camera Indicates the battery-charge status. Capture a front view picture or record videos. Use while making video calls. Provides audio output. Fix and sustain the connection to external keyboard Connect external keyboard Capture pictures or videos Note: 1. The Micro USB port does not support connecting to a computer. 2.
• Do not expose the device to extreme temperatures. • The user shall be solely responsible for any damages or lost data caused by misuse, malfunction, modification. • Do not attempt to disassemble, repair, replace the batteries or modify the product. This will invalidate the warranty. There is a danger of explosion if the battery is replaced incorrectly. • If the device is not to be used for an extended period of time, charge the battery at least once per month as to maintain battery life.
- To reduce the risk of electric shock, do not remove the cover (or back) as there are no user-serviceable parts inside. Refer servicing to qualified personnel. - The exclamation point within an equilateral triangle is intended to alert the user to the presence of important operating and maintenance instructions in the literature accompanying the device. Correct Disposal of this product. This marking indicates that this pro duct should not be disposed of with other household waste in the EU.
Basic Connections Charging the tablet Note: If using the tablet for the first time, or after a long period of idle time, charge the battery for more than half an hour before turning it on, to ensure system stability. The tablet has a built-in Lithium-Polymer rechargeable battery. Charge the device when the battery level is low. 1. Plug the power adapter into the DC-In socket. 2. Connect the power adapter to an electrical outlet and charge the tablet until the battery is fully charged. Caution: 1.
Create a child account Why creating a child account? Have peace of mind by controlling what your child can access on the device. You can the select additional limits and permissions you would like your child to have, and interpret the activity reports you get about the use of this device with confidence. The parental control is powered by Microsoft Family Safety. If you ever wonder what your child is up to on the device and online, Family Safety can help.
Parental Control Settings (Family Safety) By monitoring your child’s accounts with Family Safety, you get a better sense of whether they’re finishing their homework or spending too much time online. This info can help you set specific tablet activity limits for each child, including when they’re allowed to use the tablet, which games and apps they can use, and which apps they can see or download in the Windows Store. You can set and manage all these limits on the web, from anywhere.
- Press the Curfew tab, make sure that curfew hours are turned on, and then select blocks of time for each day when the child isn’t allowed to use the device at all. Set limits on the websites your child can visit There are two ways to limit the Internet content your child is allowed to view. You can use web filtering to set broad categories of sites that your child can visit.
• To use Windows Store and game rating levels 1. Press Game restrictions, and then press Rating. 2. Make sure that restrictions are turned on, and then use the slider to choose a rating level. You can also use a different game rating system if you prefer. The Windows Store bases its download restrictions on a child’s game restrictions in Family Safety. • To allow or block specific games 1. Press Game restrictions, and then press Game list. Make sure that game restrictions are turned on. 2.
2. Swipe-up your finger from the bottom of the display to switch to the login screen, and then enter password to log in to Windows. When the Windows Start screen is displayed, the tablet is ready for use. Note: If the login screen is not enabled in Windows 8.1, you will be taken directly from the lock screen to the Start screen. Turning Off the Tablet You can turn off the tablet in two ways: • Using the Power button: 1. Press and hold the Power button for at least 4 seconds. 2.
Removing a Micro SD card Caution: Removing the Micro SD card while it is in use may cause data loss or result in application errors. Make sure all save operations to the Micro SD card are complete before removing the Micro SD card. 1. Touch the Desktop tile to enter Desktop mode. 2. Touch Safely Remove Hardware in the notification area at the bottom-right corner of the screen. Note: If you do not see Safely Remove Hardware, touch Show Hidden Icons to display all icons in the notification area. 3.
Connecting the Keyboard Overview 1. Latch-connects to the sustaining slot of the tablet; 2. Pogo connector-connects to Pogo pin connector on the tablet. 3. Power indicator 4. Capital Lock indictor 5. Touch pad Connection For the sake of user convenience, this device is designed to be equipped with a dedicated keyboard. Follow these steps to connect the keyboard to your tablet: 1. Place the dedicated keyboard on an even and stable surface (e.g. desk); 2.
Note: 1.This keyboard is a plug-and-play device; you can connect/disconnect it anytime. 2. There is a white LED on the keyboard that lights on when the connection with the tablet is properly done. 4. Since the keyboard is powered by the tablet, it has no internal built-in battery. Basic Operation Wi-Fi Setting • Turning On/Off Wi-Fi: 1. Swipe-in from the right edge of the display to access Charms. 2. Touch Settings → Network icon . 3. Swipe Wi-Fi icon left or right to turn Wi-Fi on or off.
Drag 1. Touch and hold your finger on an item on the screen. 2. Keeping your finger in contact with the display, move your fingertip to the desired location. 3. Take your finger off the display to drop the item in the desired location. Move items such as images and icons on the screen. Swipe or Slide Move your finger in a vertical or horizontal direction on the display. Scroll through the Start screen, web pages, lists, entries, photos, contacts, and so on.
Windows 8.1 Start Screen The Windows 8.1 Start screen displays a list of default and custom Live Tiles, which act as shortcuts to Mail, Windows Explorer, Weather app, Calendar, Windows Store, Internet Explorer, and other installed apps. Live Tiles on your Start screen change and update in real time to show news and sports updates, weather updates, social-networking feeds, etc.
If you are at the Start screen, pressing the Start icon recently used app or most recently viewed screen. Note: The functionality of the Start icon takes you to the most is same as Windows button. Swipe left 1. Swipe-in from the right edge of the display to show the charms. Charms provide access to the system commands, such as Start, Search, Share, Devices, and Settings options. 2. From the Start screen, swiping left until you reach the end of the tile view will bring up the Apps icon.
1. On the tablet, access Charms and click Settings → Change PC Settings → Accounts → Your account → Connect to a Microsoft Account to switch your computer local account to your Microsoft account. 2. Click Settings → Change PC Settings → OneDrive → Sync settings to see the options for synchronizing your data and settings. Copy music, photos, videos, and data 1.
Refreshing your tablet Refreshing your tablet will restore Windows to original factory settings without deleting any of your personal files, installed apps from Windows Store, or personalization settings. • To restore your tablet: 1. Swipe-in from the right edge of the display to access Charms. 2. Touch Settings → Change PC settings → Update and recovery → Recovery. 3. Touch Get started under Refresh your PC without affecting your files. 4. Read the warning and touch Next after you read the warning.
If the tech support team is unable to solve the issue, they will provide instructions regarding how to have your Kurio serviced if it is under warranty. Find more tips and information at WWW.KURIOWORLD.COM Frequently Asked Questions (FAQ) QUESTIONS ANSWERS 1. Why the battery does not charge? What to do? There are 3 main reasons for this problem: bad connection, improper temperature condition, damaged battery or adapter. To check for bad connection: 1. Check all connectors to ensure proper connectivity.
3. Tablet is connected to the power adapter for charging, but still fails to turn on. Why? If the tablet has been idle for a long period of time, or has just been purchased and used for the first time, its battery might be completely discharged. In this case it is suggested that user should charge the battery for over half an hour before turning it on, so as to guarantee the stability of the system. 4. Tablet does not turn on, what to do? It may be because the battery is completely discharged.
10. The device crashes, or the screen turns blue after startup. What can I do? It may be because the system of the tablet has been damaged to some extent for improper shutdown actions. When shutdown, press and hold the Power and Vol- button together to reboot the device and enter Recovery mode, so as to repair or reset the system. After entering Recovery mode, user will have to choose an option from the menu before going on: • Continue – Exit without doing anything and continue to Windows 8.1 system.
Major Specifications ITEM DESCRIPTIONS CPU Intel® BayTrail™-T CR, Quad core/1.8GHz (Z3735G) Operation system Windows 8.1 DDR 1GB Internal Memory EMMC: 32GB Expandable Memory Micro SD card: up to 64 GB Interfaces USB 2.0 high speed /Micro SD (compatible SDHC, up to 64GB) card 3.5mm Earphone Connection Agreement Wi-Fi (802.11 b/g/n); BT4.0 Front Webcam Front camera, 0.3 Mega Pixels; Rear camera, 2.0 Mega Pixels Bluetooth Support Display Resolution,1280*800 Pixels, 8.
Exposure to Radio Frequency Energy Warning: Changes or modifications to this unit not expressly approved by the party responsible for compliance could void the user’s authority to operate the equipment. NOTE: This equipment has been tested and found to comply with the limits for a Class B digital device, pursuant to Part 15 of the FCC Rules. These limits are designed to provide reasonable protection against harmful interference in a residential installation.
Restricted Use of Electronic Devices «The use of electronic/electric devices may interfere with safe operation of some aircraft and can be restricted with some airline companies. Please check with your airline company before traveling. Kurio Smart has an Airplane Mode. Please go into the Networks Settings of the Windows Interface to switch the device into Airplane Mode. All wireless connections will be turned off.
Copyrights © Magma Mobile. All right reserved. Copyright © 2014, Nordcurrent. © Pixowl, Inc. Copryright © 2014 Toon Goggles, Inc. © 2012-2014 Fingersoft. Copyright © 2013-2015 KD Productions™. All rights reserved. KD GROUP™, KD™, KD INTERACTIVE™, KURIO™, KD PRODUCTIONS™, the KD™ logo, the names, the graphics, the musics and brands mentioned on this product are registered trademarks of KD GROUP™, © Breakfirst. © ELESAPIENS Learning & Fun, S.L. All rights reserved. © Junior Explorers Inc. All Rights Reserved.
Declaration of Conformity Kidz Delight, Ltd. 1431 Opus Place Suite 110 Downers Grove Illinois IL 60515 United States of America Product: Kurio Smart Model: C15200 This device complies with Part 15 of the FCC Rules. Operation is subject to the following two conditions: (1) this device may not cause harmful interference, and (2) this device must accept any interference received, including interference that may cause undesired operation.
Imported by: Kidz Delight, Ltd.