
Specifications


Tutorial: Song Mode
13-9
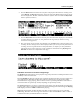
5. Set times for the Time In and Time Out fields to select the time to fix. For this example we will fix
bar 3 (see below.)
Note:Ifyouneedtofixasectionwhichisn’texactlywithinonebaroranevendivisionofbeats,
usethefollowingmethodtofindyourTime In and Time Out points:Usethebigtimelocation
numbersonthetopofthepagetofindatimewherethe
firstnotesplayed(whenyoupressplay/
pause)arethenotesthatyouwishtoreplace.EnterthislocationintheTimeInfield.Next,use
thebigtimelocationnumbersonthetopofthepagetofindatimewherethefirstnotesplayed
(whenyoupressplay/pause)
arethefirstnotesthatyouwishtokeepafterthenotesthatyou
wishtoreplace.EnterthislocationintheTimeOutfield.
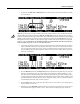
6. Use the big time location numbers on the top of the page and set a time before the area you want to
replace. This will be where you start playback of the song in order to re-record the desired section.
Leave enough time (usually a bar or two) so that you will have time to prepare before the section
you are replacing plays. For this example we will set our start time to 1 :1 :0, because it is two bars
before bar 3 (see below.)
7. Press the Record button, then the Play/Pause button located on the front panel. Play your new part
when the song reaches the part you want to replace. This technique is called “punching in.” You
will often get more natural sounding results if you play along with the song before the part that you
are fixing. Doing this allows you to match your performance style (loudness, timing, phrasing) with
what has already been recorded. Because of your settings in steps 4, 5 and 6, no extra notes will be
recorded outside of the time that you want to replace.
8. Press the Stop button when you are done. You will be able to review and save your changes just as
in Step 4 of Part 3 (see above.)
9. Remember to set the RecMode parameter back to Linear when you are done if you wish to record
in the standard way again (as in Part 3, above.) This is done on the Big Time page (see below.)