
User's Manual


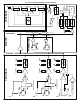

CONTROLS & FUNCTIONS OVERVIEW
INPUT SECTION:
This is where you may plug in microphones, instruments, keyboards, drum machines and other audio devices, adjust the
volume, bass and treble.
1. MIC Inputs: These XLR inputs are designed for low-impedance microphones or equipment that has a mic-level,
balanced output (often called a Direct Out). Note: These inputs receive 15-volt phantom power. This is used to provide
power to condenser microphones. Phantom power will not damage any dynamic or non-condenser microphone.
2. LINE Inputs: These ¼-inch inputs may be used to connect high-impedance microphones or keyboards, drum
machines and other audio devices.
3. AUX IN: Use this stereo input to connect an external audio device such as an MP3, CD player or computer for playback.
Note: Right and Left channels are summed to mono on this input.
4. Volume: Use these controls to adjust the volume level of each channel and the relative balance between them.
5. Low: Determines the emphasis of bass frequencies. Turning this knob clockwise creates a deeper, warmer tone. If you
need a brighter sound, reduce the bass by turning counterclockwise.
6. High: Turned clockwise, this control accents treble frequencies to produce clearer, crisper sound. Turn counterclockwise
to make the sound softer and less bright.
7. Bluetooth LED: Indicates that a Bluetooth equipped device has successfully paired with the PW100BT.
8. Master Volume: Controls the overall volume of all channels and input on POWERLINK
Note: Does not affect POWERLINK Output level.
9. POWERLINK IN: This balanced XLR Jack accepts the POWERLINK output from another PW100BT using a standard
mic cable. Channels from both PW100BT’s are summed together. Use the channel volume controls to get the mix of the
6 channels (If a channel is not used turn the volume all the way down). MASTER volume controls the loudness of the mix
through its PW100BT. It does not affect volume of a linked PW100BT.
Note: The shield connection (pin 1) on this jack is connected to chassis ground. It is not lifted.
10. POWERLINK OUT: This balanced XLR Jack accepts the POWERLINK input from another PW100BT using a standard
mic cable. Channels from both PW100BT’s are summed together. Use the channel volume controls to get the mix of the
6 channels (If a channel is not used turn the volume all the way down). MASTER volume controls the loudness of the mix
through its PW100BT. It does not affect volume of linked PW100BT. This jack may also be used to connect the PW100BT
to a power amp with a balanced line input.
Note: The shield connection (pin 1) on this jack does not connect to chassis ground. It is lifted.
11. Subwoofer Out: The PW100BT subwoofer output jack sends a line level unbalanced low frequency signal crossed
over at 150Hz to a powered subwoofer. It will also work with any powered subwoofer that accepts a line level input. A
crossover that rolls off the frequencies below 150Hz through the PW100BT’s speakers is activated when using this jack
with a standard ¼” mono (tip/Sleeve) SHIELDED instrument cable. When Subwoofer jack is not used, this crossover is
bypassed and PW100BT speakers are full range. Note: It is recommended to connect subwoofer using a standard ¼”
mono (tip/sleeve) SHIELDED instrument cable because the sleeve connection to ground activates crossover on PW100BT
speakers. When possible, plug AC cable on PW100BT and Subwoofer into same outlet or power strip. This will prevent
possible ground loop hum through the system.
12. Power Indicator Light: Indicates that the power switch is in the “ON” position.
13. AC Power Cord Receptacle: Insert the PW100BT’s AC cord rmly into the AC receptacle. Be sure to use the cable
provided with your PW100BT. The power cord can be removed for storage or replacement if damaged. Note: Replace the
AC cord if its protective jacket is damaged or ground pin is damaged or removed.
14. Power: This switch activates AC power to the powered PA.