
User Manual

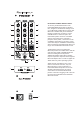
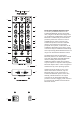
CONTROLS & FUNCTIONS OVERVIEW
1. MIC INPUTS: Connect dynamic and condenser microphones here. These inputs are designed for low-impedance
mics and equipment that has a mic-level, balanced output. 15-volt phantom power is supplied to all MIC Inputs.
2. LINE INPUTS: These ¼-inch inputs may be used to connect high-impedance microphones, keyboards, drum modules,
and other audio devices.
3. LOW: Adjusts bass frequencies (@100Hz) per channel. Turn clockwise to boost, counter-clockwise to cut.
4. HI: Adjusts treble frequencies (@10KHz) per channel. Turn clockwise to boost, counter-clockwise to cut.
5. VOLUME: Adjusts the volume of each channel and is used to control overall volume balance between channels.
6. AUX IN: Use this stereo input to connect an audio device such as an MP3 player, phone, or laptop.
Note: Right and Left channels are summed to mono through this input.
7. BLUETOOTH LED: Lights when a Bluetooth device is successfully paired to PW BT unit.
POWERLINK CIRCUIT: Use to expand your system by linking multiple units.
The shield connection (pin 1) on Powerlink jacks do not connect to chassis ground. Ground connection is lifted.
8. POWERLINK IN: Connect to POWERLINK OUT of any PW Unit using standard XLR (microphone) cable.
Channels of linked unit will be summed and heard through this unit. Turn down unused channels to reduce noise.
MASTER VOLUME controls the overall level of mix heard per unit but does not aect the volume of linked units.
9. POWERLINK OUT: Connect to POWERLINK IN of any PW Unit using standard XLR (microphone) cable.
Channels will be summed and heard through linked unit. Use the channel volume controls to adjust mix
(Turn down unused channels). This jack may also be connected to a power amp’s BALANCED LINE INPUT.
10. SUB OUT: Use this jack for connecting a powered subwoofer. Use a shielded instrument cable to send line-level,
unbalanced signal crossed over at 150Hz. When jack is disconnected, crossover is bypassed and unit operates at
full-range. When possible, plug PA System and Subwoofer AC cables into same outlet or power strip to avoid
ground loop hum.
11. MASTER VOLUME: Master Volume: Controls the overall volume of all channels including audio connected to
POWERLINK IN. Does not aect POWERLINK OUT level.
12. POWERBANK: 5V USB jacks for powering and charging mobile devices.
13. POWER: This switch activates power to the unit. Switch is lit in the “ON” Position.
14. POWER LED INDICATOR: Shows when unit is on.
15. AC POWER CORD RECEPTACLE: Insert the AC cord included with your PW unit here. Insert cord rmly into AC
Power Cord Receptacle. Replace the AC cord if protective jacket or ground pin are damaged or removed.
16. FUSE: The fuse is located in a fuse tray just below the receptacle. Replace only with the same type and size.
For your convenience, a spare fuse is located inside the fuse tray toward the front. To replace fuse, remove AC
power cord. Remove fuse tray by pulling the tab located aboce the fuse symbol away from the receptacle.
17. EFFECT SELECT: Press to select eect type heard through channels 1 and 2. LED lights to indicate current eect.
18. EFFECT LEVEL: Controls level of eect heard on channel. Turn completely counter-clockwise to disable eect.