KUZMA STABI M TURNTABLE (without arm ) S/N……..
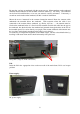
KUZMA LTD INSTRUCTION MANUAL FOR STABI M turntable The Stabi M turntable is a very precisely engineered piece of equipment. However the construction is robust and requires minimal maintenance for optimal performance. Top plate Outer main frame CONTENTS: Page General 3 Tech.
General STABI M is a modern turntable designed in a classic turntable style with the emphasis on providing the best possible record playback. The turntable's size allows even 12 inch tonearms to be mounted and covered with its massive acrylic dust cover on spring hinges. The dust cover is constructed not to pick up any vibration from loud music. The turntable is assembled from various solid parts of aluminium, making the construction rigid and absorbing vibration.
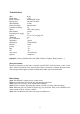
Technical data: Mass Platter mass Platter material Bearing type Shaft diameter Chassis/levelling Turntable levelling Motor Belt material External power supply Speeds Armboard No.
Unpacking The larger crate contains the outer frame with top plate and lid. Unscrew the top screws and remove the inner top foam. Remove side foam around lid first and put it aside. Then remove the wooden floor plate and top foam. Remove the side foam around the turntable and then two people should lift it up and position it on a strong support. The smaller crate contains the platter, subplatter, clamp, power supply, cables, armboard and accessories, Unscrew the top screws and remove the inner top foam.
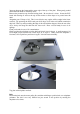
3mm gap between the frame and the outer edge of the top of the plate. When gently pushed down with both hands it will barely move. Remove the protection cup from the bearing shaft. Be sure that it is clean. Locate the PVC bottle with bearing oil and cut the top off the nozzle to allow drops to be poured onto the shaft. Altogether pour 35 drops of oil. This is not critical as any surplus will be caught in the lower reservoir.
Note: Be careful when positioning the platter onto the subplatter if the armboard is already mounted on the top chassis. There is only a small gap. Platter: Position the platter on the subplatter, holding the platter with both hands at the sides. Due to the small gap between the lower edge of the platter and the top of the subchassis, do not hold the platter underneath. Hold it firmly, so it will not slip.
Be sure that you have an armboard with the correct pre-cut. Mount armbase on the armboard and then mount armboard on the turntable with four Allen keys. Fix firmly. The armboard can be fixed in both directions, so be sure you mount it correctly orientated. If necessary a second cut can be made on the armboard, but this is made of aluminium. Mount the arm as instructed in the tonearm instruction manual. Route the tonearm cable underneath the turntable below the armboard.
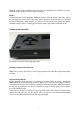
General description: The DC motor controller unit generates a precise sine wave output to control rotation of a three phase frequency controlled DC motor. The signal is generated by a sophisticated computer based program. This allows for smooth generation of the sine wave with very fine choice of speed. Each speed can be selected, finely adjusted independently and then stored in the memory. The PS is factory preset.
Use and adjustments Platter rotation: Ensure that the red LED lights up and the green display shows the selected speed, when the PS DC is switch on. Press the start button. It is normal to hear some crackling sounds made by the belt and this will disappear in a few days. If constant noise is heard, then check the position of the belt on the motor pulley. Platter should reach 33rpm on 3 seconds. Fine speed adjustment: Observe on a strobe disc if the bars are stationary.
It is advisable to put a washer under the LP (thin for thick records and thick for thin records) before screwing the clamp down. Observe the outer edge of the LP. To start with this edge will be above the mat but will slowly lower to touch the mat. Hold the LP so that it does not rotate. If the clamp is screwed too much, the outer edge will begin to rise. Pressure should then be released by slightly unscrewing the clamp until the outer edge is touching the mat again.
Wrong speed: If you find out that your speed selection is way out of range for some reason, you should reset PS to factory set outputs: First check position of the belt. Factory preset: If the speed is totally incorrect: Reset to factory preset and then adjust correct speed on the PS DC by using strobo disc: Turn the power off, wait 10 sec and then press and hold speed button, then press power on. When display will shows CU, release the speed button. The display will now show FA and then 33.