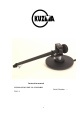
Instruction manual KUZMA STOGI REF 313 TONEARM Serial Number: ….
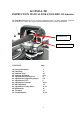
KUZMA LTD INSTRUCTION MANUAL FOR STOGI REF 313 tonearm The Stogi Ref 313 tonearm is very precisely engineered pieces of audio equipment. However the construction is robust and requires minimal maintenance for optimal performance. Azimuth fixing Azimuth adjustment Fig 1. CONTENTS: 1.0. General description 2.0. Unpacking 3.0. Tonearm Setup 4.0. Tonearm adjustment 4.1. Adjustment of tracking force 4.2. Adjustment of tangential geometry 4.3. Adjustment of VTA 4.4. Adjustment of azimuth 4.5.
1.0. General description: The Stogi Ref 313 tonearm has the same basic construction as the Stogi Ref arm. The main difference is that Stogi Ref 313 has q 12 inch ( 313mm) long tonearm tube. The Stogi Ref 313 has a very sophisticated, precise and repeatable azimuth adjustment mechanism with zero play and a very rigid locking mechanism. The main structure, conical tube and headshell are machined from solid aluminum blocks. Our own unique detachable headshell is incorporated.
2.0.0. Unpacking: 2.1.0. Packing list: Tonearm with fingerlift; counterweight; armbase; instruction manual; protractor for cartridge geometry adjustment and a bag containing: Bag: Sets of 3 socket head screws M6x16 mm, M6x20 mm, M6x25 (for Stabi Ref), M6x 30 mm, three washers, three spring washers (wooden armboards) for fixing base.
3.1.2. Armbase mounting: To fix armbase to armboard you will need the correct length of three socket head screws, washers and Alley key 5 mm. Fit washers on screws and insert into underside of tonearm board and up into tonearm base. Position base so that height adjustment (VTA adjustment) screw is at top right position, i. e. 2 o’clock and tighten screws using Allen key. Remember that the screws are of harder material than the armbase (aluminum) so do not over tighten as this could damage the base.
3.3. Setting up the tonearm: 3.3.0. Headshell removal and fixing: This tonearm has a detachable headshell and fixing and positioning it has no negative effect on tonearm performance. The whole headshell is fixed with one Allen key 2 mm. Insert it in the top hole and release screw with Allen key for at least one turn (ACW). (Fig.2&3) Disconnect cartridge pins, remove Allen key and pull out the headshell. (Fig.4) Fix the cartridge and return headshell back into the tube.
3.3.2. Cartridge mounting: You will need Allen key 2 mm plus the two screws and nuts M 2.5 (some cartridges have threads and nuts will not be needed). Mount the cartridge with the appropriate set of 2.5mm screws and check its travel above the record with the cueing device in the “up” position! Starting overhang is achieved, if the needle is in line with the front edge of the headshell. Keeping the stylus guard on the cartridge, insert screws from underneath the cartridge through the slots in the headshell.
4.0. Tonearm adjustments: 4.1. Adjustment of tracking force: 4.1.1. Balance scale: Set up the cartridge tracking force with the balance scale, which must be at record height. Rotate the counterweight towards the tube to increase tracking force. 4.1.2. Manually: Balance tonearm to zero. Then the position of one dot should be noted and taken as zero, (any dot will do, so choose the most easily visible).
points are used when aligning the cartridge. In practice these points lie at 66mm and 121mm from the record centre (see protractor). Other protractors make use of different zero points due to the use of different parameters in calculation. In this case 60mm has been chosen as the inner groove and 146 mm as the outer groove which still has optimum tracking distortion.
If the tonearm is too high the sound tends to be too bright, ie. too aggressive, especially on acoustic strings. Try moving the tonearm up and down in 2mm steps to judge where the arm sounds most balanced with a more precise stereo picture. Fine adjustments can be made in the range of 0.5mm. Now fix height firmly. 4.4. Adjustment of azimuth: Azimuth describes the angle between the record surface and the stylus, viewed from the front of the cartridge.
Significantly improved sound can be obtained by paying attention to azimuth adjustment prior to final VTA adjustment. To make azimuth adjustments, release the two screws locking the mechanism at the centre top of the main tonearm tube, with Allen key 2mm. Under the main tube is a tiny rod with a hexagonal screw. Insert the Allen key 2mm into the screw (it may feel loose), rotate it slightly and it will alter the azimuth. (Fig.1) Rotating it back will bring azimuth to its previous position.
4.6. Cueing device adjustment: Should you find that in the ‘up’ position the cartridge is too high or too low above the record then the cueing device can be raised or lowered. This can be done simply by using Allen key 1.5 mm: Insert key into the screw on the side of the arm rest. Release the screw, raise or lower the device and retighten. Rotation of the cueing device can affect the drift of cartridge while traveling vertically down. The cueing device may lift slightly as the screw is retightened.
6.0. Transport: During transport the tube should be locked in the armrest, secured with tape or wire and the counterweight removed. 6.1. Tonearm with cartridge on turntable: The tonearm can be left on the turntable when being transported short distances by: Placing the tonearm in armrest. Secure the arm to armrest with elastic band or tape. Remove counterweight. Secure movement of subchassis by insertion of wedges.
7.2. Broken bias thread: You will need about 100mm of thin nylon fishing line, Allen key 2.5mm and a sharp knife. You can get bias thread as a spare part from a dealer. Remove counterweight. With Allen key remove the screw at the point where nylon is coming out from the metal part. Note: This does not in any way affect the bearings. At the end of the thread is a small plastic tube to which the thread is attached. Cut away the broken thread and tie and knot new thread around tube.
P: +386 4 25 35 450 F: +386 4 25 35 454 E mail: kuzmaltd@siol.net www.kuzma.