
Control Panel Configuration Installation Guide TracVision M5


11
The switchplate comes preconfigured for a
standard TracVision installation without an
MCP. To configure the switchplate for an MCP
installation, follow these steps to replace the
maintenance port assembly in the switchplate
with the MCP-ready maintenance port assembly
supplied in the kitpack.
NOTE: The MCP-ready maintenance port assembly
moves the DB9 maintenance port to the back of the
switchplate. This allows you to later connect the main
control cable to the back of the switchplate, hidden
from view. However, if you wish, you may skip this
step and simply connect the main control cable to the
DB9 maintenance port on the front of the unmodified
switchplate.
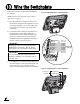
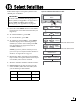
a. Remove and discard the two jack screws
securing the standard maintenance port
assembly to the switchplate (see Figure 21).
Remove and save the standard maintenance
port assembly (see Figure 22).
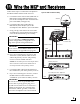
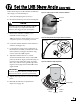
b. Attach the MCP-ready maintenance port
assembly to the switchplate using two #4-24
screws (see Figure 23). These screws simply
replace the jack screws you removed in
Step 9a.
Remove
Jack Screws
Figure 21: Detaching the Standard Maintenance Port Assembly
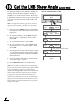
Front View
Standard
Maintenance Port Assembly
Figure 22: Standard Maintenance Port Assembly
Rear View
MCP-ready
Maintenance Port Assembly
Figure 23: MCP-Ready Maintenance Port Assembly
Rear View
Modify the Switchplate (Optional)
9