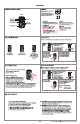
68600-001 = Parts in the box Rev 03 5 uc [Yer eh Coat Zambezi : CONNECT Black mounting Geld mounting Silver mounting plate plate Gold adapter plate Sliver adapter Black adapter | cover : 5 : Smart Lock Conversion Kit Mounting Interior assembly Mounting Interior assembly Mounting Interior assembly plate screws STEWS plate screws.
H Install the mounting plate and test your latch A | Place the mounting plate on the door so that the torque B | Secure the mounting plate with the mounting screws. ‘blade inserts through the canter hole. Battles, Wised, & Welsher To determine which mounting screws to use, test one of the thicker screws first. If the thicker screw fits, continue Installing the thicker screws. If the thicker screw doesn't fit, Install the thinner screws.
B Perform the door handing process This step will teach the lock the orientation of your door and Is crucial for lock operation. A inland AA batteries #8 | Make sure the door Is open. insert the battery pack ‘The Status LED wil flash rad and £3 | Thalami Holt will retract and extend on Its own In the battery pack. Whi DRESSING AND HOLDING the Program hut tan. green, and the lock will beep. fo learn the orientation of the door. Did the.
Reference Guide Thickset Convert at a Glance Switches ‘These features can be adjusted in some smart home apps. Once the associated functions are set by Zambezi, the setting of switches #1,2, edit ana3nolongerafiectthelock operation until factory reset is completed, i 1 Button "A" Button "B” on oft Back panel b 1. Status LED 3. Audio gram button Switches Door lock status LED blinks every 6 Beeping sound is heard during Status LED seconds. ON position is factory default. programming and normal operation.