Installation and User Guide ENGLISH 66070 / 01 Required tools Parts in the box Ruler Latch with rectangular faceplate Drive-in latch Strike Exterior assembly Adapter ring Keys Phillips screwdriver A Additional tools (depending on application) Hammer B Mounting plate Interior assembly G N Q 03809 Interior cover J Strike screws P D Battery pack H Latch screws Wood block C K 46780 F Batteries SmartKey tool L Mounting plate screws R E S M Interior assembly screws Inte
1 Prepare the door and check dimensions If drilling a new door, use the supplied template and the complete door drilling instructions available at www.kwikset.com/doorprep. A Measure to confirm that the hole in the door is either 2-1/8" (54 mm) or 1-1/2" (38 mm). B Measure to confirm that the backset is either 2-3/8" or 2-3/4" (60 or 70 mm).
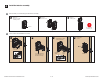
2 A Install the latch and strike B Is the door edge chiseled? YES Hold the latch in front of the door hole, with the latch face flush against the door edge. D Latch “A” NO chiseled or Use latch “A”. If the latch bolt is not already extended, extend the latch bolt as shown. A Which latch are you installing? not chiseled B A Use latch “B”. If the latch bolt is not already extended, extend the latch bolt as shown.
3 A Install the exterior assembly C What is the diameter of the hole in the door? Diameter is 2-1/8" (54 mm) 2-1/8" a Diameter is 1-1/2" (38 mm) or Install exterior assembly and mounting plate. b Cable goes underneath latch. D 1-1/2" 54 mm Support exterior assembly during mounting plate installation. 38 mm “E” is required for installation. Install “E” on “D”. Route cable through center hole, then push cable into bottom hole. “E” is not needed for installation. Discard “E”.
4 A Install the interior assembly Remove battery cover and battery pack from interior assembly. a b Make sure turnpiece is in the vertical position. c Remove interior cover. Remove battery pack. J K H K H vertical Do not install batteries yet. B Connect cables and install interior assembly. a c b Push turnpiece shaft onto torque blade. d Secure with screws. H U (2x) Ensure tight cable connection. align turnpiece shaft Lay excess cable flat inside the bottom of the interior housing.
5 Perform the door handing process This step will teach the lock the orientation of your door and is crucial for lock operation. A C Install 4 AA batteries in the battery pack. After a few seconds, the latch bolt will retract and extend on its own to learn the orientation of the door. This is called the door handing process, and it is crucial to lock operation. L (4x) Once the door handing process is complete, the touchscreen will indicate success or failure: J Ensure correct polarity.
6 Install the interior cover a b Install cover. Install screws. V (3x) K 7 OPTIONAL: Re-key the lock If desired, the lock may be re-keyed to work with your existing key. See the supplied SmartKey Re-key instructions for more information. 8 Download the Premis app and pair your lock to your phone A Download the Premis app from the App Store. B Follow the instructions inside the app to pair your smartphone, manage the settings of your lock, and send user codes to family and friends.
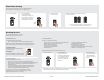
Premis at a Glance Locking and Unlocking With the Premis App Exterior When you are within Bluetooth range of your lock, you can use Siri commands to lock and unlock your door. Make sure your phone is unlocked, and refer to your lock by the name you assigned to it inside the Premis app. You can also tap the symbol of your lock inside the Premis app to lock and unlock the door. If you have an Apple TV (4th generation or later), you can lock and unlock the door when you’re away from home.
Lights and Sound Status LED Colors The Status LED blinks every 6 seconds on lock interior to communicate whether the door is locked or unlocked, or if the batteries are low. The Status LED may be turned off inside the Premis app. Note: During the pairing process, the Status LED will flash red and green, followed by a short beep (if the lock's sound is not muted). Sound The lock beeps during normal use and programming. If desired, you may mute the lock inside the Premis app.
Manual Door Handing If needed, the door handing process can be initiated manually. This is useful if the lock is being moved to a different door. 1 Remove battery pack. 2 Press and HOLD the Program button while reinserting the battery pack. 3 Press the Program button once more. 4 The latch bolt will extend and retract to learn the orientation of the door. Release button once battery pack is installed. The status LED will flash red and green.
Troubleshooting A complete troubleshooting guide is located in the online Premis User Guide at www.kwikset.com/support/guides/premis-user. Important Safeguards • • • • • • • • • • Protect your user codes and mastercode. Familiarize yourself with all warning and caution statements. Remind all family members of safety precautions. Dispose of used batteries according to local laws and regulations. Always have access to your lock’s standard key. Replace low batteries immediately.