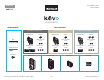
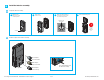
Installation and User Guide ENGLISH 66087 / 01 Required tools Parts in the box Black mounting plate kit Mounting plate Existing key Mounting plate Interior assembly screws Ruler Phillips screwdriver Adapter Gold mounting plate kit Mounting plate screws Interior cover Kevo Support: 1-800-327-5625 • www.kwikset.
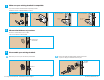
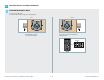
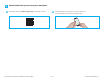
1 Make sure your existing deadbolt is compatible. If you have a standard deadbolt mounted separately from the handle below it, it is compatible with Kevo Convert. Compatible Not Compatible Not Compatible Rim Lock 2 Mortise Lock Not Compatible Integrated Interior Measure the thickness of your door. Measure to confirm that your door is either 1-3/8" or 1-3/4" (35 mm or 44 mm) thick. 1-3/8"or 1-3/4" 35 or 44 mm 3 A Disassemble your existing deadbolt.
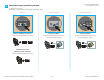
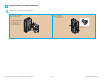
4 For a list of compatible deadbolt models, please see page 11. Determine the parts needed for your door. Look at the hole in your door. What shape is your torque blade (the part sticking out through the latch)? D-shape Slanted rectangle Horizontal rectangle Kwikset and Weiser deadbolts: Schlage deadbolts: Schlage deadbolts: Use the black mounting plate kit for your door. Use the silver mounting plate kit for your door. Use the silver mounting plate kit for your door.
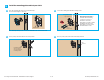
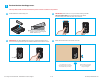
5 A Install the mounting plate and test your latch. B Place the mounting plate on the door so that the torque blade inserts through the center hole. Secure the mounting plate with the mounting screws. Keep parallel to the edge of the door. Black Components Only: To determine which mounting screws to use, test one of the thicker screws first. If the thicker screw fits, continue installing the thicker screws. If the thicker screw doesn't fit, install the thinner screws.
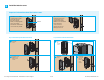
6 A Install the interior assembly. Prepare the interior assembly. a Make sure the turnpiece is in the vertical position. b c Remove the interior cover. Make sure shaft is oriented as shown. If needed, rotate the shaft to this position. d Remove the battery pack. Stripe should be vertical. Do not install batteries yet. vertical B Install the adapter on the interior assembly. Silver adapter: Tab is on bottom. Gold adapter: Keep slot vertical.
! Install the interior assembly (continued). SCHLAGE DEADBOLTS ONLY: Look at your mounting plate. Is your latch bolt to the left or right of your mounting plate? Left Right No adjustment is required. Proceed to the next page. On your interior assembly, flip switch #2 to the top position. Switch #2 n. Kevo Support: 1-800-327-5625 • www.kwikset.com/kevo/support 6 / 13 © 2016 Spectrum Brands, Inc.
6 C Install the interior assembly (continued). Install the interior assembly onto the mounting plate. a b Align the adapter with the torque blade. Secure with two (2) interior assembly screws. Schlage deadbolts only: You may need to rotate the adapter to align with the torque blade. bottom hole Kevo Support: 1-800-327-5625 • www.kwikset.com/kevo/support 7 / 13 © 2016 Spectrum Brands, Inc.
7 Perform the door handing process. This step will teach the lock the orientation of your door and is crucial for lock operation. A B Install 4 AA batteries in the battery pack. IMPORTANT: Make sure the door is open. Insert the battery pack while PRESSING AND HOLDING the Program button. Release the button when the battery pack is all the way inside the lock interior. Ensure correct polarity. For best results, use new, non-rechargeable Alkaline batteries only.
8 A Download the Kevo app and set up your smartphone. Download the Kevo app at kwikset.com/kevo/app or scan the QR code below. Kevo Support: 1-800-327-5625 • www.kwikset.com/kevo/support B 9 / 13 Follow the instructions inside the app to create an account, enroll your first smartphone and send eKeys to family and friends. © 2016 Spectrum Brands, Inc.
9 Install the interior cover. Important information about the interior cover: The interior cover will be secured by three screws to prevent someone from removing the battery or tampering with your lock's settings. If the window is unlocked, it can slide up for more convenient access to programming buttons while the cover is installed. window Note: The interior cover and screws must be removed for battery pack access. The window on the interior cover is locked by default.
Kevo Convert Compatibility Chart Kevo Convert is compatible with the following models: Kwikset Weiser Schlage Model Mounting plate required Screws required Model Mounting plate required Screws required Model Mounting plate required Adapter required 158 Black Thick GDC9471 Black Thin B360N Silver Gold 660 Black Thin GCD9471 Black Thick B560P Silver Silver 660M Black Thin GCD9571 Black Thick B60N Silver Silver SSD9471 Black Thick B660P6 Silver Silver B760P Silver
Reference Guide Kevo Convert at a Glance Kevo-Compatible Devices Smartphones and Smart Devices 1. Reset button A 1. Only use to reset Kevo Convert to delete all eKeys from your system. See “System Reset” for more information. 2. Where all the programming features are located. 3. Use to enroll smartphones. 4. Engages with turnpiece when interior cover is installed. When the cover is removed, the B 2. Back panel 3. Program button 5. Switches 6. Status LED 4.
Advanced Features History Log Kevo Plus A history of the lock’s activity may be viewed through the Kevo app or by logging into the web portal: www.mykevo.com. With Kevo Plus, you will be able to lock and unlock your home and check whether your door is locked or unlocked when you are away from home. You can upgrade to Kevo Plus inside the Kevo app. Visit www.kwikset.com/kevo/kevo-plus for more information.