USER GUIDE • GUÍA DEL USUARIO Before programming, install the lock on your door. Follow the instructions in the Installation Guide, on the reverse side of this manual. Antes de la programación, instale la cerradura en la puerta. Siga las instrucciones que se describen en la Guía de instalación, al dorso de este manual. Kwikset 1-866-863-6584 www.kwikset.
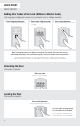
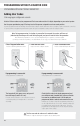
QUICK START INICIO RÁPIDO Adding User Codes at the Lock (Without a Master Code) Cómo agregar códigos de usuario en la cerradura (sin un código maestro) 1 Press Program button once. Presione el botón Programa una sola vez. 2 Enter new 4-8 digit user code. Ingrese un nuevo código de usuario de 4-8 dígitos. 3 Press Lock button once. Presione el botón de bloqueo una sola vez.
CONTENTS CONTENIDOS Quick Start 2 Inicio rápido Programming with a Master Code 12 Programación con un código maestro Contents 3 Contenidos Normal Operation 17 Funcionamiento normal Need Help? 3 ¿Necesita ayuda? Factory Reset 18 Efectúe el reinicio de fábrica SmartCode at a Glance 4 Una mirada rápida sobre SmartCode Status LED Colors 19 Colores del estado del LED Switches 5 Interruptores Keypad Warnings 20 Advertencias del teclado Prevent Unauthorized Entry 6 Prevenga la entra
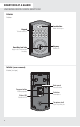
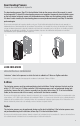
SMARTCODE AT A GLANCE UNA MIRADA RÁPIDA SOBRE SMARTCODE Exterior Exterior Lock button Keypad Botón de bloqueo Teclado numérico SmartKey tool hole Agujero de la herramienta Smartkey Keyway Chavetero Interior (cover removed) Interior (sin tapa) Back panel Panel posterior Program button Botón programa Switches Status LED Interruptores Estado del LED Turnpiece shaft Eje de la perilla gire 4
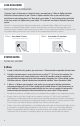
SWITCHES INTERRUPTORES ON 1 2 3 OFF 4 Switch 1: Door lock status LED blinks every 6 seconds. ON position is factory default. Switch 2: Lock automatically re-locks door 30 seconds after unlocking. OFF position is factory default. If this switch is turned on, it will be disabled if all codes are deleted from the lock. Switch 3: Beeping sound enabled. When disabled, keypad buttons light red or amber when pressed. ON position is factory default.
PREVENT UNAUTHORIZED ENTRY PREVENGA LA ENTRADA DESAUTORIZADA CAUTION: Prevent unauthorized entry. Since anyone with access to the back panel can change the user codes, you must restrict access to the back panel and routinely check the user codes to ensure they have not been altered without your knowledge. The use of a master code can help protect your system’s settings. WARNING: This Manufacturer advises that no lock can provide complete security by itself.
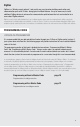
Door Handing Process Proceso de orientación de la puerta The door handing process, Step 23 in the Installation Guide (on the reverse side of this manual), is crucial for lock operation. To check if the door handing process was completed, temporarily place the battery cover on the lock interior, but do not secure with the provided screws. Make sure the turnpiece rotates smoothly. If it doesn’t rotate smoothly, the door handing process was not performed correctly, and Step 23 should be performed again.
LOCK EXCLUSION EXCLUSIÓN DE LA CERRADURA “Exclusion” refers to the process in which the lock is removed from a Z-Wave or ZigBee controller. Initiate the Exclusion process at your Z-Wave or ZigBee controller. Refer to your control system instructions for more information. For Z-Wave locks, press button “A” on the lock one time to Exclude it from your system. For ZigBee locks, press button "B" on the lock nine times to Exclude it from your system.
ZigBee ZigBee is a “Wireless mesh network,” and results may vary based on building construction and communication path, with 35 feet+ being typical installed distance. It may be necessary to install additional ZigBee devices to enhance the communication path between the lock and controller for a more robust ZigBee network. ZigBee es una "red de malla inalámbrica" y los resultados pueden variar según la construcción del edificio y la ruta de comunicación. La distancia típica de instalación es más de 35 pies.
PROGRAMMING WITHOUT A MASTER CODE PROGRAMACIÓN SIN CÓDIGO MAESTRO Adding User Codes Cómo agregar códigos de usuario A total of 30 user codes may be programmed. Each user code must be 4-8 digits, depending on your control system. Use the space provided on page 25 to keep track of the person assigned to each user code position. Se puede programar un total de 30 códigos de usuario. Cada código de usuario debe tener entre 4 y 8 dígitos, según su sistema de control.
Deleting a Single User Code Eliminar un solo código de usuario Note: All codes may be deleted at once if the master code is enabled. See page 16. Nota: Pueden eliminarse todos los códigos de una sola vez si el código maestro está habilitado. Consulte la página 16. Note: During programming, if no button is pressed for five seconds, the system will time out (indicated by three beeps and a red flashing keypad), and you will need to restart the procedure.
PROGRAMMING WITH A MASTER CODE PROGRAMACIÓN CON UN CÓDIGO MAESTRO Enabling and Setting the Master Code Habilitar y configurar el código maestro The master code is used to add and delete user codes, but it cannot unlock the door (unless the same code is programmed as a user code, though this is not recommended). The master code must be 4–8 digits.
Disabling the Master Code Deshabilitar el código maestro Note: During programming, if no button is pressed for five seconds, the system will time out (indicated by three beeps and a red flashing keypad), and you will need to restart the procedure. Nota: Durante la programación, si no se presiona ningún botón por 5 segundos, el sistema expirará (se indica por medio de tres pitidos y el teclado titilando en color rojo) y necesitará reiniciar el procedimiento. 1 Press and HOLD Program button.
Adding User Codes (With a Master Code) Cómo agregar códigos de usuario (con un código maestro) A total of 30 user codes may be programmed. Each user code must be 4-8 digits, depending on your control system. Use the space provided on page 25 to keep track of the person assigned to each user code position. Se puede programar un total de 30 códigos de usuario. Cada código de usuario debe tener entre 4 y 8 dígitos, según su sistema de control.
Deleting a Single User Code (With a Master Code) Eliminar un solo código de usuario (con un código maestro) Note: During programming, if no button is pressed for five seconds, the system will time out (indicated by three beeps and a red flashing keypad), and you will need to restart the procedure. Nota: Durante la programación, si no se presiona ningún botón por 5 segundos, el sistema expirará (se indica por medio de tres pitidos y el teclado titilando en color rojo) y necesitará reiniciar el procedimiento.
Deleting All User Codes (with a Master Code) Eliminar todos los códigos de usuario (con un código maestro) Note: The Auto-Lock feature (switch #2) will be disabled if all codes are deleted. See page 5. Nota: La función de cierre automático (el interruptor Nº 2) se deshabilitará si se eliminan todos los códigos. Vea la página 5.
NORMAL OPERATION FUNCIONAMIENTO NORMAL Unlocking the Door Cómo abrir la puerta Note: If no button is pressed for five seconds, the system will time out (indicated by one beep and a red flashing keypad), and you will need to restart the procedure. Nota: Si no se presiona ningún botón por 5 segundos, el sistema expirará (se indica por medio de un pitido y el teclado titilando en color rojo) y necesitará reiniciar el procedimiento. 1 Optional — Press Lock button once. 2 Enter user code.
FACTORY RESET EFECTÚE EL REINICIO DE FÁBRICA If you wish to restore your SmartCode lock to factory default settings and delete all codes associated with it, perform the following procedure. Si desea restaurar su cerradura SmartCode según los ajustes predeterminados de fábrica y elimine todos los códigos asociados, realice el siguiente procedimiento. Note: Once the lock is reset, it may need to be re-included in your control system.
STATUS LED COLORS COLORES DEL ESTADO DEL LED Status LED Estado del LED Status LED Color Lock Status Color del estado del LED Estado de la cerradura Blinking green Parpadeando en verde Unlocked Desbloqueado Blinking green and red Unlocked, Low Battery Parpadeando en verde y rojo Desbloqueado, batería baja Blinking amber Locked Parpadeando en ámbar Bloqueado Blinking amber and red Locked, Low Battery Parpadeando en ámbar y rojo Bloqueado, batería baja Blinking red (even when switch #1 is o
KEYPAD WARNINGS ADVERTENCIAS DEL TECLADO Keypad Teclado numérico Warning Reason Solution Advertencia Razón Solución Low battery Replace battery Batería baja Reemplazar la batería Door not locked Relock door Puerta no cerrada Cierre la puerta de nuevo No user code programmed Program at least one user code Keypad flashes red with fast beeping sound (if switch #3 is on) for 3 – 4 seconds.
TROUBLESHOOTING SOLUCIÓN DE PROBLEMAS Problem Reason Solution Problema Razón Solución Door Handing Process was not executed in Step 23 of the Installation Guide. Perform Step 23. Turnpiece does not rotate smoothly after installation La perilla no gira con fluidez luego de la instalación. No se ejecutó el proceso de orientación de la puerta en el paso 23 en la Guía de instalación. Door alignment issue (latch and strike are misaligned) causes components to go out of sync.
Problem Reason Solution Problema Razón Solución Lock doesn’t operate correctly after removing and replacing the battery pack. Incorrect initialization due to remaining charge. La cerradura no funciona correctamente después que el conjunto de baterías es retirado y reemplazado. Iniciación incorrecta causada por la carga de la batería. I can see the lock in my controller, but I can't control it. Light module or switch is not beaming capable.
ESPAÑOL ¿Cuánto tiempo durará un paquete de baterías para la cerradura? Suponiendo 10 operaciones diarias, un solo conjunto de pilas alcalinas permitirá que la cerradura funcione durante más de un año. ¿Qué tipo de baterías es mejor? Para obtener los mejores resultados, use sólo baterías nuevas alcalinas. Estaré fuera por varios meses y quiero saber si cuando regrese funcionará mi cerradura.
REGULATORY COMPLIANCE CUMPLIMIENTO NORMATIVO This product complies with standards established by the following regulatory bodies: Este producto cumple con las normas establecidas por los siguientes organismos reguladores: • Federal Communications Commission (FCC) • Industry Canada • Comisión Federal de Comunicaciones (FCC) • Industry Canada FCC This device complies with Part 15 of the FCC Rules.
USER CODE ASSIGNMENTS ASIGNACIONES DE CÓDIGOS DE USUARIO Use the spaces provided to write the name of the person assigned to each user code position. Utilice los espacios provistos para escribir el nombre de la persona asignada a cada posición del código de usuario.
IMPORTANT SAFEGUARDS MEDIDAS DE PROTECCIÓN IMPORTANTES 1. Read all instructions in their entirety. 2. Familiarize yourself with all warning and caution statements. 3. Remind all family members of safety precautions. 4. Restrict access to your lock's back panel and routinely check your settings to ensure they have not been altered without your knowledge. 5. Protect your user codes and master code. 1. Lea las instrucciones en su totalidad. 2.