| EXHIBIT D FEDERAL COMMUNICATIONS COMMISSION NOTE This equipment has been tested and found to comply with the limits for a Class B digital device, pursuant to Part 15 of the FCC Rules. These limits are designed to provide reasonable protection. This equipment generates, uses and can radiated radio frequency energy and, if not installed and used in accordance with the instructions, may cause harmful interference to radio communications.
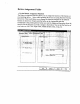
Information Folder * General Information The Information Folder has general information about the Genius Tablet such as version, corporation name and linking to Genius Web Site, etc.
Basic Folder + Changing the Tablet Orientation . Orientation allows you to rotate the Genius Tablet 90 degrees. Landscape is the normal operating position (with the tablets interface cables exiting the top of the tablet). Selecting Portrait allows you to rotate the tablet 90 degrees clockwise from the normal operating position (so the tablet's interface cables would be exiting from the right hand side of the tablet).
Button Assignment Folder * Use the Button Assignment Function The Button Assignment function allows you to change the function of the buttons on Your pointing device. Select which pointing device you are using from the Pointing Device list. This would allow you to change the functions assigned to the different buttons on that device.
Working Area Folder * Adjust Working Area The default option is the Whole Tablet. When the Tracking Mode in the Basic folder is Absolute, you can define the tracking area as your require, This is especially useful if you have a large tablet and you want to define a smaller active area so you don't have to move the pointing device around so far on the tablet. In order to set the tracking area: 1) Choose the Preserve Aspect. 2) Click on the Define button, then the define area will turn Grey.
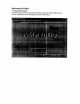
Test Folder * Test Your Buttons In this area, you can verify if all of your pointing device buttons are operating properly. Move your pointing device around the tablet and press the buttons (and the pen tip, if using a stylus). You will see the position of the cursor on the screen in the Model Name area, and the button in this area will flash to respond to the button presses. When you move your puck in the test area on the right side , you will see trails remain responding your button's movement.
Mini Pen Introduction 1.Introduction The Mini Pen is a graphics tablet that translates X-Y dimensional data into computer readable information in cordless pen. Its many use include : Guiding the cursor on a computer screen. Picking up location on application template. Hand writing and electronic signature Free hand talking on Internet conference and white board. Mini Pen is the best tool for pen computer that includes both absolute and relative cursor expression modes.
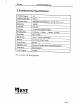
Mini pen Fundamental Specification 2.Fundamental Specification Platform Support PC Hardware Interface RS-232 Software Driver Genital II for Windows x, 95, 98, NT3.x , 4x Resolution SQ8LPL Accuracy 0.01 inch Proximity 10 mm from surface of tablet Working Area Horizontal : 3 inches , Vertical : 2 inches Baud Rate Up to 19200 Report Rate Up to 113 RPS in 9600 baud Protocol 5 or 3 bytes binary format Power Source RS-232 Operation mode Stream, SW stream, Point, Remote Request etc.
Mini Pen Operation Characteristic perpetration Characteristic 1. Tablet : Easy plug and works on RS-232 port with inches sketching area. 2.Stylus : A ball point pen like pointing device , that delivers electromagnetic flux to tablet to point out where position is. One tip button like mouse “left button” and barrel button as “right and middle button” . Both tip and barrel button function are definable by user’s choice. 3. Button operation force : Tip button: 50£30g Barrel button: 5.