
Reference Guide
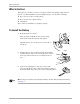
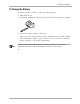
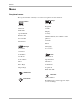
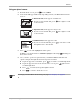

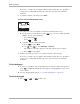
Table Of Contents
- Getting Started
- What to Do First
- To Install the Battery
- To Charge the Battery
- Parts of Your Phone
- Screen Icons
- Menus
- Basic Functions
- Where to Get More Information
- Battery
- Calling
- Contacts
- Entering Text
- Working with Contact Cards
- Settings
- Messages
- Entering Text
- About Text Messages
- Retrieving Messages
- Sending Text Messages
- Message Delivery Options
- Erasing Messages
- Changing Your Voicemail Speed Dialing Location
- Alerts
- Troubleshooting Messages
- Tools
- Web Browser
- Frequently Asked Questions

O rëÉêÛë=dìáÇÉ=Ñçê=íÜÉ=n`m=ONMM=pÉêáÉë=mÜçåÉë
tÜ~í=íç=aç=cáêëí
tÜ~í=íç=aç=cáêëí
The battery in your Kyocera 2100 Series phone is delivered partially charged. Before
first use, you must install the battery and fully charge it. You need the following:
■ Kyocera 2135 or Kyocera 2119 phone
■ Kyocera 2100 Series phone battery
■ AC Adapter
These items are included in your phone package.
qç=fåëí~ää=íÜÉ=_~ííÉêó
NK Hold the phone face down.
Place the battery with the metal contacts facing
down and towards the bottom of the phone.
Align the battery door to the grooves on the side of
the phone.
OK Slide the battery door on while pressing down firmly,
ensuring that the battery door clicks into place. Check
and repeat if the battery door is not aligned. Do not
force.
PK Connect the AC Adapter to the proper jack on the
bottom of the phone, then connect the adapter’s plug to a
wall outlet. Fully charge the battery before using the phone.
kçíÉ
_ÉÑçêÉ=ìëáåÖ=óçìê=éÜçåÉI=Ñìääó=ÅÜ ~êÖÉ=íÜÉ=Ä~ííÉêóK=qç=äÉ~êå=Üçï=íç=ÅÜ~êÖÉ=íÜÉ=Ä~ííÉêóI=
ëÉÉ=é~ÖÉ=P K