
User manual


Sending Functions
6-38
Text Stamp
When sending, you can display a text stamp on the originals.
NOTE: This cannot be set when Text Stamp is set in the system settings. For details, see Sending Jobs on
page 9-34.
The items that may be configured are as follows.
Use the procedure below to specify the Text Stamp settings.
1 Press the Send key.
2 Place the originals on the platen.
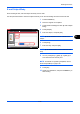
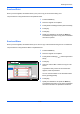
3 Press [Advanced Setup] and then press [Text
Stamp].
4 Press [On].
5 Press [Keyboard] and enter the text string to be
displayed, or select a text stamp from the displayed
templates.
NOTE: Templates that have been set will appear. For
details on registering templates, refer to
System
Stamp on page 9-31.
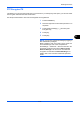
6 Press [Position] and select the position of the text
stamp.
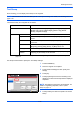
Item Detail
Position Selectable positions are [Top Left], [Top Middle], [Top Right],
[Middle Left], [Center], [Middle Right], [Bottom Left], [Bottom
Middle], and [Bottom Right].
Font Size Set the font size of the printed text stamp.*
* Registered font sizes are displayed. For details on registering font sizes, refer to System Stamp on
page 9-31.
Style Set the font style of the printed text stamp. [Bold] or [Italic] can
be set.
Font Set the font of the printed text stamp. [Courier] or [Letter Gothic]
can be set.
Color Set the color of the printed text stamp. [Black], [Cyan],
[Magenta], [Yellow], [Red], [Green], or [Blue] can be set.
Density Set the density of the color of the printed text stamp.
Display
Pattern
Set the display method of the printed text stamp. [Transparent],
[Clipping], or [Overwrite] can be selected.
Status
Copies
Cancel OK
Text Stamp
Add Shortcut
Keyboard
On
Off
Stamp
URGENT COPY
Position Font Original
Orientation
Top
Left
pt
Black
9 Top Edge
on Top
10/10/2010 10:10