
User's Manual


Web and Data 29
Data Services
Data Connection Status and
Indicators
Your phone displays the current status of
your data connection through indicators at
the top of the screen. The following
symbols are used:
Icon
Description
Your
phone
is connected to
the 3G network.
Your
phone
is connected to
the 4G network.
Your
phone
is connected to
the 4G LTE network.
30 User Manual
6 Camera and Video
Take Pictures
Open the Camera App
► From the Home screen, tap
Apps
>
Camera
.
Close the Camera App
► On the Camera screen, tap Home
or Back .
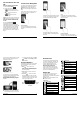
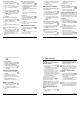
Viewfinder Screen
● Settings Button: Opens the camera
and video settings menu to select basic
and advanced settings.
● Shooting/Recording Mode: Opens
the navigation drawer to switch the
shooting/recording mode.
●
Quick Settings Panel: Displays the
settings you use most frequently.
● Thumbnail: Displays the thumbnail of
the latest image.
● Shutter Button: Takes a picture.
● Record Button: Records a video.
Take a Picture or Record a
Video
1. From the Home screen, tap Apps >
Camera.
2. Do the following to change the settings:
Tap to change the camera and
video settings as desired. See
“Camera and Video Settings” on
page 31.
Select the shooting/recording mode
by swiping from the left edge or by
tapping MODE icon.
3. Frame your subject on the screen.
4. Tap to take a picture.
– or –
Tap to record a video. Tap to
stop recording.
Camera and Video 31
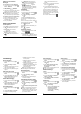
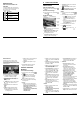
Review Screen
After taking a picture or video, tap the
thumbnail image to see the item in the
review screen. For example, when you tap
a picture thumbnail image, you may see the
following options:
● Share: Displays the available
applications to share your image.
● Delete: Deletes the currently
displayed image. Confirm the deletion
by tapping OK.
● Effects: Choose an effect to add to
your image. See “Edit a Picture” on
page 35.
● Details: Shows the details of the
image.
● Menu: Displays additional image
options. Available menus may vary:
Slideshow to start a slideshow of
the images stored.
Set as to set the currently displayed
image as a contact photo or
wallpaper.
Captions to add captions to your
video.
● Favorites: Tap to add the
image to your Favorites album.
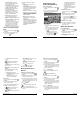
Camera and Video
Settings
Choose Camera Settings
1. From the Home screen, tap Apps >
Camera.
2. Tap to display the advanced
settings menu. You can change
the
following settings from the Settings
menu:
Note: Available options may vary
according to the subject and shooting
/recording mode.
● PHOTO
Size to choose the default size for
pictures. Front camera: Select from
HD(1280x720), 2M(1600x1200), or
1M(960×960). Back Camera: Select
from 3.6M(2560x1440),
FullHD(1920x1080), 5M(2560x1920),
3.2M(2048x1536), or
3.6M(1920x1920)
32 User Manual
Flash to choose a flash setting (back
camera only). Select from Auto, ON,
or OFF.
Self-timer to choose a timer setting.
Select from 10 seconds, 5 seconds,
2 seconds, or OFF.
HDR to combine multiple exposures
into a single image (back camera
only). Select ON or OFF.
Image stabilization to minimize the
effect of camera movement while
shooting. Select Auto, ON, or OFF.
Touch shutter to take a picture by
tapping the screen. Select ON or
OFF.
Smile shutter automatically detects
a smile on a face and shoots a smile
without touching the shutter button.
(back camera only). Select ON or
OFF.
Blink detection allows you to know
right away whether one of your
subjects blinked (back camera only).
Select ON or OFF.
● MOVIE
Size to choose the default size for
videos. Select from
FullHD(1920x1080),
HD720p(1280x720), VGA(640x480),
or QVGA(320x240).
Light to choose a light setting (back
camera only). Select from Auto, ON,
or OFF.
Image stabilization to minimize the
effect of camera movement while
recording. Select ON or OFF.
● GENERAL
Exchange camera to switch
between the back camera and the
front camera.
EV compensation to make
adjustments to exposure (back
camera only). Tap the slider bar to
increase or decrease the value.
White balance to set the white
balance (back camera only). Select
from Auto, Sunlight, Cloudy,
Fluorescent(White daylight),
Fluorescent(Daylight), or
Incandescence lamp.
Focus to choose areas of the screen
to focus on (back camera only).
Select from Face priority, or Center.
Auto exposure to adjust the
metering mode of pictures (back
camera only). Select from Center
weighted, Frame average, or Spot
metering.
ISO speed to set the ISO level (back
camera only). Select from Auto, 100,
200, 400, or 800.
Contrast allows you to use the slider
bar to set the contrast (back camera
only).