G2GO M20 0 0 user guide User Guide 1
G2G0 M2000 User Guide This manual is based on the production version of the Kyocera M2000 phone. Software changes may have occurred after this printing. Kyocera reserves the right to make changes in technical and product specifications without prior notice. The products and equipment described in this documentation are manufactured under license from QUALCOMM Incorporated under one or more of the following U.S.
thorough evaluation of scientific studies. The standards include a substantial safety margin designed to assure the safety of all persons, regardless of age and health. The exposure standard for wireless mobile phones employs a unit of measurement known as the Specific Absorption Rate, or SAR. The SAR limit set by the FCC is 1.6 W/kg.
Hearing aids—Some digital wireless phones may interfere with hearing aids. In the event of such interference, you may want to consult your service provider or call the customer service line to discuss alternatives. Other medical devices—If you use any other personal medical device, consult the manufacturer of the device to determine if it is adequately shielded from external RF energy. Your physician may be able to help you obtain this information.
Radio Frequency (RF) energy Your telephone is a radio transmitter and receiver. When it is on, it receives and sends out RF energy. Your service provider’s network controls the power of the RF signal. This power level can range from 0.006 to 0.6 watts. In August 1996, the U.S. Federal Communications Commission (FCC) adopted RF exposure guidelines with safety levels for hand-held wireless phones. These guidelines are consistent with the safety standards previously set by both U.S.
Table of Contents 1 Get Started . . . . . . . . . . . . . . . . . . . . . . . . . 9 6 Phone Battery . . . . . . . . . . . . . . . . . . . . . . . . 9 Memory Card . . . . . . . . . . . . . . . . . . . . . . . 11 Phone Overview . . . . . . . . . . . . . . . . . . . . . 12 Main Menu . . . . . . . . . . . . . . . . . . . . . . . . . 16 Guide Conventions . . . . . . . . . . . . . . . . . . . 17 2 Call Features . . . . . . . . . . . . . . . . . . . . . . 18 Power Phone Up . . . . . . . . . . . . . . . . . .
10 Browser . . . . . . . . . . . . . . . . . . . . . . . . . . 61 15 Get Help . . . . . . . . . . . . . . . . . . . . . . . . . . 84 Launch Browser . . . . . . . . . . . . . . . . . . . . . 61 Browse the Web . . . . . . . . . . . . . . . . . . . . . 61 Add a Bookmark. . . . . . . . . . . . . . . . . . . . . 61 User Guide . . . . . . . . . . . . . . . . . . . . . . . . . 84 Customer Support . . . . . . . . . . . . . . . . . . . . 84 Qualified Service . . . . . . . . . . . . . . . . . . . .
1 Get Started Phone Battery Charge the Battery Install the Battery You must have at least a partial charge in the battery to make or receive calls. To charge the battery: 1. Remove the rubber USB cover and connect the AC adapter to the microUSB jack on the side of the phone. 2. Plug the adapter into a wall outlet.
Battery Safety Guidelines • • • • • • • • • • 10 Do not disassemble or open the battery. Do not crush, bend, deform, puncture, or shred the battery. Do not attempt to insert foreign objects into the battery. Do not immerse the battery or expose it to water or other liquids. Even if a battery appears to dry out and operate normally, internal parts can slowly corrode and pose a safety hazard. Always keep the battery between 15 °C and 25 °C (59 °F and 77 °F).
Memory Card Remove the Memory Card Install the Memory Card To remove the memory card: 1. Remove the rubber memory card cover. 2. Use your finger nail to press and release the memory card in the slot until it bounces outward. 3. Carefully take the memory card out of the slot. 4. Put the rubber cover back into place. To install the memory card: 1. With the front of the phone facing you, locate the rubber memory card cover on the lower right hand side. 2. Remove the cover. 3.
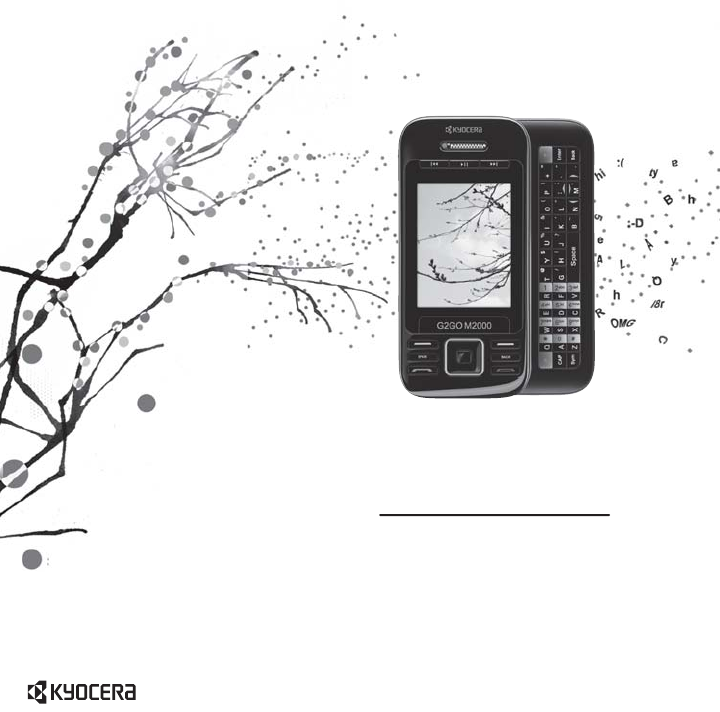
Phone Overview Get to Know Your Phone The following shows the front of the phone with the slide closed. 1. LED indicator. 2. Rewind, Play/Pause, and Fast Forward keys for the Music Player. Press the Play/Pause twice to activate the Music Player. 3. Home screen. 4. Left softkey selects items that appear on the lower left of the display. At the home screen, you can select Menu. 5. Speakerphone key activates the speakerphone and answers calls. 6. Send key starts or answers calls.
The following shows the phone’s QWERTY keypad with the slide open. 1. Right softkey selects items that appear on the lower right of the display. 2. Enter key generates a carriage return in text entry. 3. Back key erases characters in text entry or returns you to the previous screen when navigating through menus. 4. Navigation keys, with the slide open, scroll through lists and text entry fields and access the same shortcuts from the main screen as the Navigation key on the front.
LED Indicator Your phone’s LED indicator displays different colors depending on the alert. Incoming call Green—blinks (not for call waiting calls). Low battery Red—blinks until you charge the phone. New message Red—blinks for the first minute or until you respond to the alert, whichever happens first. Missed call Red—blinks for the first minute or until you respond to the alert, whichever happens first. In call Green—blinks until the call ends.
Screen Icons These icons may appear on your phone’s screen. The phone is operating in IS2000 (1X) digital mode. The phone is in airplane mode. The alarm clock is set. The phone is set to auto answer. The battery is fully charged. The more black bars, the greater the charge. A headset or other hands free device is in operation. The phone has a high speed data connection. A call is in progress. The phone is set to light up instead of ring. New photo and text message. New photo and voice message.
Main Menu Press the OK key or select Menu when the phone is in idle state to access the main menu. Idle State > Level 1 > Level 2 Menu BREW Download an application. Contacts Access these options: View All, Add New, Groups, Speed Dial List, Voice Dial List, Erase Contacts, and Contacts Count. Recent Calls Access these options: All, Incoming, Outgoing, Missed, Erase Call List, Call Timers, and Kilobyte Counter. Media Gallery Access these options: Images, Sounds, and Delete All.
Guide Conventions In this guide, the following conventions are used when describing phone features. Select means to press the Left softkey, Right softkey or OK key to select an item seen on the display. For example, “Select Menu” tells you to physically press the left softkey to choose Menu from the display. Press means to press a phone key. For example, “Press the Send key to make a phone call” tells you to physically press the Send key on your phone.
2 Call Features This section describes the basic features related to calls. Power Phone Up • • To turn your phone on, press the End key and wait until the phone display lights up. To turn your phone off, press and hold the End key until the phone plays a short musical sound and turns off. Make Phone Calls Make sure you are in an area where a signal can be received. Look for the signal strength icon on the home screen. The more bars, the stronger the signal.
End Phone Calls Silence an Incoming Call Press the End key. • Activate Voice Dialing • 1. Press and hold the Send key. 2. Follow the prompts. For more information, see “Voice Commands” on page 82. Volume Control Adjust Volume during a Call Press the Volume key up or down to adjust the earpiece volume during a call. Use the Speakerphone Your phone has a built-in speakerphone. • To turn on the speakerphone, press the Speakerphone key.
Emergency Services Call Emergency Service You can call an emergency code even if your phone is locked or your account is restricted. When you call, your phone enters emergency mode. This enables the emergency service exclusive access to your phone to call you back, if necessary. To make or receive regular calls after dialing the code, you must exit this mode. To dial an emergency code: 1. Enter your 3-digit emergency code. 2. Press the Send key.
3 Text Entry You can enter letters, numbers, and symbols in contacts, text messages, and your banner. Text Entry Modes The text entry screen has the following features: 1. Characters remaining that you can type. Allowed length of messages can vary depending on your service. 2. Text entry fields. 3. Current capitalization setting. 4. Current text entry mode. Note: The entry mode will default depending on the task you are doing. For example, when entering a phone number, you’re in a number mode.
Rapid Entry with QWERTY Keypad When you press a series of keys using Rapid entry, your phone checks its dictionary and guesses at the word you are trying to spell. From a text entry field, select Options > Rapid Entry to speed up word completion. To enter words, press a key once. For example, to enter the word “Wyoming” press the w > y > o keys and then the OK key. The icon indicates you are in Rapid Entry mode. To change case mode, press the Shift key.
Text Entry Quick Reference This table gives instructions for entering letters, numbers, and symbols. To.. Do this.. Enter a letter In Normal Alpha mode, press a key. Enter a number In Numbers Only mode, press a key. Enter a symbol Use Normal Alpha mode, press the Symbol key and then a key. Enter a space Press the Space key. Erase a character Press the Back key. Erase all characters Press and hold the Back key. Move the cursor right or left Scroll left or right.
4 BREW How does BREW Work? Download an Application Your Kyocera phone has the added ability to download and manage applications through BREW. BREW brings you the full range of applications and services you have come to expect from the Internet: Email and instant messaging, real-time navigation services, group chat, games, relevant news, and much more. You connect to the server, download applications, and then manage them as you like.
5 Contacts Use Contacts to store information about a person or company. Contacts Menu Select Contacts from the main menu to access the following functions: Level 1 > Level 2 > Level 3 Contacts View All Access your existing contacts list. Add New Add a new entry to your contacts list. Groups View your groups of contacts. Speed Dial List View your contacts assigned with speed dials. Voice Dial List View your contacts assigned with voice dials.
Use Fast Find Add a Code or Extension With Fast Find enabled, you can press one or two keys to view close matches of the contact. See “Call Contact using Fast Find” on page 72. When saving the phone number of an automated service, you may include a pause for dialing an extension. 1. From the home screen, enter a phone number. 2. Select Options and a type of pause: – Time Pause causes the phone to stop dialing for two seconds.
Send a Multimedia Message to Contacts Assign Number Types 1. From View All, select a contact. 2. At the contact details screen, select a number or email address. 3. Select Send Pic Msg. 4. Complete your multimedia message and select Send. 1. From View All, select a contact. 2. At the contact details screen, select Edit. 3. Press down twice to scroll to the number type dropdown and press the OK key. 4. Select a number type. The appropriate icon appears next to the number in your contacts list. 5.
Add a Prefix to Phone Numbers Add Contacts to Groups Use Prepend to add a prefix, such as an area code, to a phone number: 1. From View All, select a contact. 2. At the contact details screen, select a number. 3. Select Prepend to enter the prefix at the beginning of the number. 4. Select Save. 1. From View All, select a contact. 2. At the contact details screen, select a number or email address. 3. Select Add To Group. 4. Select groups from the list provided. A checkmark appears next to each selection.
Erase All Contacts From Erase Contacts, select Contacts Only > Yes > Yes to erase all your contacts. Note: You cannot recover deleted information. Erase All Contacts and Groups From Erase Contacts, select Erase All > Yes > Yes to erase all your contacts and groups. Note: You cannot recover deleted information. Contact Groups You can assign your contacts to groups. Your phone comes with default groups. You can also create your own groups. View Groups 1.
Assign Message Tones to Groups Create a Message Group 1. From Groups, select a group. 2. At the group details screen, scroll to the group name. 3. Select Options > Msg Tone > Assign Msg Tone and a ringer from the list. (Scroll to play the ringers.) You can create a group specifically for messaging, based on a contact group. 1. From Groups, highlight a group. 2. Select Options > Create Msg Group. 3. Modify the name for the group and select Next. 4. Select contacts from the list provided.
Speed Dial List Check Contacts Assign Speed Dial Numbers Select Contacts Count to check how many contacts you have stored. 1. From Speed Dial List, highlight an unassigned number (marked as empty). 2. Select Assign. 3. At the contacts list, select a contact. 4. At the contact details screen, select a phone number. Clear Speed Dial Numbers 1. From Speed Dial List, highlight an assigned number. 2. Select Erase > Yes.
6 Recent Calls Recent Calls Menu Select Recent Calls from the main menu to access the following functions: Level 1 > Level 2 > Level 3 Recent Calls All See a list all voice calls. Incoming See a list all voice calls you have received. Outgoing See a list all voice calls you have made. Missed See a list all voice calls you have missed. Erase Call List Access these options: All, Incoming, Outgoing, and Missed.
Deal with a Missed Call Erase Call List Records When you have missed a call, “Missed Call” appears on your screen. You can do one of the following: • To clear the screen, select OK. • To view the call details, select Calls and press the OK key. • To return the call, select Calls and press the Send key. Erase a Single Record 1. At a call list, highlight a contact. 2. Select Options > Erase Record > Yes. Erase a Call List Call List Options From Erase Call List, select a call list to erase records from.
View Home Calls Timer View Outgoing Calls Timer Select Home Calls to view the number of calls and the total call time. Select Done when finished. This timer tracks all calls made and received in your home network since you last reset the timer. To reset this timer to zero, select Reset > Yes. Select Outgoing Calls to view the number of calls and the total call time. Select Done when finished. This timer tracks all calls made since you last reset the timer. To reset this timer to zero, select Reset > Yes.
7 Media Gallery Use Media Gallery to retrieve and playback media files and other downloads. Media Gallery Menu Select Media Gallery from the main menu to access the following functions: Level 1 > Level 2 > Level 3 Media Gallery Images Access these options: Camera Pictures, Saved Images, Wallpapers, Wallpaper Shuffle, Screensavers, and Caller IDs. Sounds Access these options: Saved Sounds, Ringers, My Music, Ringer Shuffle, and Voice Memos.
Change the Default Wallpaper Sounds 1. From Wallpapers, select a wallpaper. 2. Select Set Default. Send a Sound Edit the Wallpaper Shuffle 1. From Wallpaper Shuffle, select Edit. With no wallpapers saved, you need to add files. 2. Select Add to include a file in the shuffle, Remove to remove a file from the shuffle, or Options to access more features. 3. When finished, select Options > Done. Change the Default Screensaver 1. From Screensavers, select a screensaver. 2. Select Set Default.
Play a Song Send a File 1. From My Music, select All Songs. 2. Choose a song and select Play. Use the Navigation key to control the playback tools displayed. 1. From a media file list, highlight a file. 2. Select Options > Send > Via EMS Msg (to attach to an enhanced message), Via MMS Msg (to attach to a multimedia message), Via Bluetooth (to send to a Bluetooth-enabled device), or To Printer (to print on a Bluetooth-enabled device). The options available depend on the file type. 3.
Play a File Modify a File 1. From a media file list, highlight a file. 2. Select Options > Play. Use the Navigation key to control the playback tools displayed. 1. From a media file list, select a file. 2. Select Options > Modify. 3. Select Options and an option to rotate, resize, and so on. 4. When done, select Save to save over an existing file or as a new one. Copy a File to a Memory Card 1. From a media file list, highlight a file. 2. Select Options > Copy File to copy the file to your memory card.
Erase Media Files Erase All Media Files Erase a Single File From Delete All, select Delete All > Yes to erase all files in the Media Gallery folder. Note: You can only erase unlocked files. Preloaded files on your phone are always locked. 1. From a media file list, highlight a file. 2. Select Options > Erase > Yes. You can only erase unlocked files. Preloaded files on your phone are always locked. Erase All Files in a Folder From a media file list, select Options > Erase All > Yes.
8 Messaging Use Messaging to send, receive, and erase messages from your phone. Messaging Menu Select Messaging from the main menu to access the following functions: Level 1 > Level 2 > Level 3 Messaging New Text Msg Compose a text message. New Pic Msg Compose a multimedia message. Voicemail Shows how many voicemails are waiting. Inbox Shows a list received text and multimedia messages. Browser Alerts Shows how many alerts are waiting.
Send Messages Create a Text Message You can only send text messages to phone numbers capable of receiving them or to email addresses if supported. 1. From New Text Msg, enter a recipient’s phone number or email address. (Select Options to access contacts, groups or recently used addresses. Scroll down to move to the next field when done.) You can message up to ten recipients at once. Use comma or spaces to separate addresses. 2. Enter the message. (Select Options to access more features.) 3.
Add Recipients from Recent List Add Recipients from Message Text 1. At the compose message screen, select Options > Recent List when entering a phone number or email address. 2. Select a number or address. 3. Complete your message. 1. At the compose message screen, select Options > Add Address when entering the text to add more recipients. 2. Enter a number or address to add. 3. Complete your message. Add Recipients from Recent Calls Send Messages to Online Location 1.
Save Messages as Preset Text Add Sounds to Messages 1. At the compose message screen, select Options > Save as QuickText when entering the text to use it later as preset text. 2. Complete your message. 1. At the compose message screen, select Options > Insert Sound when entering the text. 2. Select a file. 3. Complete your message. Save Received Messages as Preset Text When viewing a received message, select Options > Save as QuickText to use it later as preset text.
Add Media Files to Messages Preview Messages 1. At the compose message screen, select Options > Media Gallery when adding a media file. 2. Select a file to add to your message. To remove a media file, select the applicable option. For example, to remove a sound, select Options > Remove Sound. 3. Complete your message. 1. At the compose message screen, select Options > Preview Message when entering the message or media file. 2.
Change the Callback Number 1. When entering the message, select Options > Msg Settings > Callback Number. 2. Enter your callback number and select OK. 3. Complete your message. Send Messages Later 1. When entering a message, select Options > Msg Settings > Send Later. 2. Select Immediate or Set Time to set a specific time to send the message. 3. Press the OK key to change the time. – Scroll left or right to move between the hour, minute, and AM/PM. – Scroll up or down to change the hour, minute, and AM/PM.
Handle Received Messages Reply to Text Messages Reply to Multimedia Messages (with Prompt) When receiving a message, your phone displays a notification and the message icon appears at the top of your screen. The message icon flashes with an urgent message alert if the message is urgent. 1. When a message notification appears, select Inbox (to view the message) or Ignore (to clear the notification). An icon appears at the top of your screen when you have an unread message. 2.
Reply with a Copy of the Message Go to Web Addresses in Messages 1. When viewing a received message, select Options > Reply with Copy. The original message appears in your reply message. 2. Complete your message and select Send. When viewing a received message, select Options > Launch Browser to go to a web address included in the message. Call Sender Play Attached Files When viewing a received message, select Options > Call to call the sender.
View Message Information Check your Voicemail When viewing a received message, select Options > Message Info to view the message priority, sent time, size, and so on. When you receive a voicemail message, a notification with a voicemail message icon appears at the top of your screen. • At the voicemail notification, select Call to call your voicemail number and follow the system prompts to retrieve the message. Select Ignore to clear the notification without checking messages.
Check Message Status in Outbox Message Settings Use the following symbols to check your Outbox for the status of messages sent but still in process. The following message settings affect all messages unless you change them for individual messages. The message is pending and will be sent when possible. You can cancel delivery of the message. The message cannot be sent because service is not available. An alert appears on your phone if the message cannot be sent.
Set Message List View Enable Auto Retrieve From Msg List View, select one of the following to set your message list display: • Sender & Preview displays the sender and first part of messages. • Sender & Date-Time displays the sender and sent time of messages. • Msg Preview displays the first part of messages. • Sender displays the message sender. From Auto Retrieve, select one of the following: • Disabled turns off auto retrieve and prompts you before downloading any multimedia messages.
Enable Auto-Erase Set your Voicemail Number Use Auto-Erase to set your phone to erase messages automatically when it needs memory for incoming messages. From Auto-Erase, select one of the following: • Disabled erases no messages. • Inbox Msgs erases old messages in Inbox when memory is needed. • Sent Msgs erases old messages in Sent Msgs when memory is needed. • Both erases old messages in both Inbox and Sent Msgs when memory is needed.
Message Groups You can create groups for messaging. View Message Groups List 1. From Message Groups, view your preloaded groups, followed by the custom groups you have created. 2. Highlight a group and do one of the following: – Press the OK key to view the groups details. – Select New to create a new group. – Select Options to access more functions. Create a New Message Group 1. From Message Groups, select New. 2. Enter a name for the group and select Next. 3. Select contacts from the list provided.
Erase Messages Erasing old messages frees up memory in your phone. You can erase messages as you send or read them, erase them one at a time, or erase them all at once. Erase a Single Message When viewing a received message, select Options > Erase > Yes. Note: You can erase a scheduled message, but cannot cancel its delivery. Erase Messages from a Folder From Erase Msgs, select a folder to erase messages from. For example, to erase received messages, select Inbox > Yes.
9 Tools & Games Tools & Games Menu Select Tools & Games from the main menu to access the following functions: Level 1 > Level 2 > Level 3 Tools & Games Brick Attack Play Brick Attack. Voice Memo Access these options: Record New and Recorded Memos. Scheduler Access these options: Add New Event, View Month, View Day, Go to Date, View All Events, and Settings Alarm Clock Set an alarm. Tip Calculator Calculate a tip. Calculator Perform basic calculations. Timer Set a countdown timer.
Record Voice Memos 1. From Voice Memo, select Record New. 2. Record your voice memo and select Stop when done. 3. Select Save. If you receive an incoming call while recording a memo, the memo is saved and the incoming call screen appears. Play Voice Memos 1. From Recorded Memos, highlight a memo. 2. Select Play to play the memo or Options to access more features. Scheduler Use Scheduler to schedule events and set reminder alerts. Create an Event 1. From Add New Event, enter a name.
3. Do one of the following: – Scroll left or right to move to another date. – Select an event. – Scroll to a time and select Add New to create a new event. – Select Options to access more features. View Events by Date From View Day, do one of the following: • Scroll left or right to move to another date. • Select an event. • Scroll to a time and select Add New to create a new event. • Select Options to access more features. Go to a Specific Date 1.
Erase Events Change Scheduler Settings Erase an Event From Settings, you can modify the following features. 1. From View Day, select an event. 2. At the event details screen, select Options > Erase > Yes. Erase the Current Day’s Events From View Day, select Options > Erase Today’s Events > Yes to erase all events on that day. Erase All Events Set Scheduler Hours 1. From Scheduler Hours, modify the start and end times. – Scroll left or right to move between hour, minute, and AM/PM fields.
Alarm Clock Set the Quick Alarm You can set up to four alerts with your phone’s three alarm clocks and one quick alarm. Note: The alert occurs only if the phone is on. 1. From Alarm Clock, scroll to the quick alarm and select Set. 2. Choose a time. (A notification shows the quick alarm is on.) When the quick alarm rings, select Off to turn off the alarm, or Reset to set the quick alarm again. Set an Alarm 1. From Alarm Clock, scroll to one of the alarms and select Set. 2.
Use Calculator Use Timer 1. From Calculator, enter the first number. 2. Select a mathematical operation: – Scroll left to multiply. – Scroll right to divide. – Scroll up to add. – Scroll down to subtract. Your selection will appear highlighted. 3. Enter the second number, and press the OK key to view the result. 4. Select Exit to return to the menu, or Options and one of the following: – MS clears value currently stored and adds the displayed result to value stored in memory.
Memopad Erase a Memo Write a Memo 1. From View Memos, highlight a memo. 2. Select Options > Erase > Yes. 1. From New Memo, enter the memo. 2. Select Save. View a Memo From View Memos, select View to open a memo or Options to access more features. Edit a Memo 1. From View Memos, highlight a memo. 2. Select Options > Edit. 3. Edit the memo, and select Save. Send a Memo 1. From View Memos, highlight a memo. 2. Select Options > Send as SMS. 3. Complete the message, and select Send.
10 Browser You can use your phone to browse the Internet if you have obtained phone Internet services from your service provider and if over-the-air Internet access is available in your area. Launch Browser Select Browser to launch the browser. An alert appears notifying of airtime fees, if you have enabled web alerts. Select OK to continue. If this is the first time you have connected to the Internet, a message informs you that security is not yet enabled for your browser. Select Yes to enable security.
11 Music Player Use Music Player to play and manage media files. 1. From the home screen, select Menu > Music Player. 2. At the song list, scroll to a song. 3. Select Play to play the song or Options to access more functions. You can also access the Music Player from the home screen by pressing the Play/Pause twice. 4. From your phone’s main menu, select Settings > USB Mode > Mass Storage. 5. On your computer, you will see your phone as a removable disk drive. 6. Open the removable disk drive. 7.
View Song Details Access a Playlist To view the details of the song your are currently playing, select Options > Details. 1. From Music Player, select Options > Music Library > Playlists. 2. Choose a playlist. 3. Select Play to start the playlist or Options to access more functions. Work with Songs 1. From Music Player, select Options > Music Library. 2. Select All Songs or other song list. 3. Scroll to a song and select Options to access functions such as locking or assigning the file.
Set Auto Off Duration Use Auto off to set the duration for which your phone is paused or stopped before automatically turning off Music Player. From Auto off, select one of the following: • 10 Minutes automatically turns off Music Player after the phone pauses or stops for 10 minutes. • 20 Minutes automatically turns off Music Player after the phone pauses or stops for 20 minutes. • Off never automatically turns off Music Player.
12 Settings Settings Menu Select Settings from the main menu to access the following functions: Level 1 > Level 2 > Level 3 Settings Bluetooth Access these options: On/Off, My Devices, and Settings. Sounds Access these options: Ringers, Ringer Mode, Volume, Slide Sounds, Pwr On/Off Sound, and Keypad. Display Access these options: Set Wallpaper, Wallpaper Shuffle, Set Screensaver, Themes, Main Menu View, My Banner, Backlighting, Brightness, Language, and Time/Date Format.
Bluetooth The Bluetooth® wireless technology (not available on all phones) enables wireless connectivity with accessories such as portable or installed hands-free car kits, headsets, handsets, computers, and so on. For details, check with your service provider. You must use a Bluetooth device (compatible with Class 2 Bluetooth wireless technology, version 1.2) in order to use this phone wirelessly. Bluetooth accessories display a symbol on your phone.
View Device Services Enable OBEX Authentication A Bluetooth device paired with your phone may have more than one service profile (such as Headset, Handsfree, and so on). Do the following to check the services available: 1. From My Devices, highlight a device. 2. Select Options > Services. 3. At the service list, highlight a profile and select Connect to change the active profile. From OBEX Authentication, select Enabled.
– View Ringer Shuffle Volume 1. From Ringer Shuffle, select View. Only the files used in your shuffle appear. 2. Select Edit to modify the shuffle list or press the Back key to exit. From Volume, you can modify the following settings. Set Ringer Mode 1. From Ringer Volume, scroll right or left to set the ringer volume. 2. Press the OK key to save. Your phone is set to make sounds when you receive calls, press keys, navigate through menus, and receive alerts (such as new messages).
Set Power On/Off Sounds Wallpaper Shuffle 1. From Pwr On/Off Sound, select Power On Sound or Power Off Sound. 2. Select a sound to play when your phone powers on or off. (Scroll down the list to play the sounds.) Enable Wallpaper Shuffle Keypad 1. From Wallpaper Shuffle, select Edit. 2. Select Add (to include a file in the shuffle) or Remove (to remove a file from the shuffle). 3. When finished, select Options > Done. From Keypad, you can modify the following settings.
Set Screensaver Screensavers appear on the home screen, activated ten seconds after the last keypress. Incoming calls and alerts override the screensavers. 1. From Set Screensaver, select Camera Pictures, Saved Images, or Screensavers. To turn off screensaver, select None. 2. Select a file. You may need to resize or crop the file. 3. Select Done. 3. Enter your new text (up to 14 characters) or press the Space key for a blank banner. 4. Select Save.
Set Time and Date Format From Time/Date Format, select a time and date format. Convenience Use these settings to make your phone more convenient to use. Set Date and Time In Airplane mode, you can set the time and date manually. Note: You can only access Set Time/Date with Airplane Mode enabled. 1. From Set Time/Date, do the following to change the date: – Scroll left or right to move between the month, day, and year fields. – Scroll up or down to change the month, day, and year. 2.
Use 1-Touch Dialing Place a Call on Hold The 1-Touch Dialing feature is the fastest way to call a speed dial location. To call a contact with speed dial, press and hold the speed dialing location. If it is a two-digit location, press the first digit briefly, then press and hold the second digit. Note: To use 1-Touch dialing, you must enable 1-Touch dialing on your phone and have a speed dial location assigned to a contact. From 1-Touch Dialing, select Enabled to turn on 1-touch dialing.
Enable Frequent List Create a Custom Menu From Frequent List, select Enabled. With Frequent List enabled, the last 15 of your most frequently called contacts appear at the beginning of your contacts list. Scroll past the double line to view the entire contacts list. 1. From the home screen, scroll up and hold. 2. Select Edit. 3. Select features from the list provided. A check mark appears next to each selection. You can also remove checkmarks. 4. Select Save after selecting all your options.
Set Display Results You can set the phone to display up to three voice recognition contacts when calling or searching for a contact with voice commands. From Display Results, select Single Best or Three Best. Set Digit Lengths You can set the number of digits used for a phone number in your voice dial list. From Digit Lengths, select one of the following options: • North American recognizes only 7, 10, and 1 + 10 digits in a phone number. • Permit All allows 4-14 digits in a phone number.
Memory Card Choose Files to Save 1. From Memory Card, select Items to Save to choose what files you save to your memory. 2. Select file types from the list provided. A checkmark appears next to each file type that is saved to the memory card. Press the OK key to add or remove checkmarks. 3. When finished, select Done. Format Memory Card From Memory Card, select Format Card > Yes to format your memory card. Note: Formatting will erase all current information on the memory card.
Enable Roaming Service Alert Use this setting if you want the phone to alert you when you roam outside of your home service area. From Roam/Svc Alert, select one of the following: • Disabled turns roaming service alert off. • When no svc alerts you with three tones decreasing in pitch when service is lost and three tones increasing in pitch when service is acquired again.
Enable Roaming Call Alert Unlock the Phone You can set the phone to warn you before you answer or place a call while roaming. Note: Call prompt is disabled when the phone is in Emergency Mode. From Roam Call Alert, select Enabled. The phone emits a distinctive ring to indicate when you are roaming during a call. To accept or place a call while roaming, you must press 1. 1. From the home screen, select Unlock. 2. Enter your four-digit lock code.
Phone Info View Version Information Select Build Info to check your phone’s software and hardware information. View Phone Icons Select Icon Key to view the icons used in your phone. Access User Guide From User Guide, access the user guide for your phone.
13 Camera Camera Tips Your phone comes with a camera. Before using your phone’s camera, here are some tips: • You cannot activate the camera while on an active call or while browsing files in the media gallery. • Once the camera is active, the home screen acts as the viewfinder. • If you get a “Low memory” error, check your resolution and quality compression settings. • If there is no activity within 45 seconds after you turn your camera on, the camera quits and returns to the previous launch point.
Enable Date/Time Stamp Set Color Tone From camera mode, select Options > Settings > Date/Time > On to place a date/time stamp each picture taken. The icon indicates when the date/time stamp is on. 1. From camera mode, select Options > Settings > Color Tone. 2. Scroll left or right to select a color tone. Look at the viewfinder to see how each setting looks. Enable Multishot Mode Set Picture Quality From camera mode, select Options > Settings > Multishot > On to take multiple pictures.
Other Camera Options Set Brightness Level 1. From camera mode, select Options > Brightness. 2. Scroll left or right to change the brightness level. Press the OK key to set the brightness. Go to Camera Pictures From camera mode, select Options > Camera Pictures to see all of the pictures you have taken. These are located in Camera Pictures. Take a Picture in a Frame 1. From camera mode, select Options > Frames. 2. Scroll left or right to view the frames available. 3. Select OK to choose a frame. 4.
14 Voice Commands You can do certain commands through voice recognition. To control the settings associated with voice commands, see “Voice Features” on page 73. Call a Contact 1. From the home screen, press and hold the Send key. The phone prompts, “Say a command”. 2. Say “Contact” and then name of the person you want to call. The phone prompts, “Please repeat” or “Say a name” if it does not recognize the name.
Play a Playlist 1. From the home screen, press and hold the Send key. The phone prompts, “Say a command”. 2. Say “Play” and then a playlist name. If you pause, the phone prompts you to say a playlist name. 3. Say “Yes” to confirm your choice. Find a Contact 1. From the home screen, press and hold the Send key. The phone prompts, “Say a command”. 2. Say “Find Contacts”. The phone prompts, “Say a name”. The phone prompts, “Please repeat” or “Say a name” if it does not recognize the name.
15 Get Help User Guide From Phone Info, select User Guide to access the user guide. You can also find the user guide at www.kyocera-wireless.com/support. Customer Support Your service provider’s customer support department may be accessible directly from your phone when you dial a number, such as *611 (check with your service provider). They can answer questions about your phone, phone bill, call coverage area, and specific features available to you, such as call forwarding or voicemail.
Index Numerics 1-touch dialing, 72 A accessories, 84 headsets, 74 T-coil hearing aid, 75 TTY device, 75 airplane mode, 71 set date and time, 71 alarm clock, 58 alerts browser, 76 calls, 36, 67 LED, 14 lights only, 68 messages, 49 minute, 73 missed calls, 73 pages, 49 roaming, 67, 76, 77 scheduler, 57 vibrate, 68 voice privacy, 75 voicemail, 49 applications, 24 downloading, 24 auto-hyphenation, 71 B backlighting, 70 banner, 70 battery charging, 9 drain, 10 User Guide installing, 9 recharging, 9 safety gu
viewing contacts, 33 call logs, see call lists call timers all, 33 data, 34 home, 34 incoming, 34 outgoing, 34 recent, 33 roaming, 34 caller IDs, 36 calls alerts, 67 answering, 18 any key answer, 73 auto answer, 11, 74, 75 call lists, 32 emergency, 20 ending, 19 limiting, 77 making, 18 missed, 73 placing on hold, 72 redialing, 18 silencing, 19 timing, 73 voice answer, 74 voice commands, 82 camera, 79 brightness, 81 color tone, 80 date stamp, 80 multishot, 80 picture quality, 80 resolution, 79 save location,
E earpiece, 18 emergency calls, 20 emergency services, 76 F fast find, 72 frequent list, 73 G games Brick Attack, 54 groups adding, 29, 30, 52 adding contacts, 28 assigning alerts, 29, 30, 52 assigning pictures, 30 editing, 29, 52 erasing, 30, 52 sending messages, 29, 52 sending vCard, 30, 52 viewing, 29, 52 groups list, 29, 52 H headset sounds, 74 headsets auto answer, 74 voice answer, 74 help, getting, 84 hold calls activating, 72 changing message, 72 I icons, 15 images erasing, 39 sending, 35 inbox,
shuffle, 63 memopad, 60 calling numbers, 60 creating memos, 60 editing memos, 60 erasing memos, 60 locking memos, 60 sending memos, 60 viewing memos, 60 memory card, 11 formatting, 11, 75 saving files, 75 menus contacts, 25 custom, 73 main, 16 media gallery, 35 messaging, 40 recent calls, 32 setting main view, 70 settings, 65 tools, 54 message groups, 30, 52 messages adding addresses, 42 adding contacts, 41 adding groups, 42 adding media files, 44 adding preset text, 42, 50 adding slides, 43 alerts, 49 atta
auto retrieve, 46, 50 CC/BCC fields, 50 prompt, 46 music searching, 62 voice commands, 83 N navigation shortcuts, 12, 73 notifications messages, 46 voicemail, 48 number prefixes, 28 number types, 27 O OBEX authentication, 67 outbox, 49 outgoing calls, 32 pictures erasing, 39 frames, 81 sending, 35 slideshow, 38 taking, 44, 79 viewing, 81 playlists access, 37 accessing, 63 creating, 63 power on sounds, 69 preset text, 42, 50 primary number, 28 product evaluation, 84 Q quick alarm, 58 P R pages alerts,
event priority, 57 event reminders, 57 finding dates, 56 finding events, 56 month view, 55 sending events, 56 silent mode, 57 sorting events, 56 work hours, 57 screensavers, 36, 70 security, 77 Select, 25 sent messages folder, 48, 50 settings accessories, 74 camera, 79 convenience, 71 display, 69 network, 75, 76 scheduler, 57, 67, 68, 69 security, 77 sounds, 67 voice commands, 73 silent mode, 68 slide sounds, 68 slideshow, 38 songs details, 63 finding, 62 loading, 62 playing, 37, 62 repeating, 62 working wi
expert mode, 73 finding contacts, 83 making calls, 82 playing music, 83 shortcuts, 82 voice training, 74 voice dial list automatic add, 73 digit lengths, 74 editing, 31 voice dialing, 19 voice memos, 54 playing, 37, 55 recording, 55 voicemail alerts, 49 changing number, 51 checking, 48 configuring, 48 volume adjusting, 19 earpiece, 68 keypad, 68 ringers, 68 speakerphone, 68 W wallpaper shuffle activating, 69 editing, 36, 69 time interval, 69 viewing, 69 wallpapers, 36, 69 web browser, 61 world clock, 60 U
Kyocera Communications Inc. www.kyocera-wireless.com 82-R5604-1EN, Rev.