
Operating Instructions


Introduction Getting Ready
Taking Pictures
Playback Set Up
GB-116
Viewing Still Images | Viewing Movies | [o] Viewing Images Automatically as a Slideshow (slideshow) | [O] Viewing Multiple Images | [INFORMATION] Viewing Image Information | [J]/[I] Erasing Unwanted
Images | [U] Protecting Images from Accidental Erasing (PROTECT) | [p] Adding Voice Messages to Still Images (POSTRECORDING) | [V] Resizing and Trimming Images (RESIZE) | [W] Rotating an Image |
[T] Using DPOF to specify print settings | [G] Printing by Connecting the Camera Directly to a Printer (PictBridge) | Connecting to a Windows PC | Connecting to a Macintosh
NEXTBACK
Contents (Top page) Detailed Contents Index Nomenclature Menus and Settings Troubleshooting
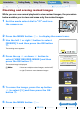
Checking and erasing resized images
While you can use normal playback to view resized images, the procedure
below enables you to view and erase only the resized images.
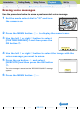
1
Set the mode select dial to "P" and turn
the camera on.
2
Press the MENU button K to display the menu icons.
3
Use the left l or right r button to select
[RESIZE]
V
and then press the OK button
E.
The resizing menu appears.
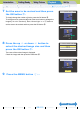
4
Press the up u or down d button to
select [VIEW RESIZED IMAGE] and then
press the OK button E.
The resized image is displayed.
5
To erase the image, press the up button
u to select [
J
] and then press the OK
button E.
6
Press the MENU button K.
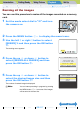
BNote
If there are multiple resized images, use the left l
or right r button to move between images.
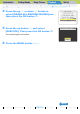
RESIZE
RESIZE
MENU
EXECUTE
RESIZING
VIEW
RESIZED
IMAGE
RESIZE
ALL
IMAGES
ERASE
ALL
RESIZED
IMAGES
RETURN
R_KC0001.JPG 15KB
RETURN
R_KC0001.JPG 15KB
RETURN