FS-9130DN FS-9530DN Operation Guide
Contents 1 Machine Parts.............................................................................................................................1-1 Components at the Front of the Printer .......................................................................................1-2 Components at the Left and the Rear of the Printer ...................................................................1-3 Components at the Right of the Printer ...................................................................
ii OPERATION GUIDE
Legal and Safety Information CAUTION: NO LIABILITY IS ASSUMED FOR ANY DAMAGE CAUSED BY IMPROPER INSTALLATION. Notice on Software SOFTWARE USED WITH THIS PRINTER MUST SUPPORT THE PRINTER'S EMULATION MODE. The printer is factory-set to emulate the PCL. The emulation mode can be changed. Notice The information in this guide is subject to change without notification. Additional pages may be inserted in future editions.
This product uses PeerlessPrintXL to provide the HP LaserJet compatible PCL 6 language emulation. PeerlessPrintXL is a trademark of Peerless Systems Corporation, 2381 Rosecrans Ave. El Segundo, CA 90245, U.S.A. This product was developed using the Tornado™ Real Time Operating System and Tools from Wind River Systems. This product contains UFST™ and MicroType® from Monotype Imaging Inc. USB This product has been certified by the USB Implementers Forum, Inc.
License Agreements IBM Program License Agreement THE DEVICE YOU HAVE PURCHASED CONTAINS ONE OR MORE SOFTWARE PROGRAMS (“PROGRAMS”) WHICH BELONG TO INTERNATIONAL BUSINESS MACHINES CORPORATION (“IBM”). THIS DOCUMENT DEFINES THE TERMS AND CONDITIONS UNDER WHICH THE SOFTWARE IS BEING LICENSED TO YOU BY IBM. IF YOU DO NOT AGREE WITH THE TERMS AND CONDITIONS OF THIS LICENSE, THEN WITHIN 14 DAYS AFTER YOUR ACQUISITION OF THE DEVICE YOU MAY RETURN THE DEVICE FOR A FULL REFUND.
Some jurisdictions do not allow the exclusion of implied warranties, so the above exclusion may not apply to you. 3. Limitation of Remedies IBM's entire liability under this license is the following; For any claim (including fundamental breach), in any form, related in any way to this license, IBM's liability will be for actual damages only and will be limited to the greater of: 1 the equivalent of U.S.
Typeface Trademark Acknowledgement All resident fonts in this printer are licensed from Monotype Imaging Inc. Helvetica, Palatino and Times are registered trademarks of Linotype-Hell AG. ITC Avant Garde Gothic, ITC Bookman, ITC ZapfChancery and ITC Zapf Dingbats are registered trademarks of International Typeface Corporation.
8 THE PARTIES AGREE THAT ALL OTHER WARRANTIES, EXPRESSED OR IMPLIED, INCLUDING WARRANTIES OF FITNESS FOR A PARTICULAR PURPOSE AND MERCHANTABILITY, ARE EXCLUDED. 9 Your exclusive remedy and the sole liability of Monotype Imaging in connection with the Software and Typefaces is repair or replacement of defective parts, upon their return to Monotype Imaging.
guarantee that interference will not occur in a particular installation. If this equipment does cause harmful interference to radio or television reception, which can be determined by turning the equipment off and on, the user is encouraged to try to correct the interference by one or more of the following measures: • Reorient or relocate the receiving antenna. • Increase the distance between the equipment and the receiver.
Safety Information Laser Safety This printer is certified as a Class 1 laser product under the U.S. Department of Health and Human Services (DHHS) Radiation Performance Standard according to Radiation Control for Health and Safety Act of 1968. This means that the printer does not produce hazardous laser radiation. Since radiation emitted inside the printer is completely confined within protective housings and external covers, the laser beam cannot escape from the printer during any phase of user operation.
Caution Labels Caution labels have been attached to the copier at the following locations for safety purposes. Be sufficiently careful to avoid fire or electric shock when removing a paper jam or when replacing toner. NOTE: Do not remove these labels. High temperature inside. Do not touch parts in this area, because there is a danger of getting burned. Do not incinerate toner and toner container. Dangerous sparks may cause burn. High temperature inside.
For U.S.A. and Canada For Europe, Asia, and other countries CDRH Regulations The Center for Devices and Radiological Health (CDRH) of the U.S. Food and Drug Administration implemented regulations for laser products on August 2, 1976. These regulations apply to laser products manufactured after August 1, 1976. Compliance is mandatory for products marketed in the United States. A label indicating compliance with the CDRH regulations must be attached to laser products marketed in the United States.
The manufacturer and its merchandising companies retain the following technical documentation in anticipation of the inspection that may be conducted by the authorities concerned. User’s instruction that conforms to the applicable specifications. Technical drawings. Descriptions of the procedures that guarantee the conformity. Other technical information. Kyocera Mita America Inc.
Declaration of Conformity (Australia) Manufacturer: Kyocera Mita Corporation Manufacturer's address: 2-28, 1-Chome, Tamatsukuri, Chuo-ku, Osaka, 540-8585, Japan declares that the product Product name: Page Printer Model name: FS-9130DN/FS-9530DN Description of devices: This Page Printer Model FS-9530DN is the 51ppm (FS-9130DN is the 40ppm); A4 size and utilized plain paper; dry toner; etc.
EN ISO 7779 Maschinenlärminformations-Verordnung 3. GPSGV, der höchste Schalldruckpegel beträgt 70 dB (A) oder weniger gemäß EN ISO 7779.
Energy Star (ENERGY STAR®) Program We have determined as a participating company in the International Energy Star Program that this product is compliant with the standards laid out in the International Energy Star Program.
Please read this Operation Guide before using the machine. Keep it close to the machine for easy reference. The sections of this guide and parts of the machine marked with symbols are safety warnings meant to protect the user, other individuals and surrounding objects, and ensure correct and safe usage of the machine. The symbols and their meanings are indicated below.
Symbols The following symbols indicate that the related section includes safety warnings. Specific points of attention are indicated inside the symbol. .... [General warning] .... [Warning of danger of electrical shock] .... [Warning of high temperature] The following symbols indicate that the related section includes information on prohibited actions. Specifics of the prohibited action are indicated inside the symbol. .... [Warning of prohibited action] ....
Installation Precautions Environment CAUTION: Avoid placing the machine on or in locations which are unstable or not level. Such locations may cause the machine to fall down or fall over. This type of situation presents a danger of personal injury or damage to the machine. Avoid locations with humidity or dust and dirt. If dust or dirt become attached to the power plug, clean the plug to avoid the danger of fire or electrical shock.
• • • • • Avoid locations with vibrations. Avoid locations with drastic temperature fluctuations. Avoid locations with direct exposure to hot or cold air. Avoid poorly ventilated locations. When casters are installed on the printer, moving the printer can cause damage to certain floor surfaces. During printing, some ozone is released, but the amount does not cause any ill effect to one's health.
Handling of Plastic Bags WARNING: Keep the plastic bags that are used with the machine away from children. The plastic may cling to their nose and mouth causing suffocation.
Precautions for Use Cautions when Using the Machine WARNING: Do not place metallic objects or containers with water (flower vases, flower pots, cups, etc.) on or near the machine. This situation presents a danger of fire or electrical shock should they fall inside. Do not remove any of the covers from the machine as there is a danger of electrical shock from high voltage parts inside the machine. Do not damage, break or attempt to repair the power cord.
CAUTION Do not pull the power cord when removing it from the outlet. If the power cord is pulled, the wires may become broken and there is a danger of fire or electrical shock. (Always grasp the power plug when removing the power cord from the outlet.) Always remove the power plug from the outlet when moving the machine. If the power cord is damaged, there is a danger of fire or electrical shock. If the machine will not be used for a short period of time (overnight, etc.), turn the power switch off (O).
Other Precautions Do not place heavy objects on the machine or cause other damage to the machine. Do not open the upper front cover, turn off the power switch, or pull out the power plug during printing. When lifting or moving the machine, contact your service representative. Do not touch electrical parts, such as connectors or printed circuit boards. They could be damaged by static electricity. Do not attempt to perform any operations not explained in this handbook. Use shielded interface cables.
• If toner does happen to get on your skin, wash with soap and water. Do not attempt to force open or destroy the Toner Container. Other Precautions After use, always dispose of the Toner Container in accordance with Federal, State and Local rules and regulations. Store all consumables in a cool, dark location. If the machine will not be used for an extended period of time, remove the paper from the cassette, return it to its original package and reseal it.
xxvi OPERATION GUIDE
Guide to the Operation Guide This Operation Guide has the following chapters: 1 Machine Parts This chapter explains the names of parts. 2 Printing Operation This chapter explains how to print from your workstation. 3 Maintenance This chapter explains how to replace the toner container, waste toner box, and how to care for your printer. 4 Troubleshooting This chapter explains how to handle printer problems that may occur, such as paper jams.
Conventions This manual uses the following conventions: Convention xxvi Description Example Italic Typeface Used to emphasize a key word, phrase or references to additional information. Close the top cover. Refer to Toner Container Replacement on page 3-3. Courier Typeface Used to denote messages or names displayed on the operation panel. Replace the waste toner box when the Check waste toner box message is displayed. Bracket Bold Text Typeface Used to denote operation panel keys. Press [Go].
1 Machine Parts This section provides explanations and illustrations for you to determine the parts and their functions. Try to be familiar with the names and functions of these parts for correct use and optimal performance. This chapter contains explanations on the following topics: • • • OPERATION GUIDE Components at the Front of the Printer ....................... 1-2 Components at the Left and the Rear of the Printer.... 1-3 Components at the Right of the Printer .......................
Machine Parts Components at the Front of the Printer 11 12 1 10 9 8 14 13 2 7 1 2 3 4 5 6 7 8 9 10 11 12 13 14 3 6 4 5 Operation Panel Front Cover Paper Cassette 2 Paper Guide Paper Stopper Paper Cassette 1 Handles for Transport MP (Multi-Purpose) Tray Main Switch Top Tray Toner Container Toner Container Release Lever Waste Toner Box Cleaning Brush IMPORTANT: After turning the printer off, please wait at least five seconds before turning it on again.
Machine Parts Components at the Left and the Rear of the Printer 20 19 18 17 16 15 15 16 17 18 19 20 OPERATION GUIDE Power Cord Connector Option Unit Connector Handles for Transport Left Cover 2 Lock Lever Left Cover 1 1-3
Machine Parts Components at the Right of the Printer 21 22 23 24 25 26 27 28 21 22 23 24 25 26 27 28 1-4 Memory Card Slot Option Interface Slot (OPT) Option Memory Slot Cover USB Memory Slot (A1) Parallel Interface Connector Option Hard Disk Unit Slot (HDD) Network Interface Connector USB Interface Connector (B1) OPERATION GUIDE
2 Printing Operation This chapter contains explanations on the following topics: • • OPERATION GUIDE Loading Printer Driver ................................................. 2-2 Printing from Application Software ..............................
Printing Operation Loading Printer Driver Ensure the printer is plugged in and connected to the PC before installing the printer driver from the CD-ROM. 1 Switch on the PC and activate Windows. NOTE: If the Welcome to the Found New Hardware Wizard dialog box displays, select Cancel. 2 Insert the CD-ROM supplied with the printer into the optical drive of the PC. 3 The installation program launches.
Printing Operation Printing from Application Software The steps required to print a document created with an application are explained below. You can select the printing Paper Size and Output Destination. 1 Load the paper required into the paper cassette. 2 From the application File menu, select Print. The Print dialog box displays. 3 Click the drop down list of printer names. All the printers installed in Windows are listed. Click the name of the machine.
Printing Operation 2-4 OPERATION GUIDE
3 Maintenance This chapter contains explanations on the following topics: • • • OPERATION GUIDE General Information..................................................... 3-2 Toner Container Replacement..................................... 3-3 Cleaning the Printer....................................................
Maintenance General Information This chapter describes basic maintenance tasks you can perform on the printer. You can replace the following component according to the printer's display: • Toner Container • Waste Toner Box Also, the internal parts need periodic cleaning.
Maintenance Toner Container Replacement The toner container in the printer should be replaced as soon as the message display shows Toner low or soon after. If you continue to use the printer, eventually the toner supply will be exhausted at which point the printer will stop printing and the Replace toner Clean printer message will be shown instructing you to install a new toner kit.
Maintenance Replenishing Toner This section explains how to replace the toner container. When replacing the toner container, always replace the waste toner box at the same time. If this box is full, the printer may be damaged or contaminated by the waste toner that may spill over the box. NOTE: During toner container replacement, temporarily put storage media and computer supplies (such as floppy disks) away from around the toner container. This is to avoid damaging media by the magnetism of toner.
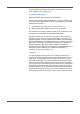
Maintenance OPERATION GUIDE 3 Grasp the handle on the toner container, push the lock lever up again and gently lift the toner container. 4 Seal up the old toner container with the supplied plastic bag and dispose of it. 5 Lightly tap the new toner on the top 5 to 6 times.
Maintenance 6 Thoroughly shake the toner container (in the direction of the arrows) ten times or more to loosen and mix the toner inside. 7 Grasp the handle on the toner container and insert the toner container along the rail of the printer. When inserting, be sure that the gear side of the toner container faces the printer. Leave the front cover open to allow insertion of the waste toner box.
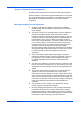
Maintenance 8 Hold the toner container using both hands and fully insert it into the printer. 9 Close the front cover. Replacing the Waste Toner Box When replacing the toner container, the used waste toner box in the printer should also be replaced with the new one from the new toner kit. The printer will not operate without replacing the waste toner box. The old waste toner box has two stickers (explained as A and B) at the front.
Maintenance 3-8 3 Peel sticker A off the waste toner box. 4 Turn around the waste toner box. Stick sticker A over the opening at the back. 5 Peel off the backing paper to gain access to sticker B.
Maintenance OPERATION GUIDE 6 Peel sticker B off the waste toner box. 7 Stick sticker B down over top of sticker A at the back. 8 Seal up the old waste toner box with the supplied plastic bag and dispose of it.
Maintenance 9 10 3-10 Fit the new waste toner box to the printer. Close the front cover.
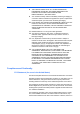
Maintenance Cleaning the Printer Cleaning the Filters When replacing the toner container, also clean the filters. OPERATION GUIDE 1 Open the MP tray. 2 Remove the filters from the printer. Press in the tabs on the top filter while removing it. 3 Press in the tab on the right filter while removing it.
Maintenance 4 Clean the filters using a vacuum cleaner or a dry cloth. Do not wash the filters nor use the cleaning brush supplied with the machine. 5 After cleaning, replace the filters in their original positions. After cleaning the filters, proceed to next section.
Maintenance The Inside of the Printer To avoid print quality problems, the interior of the printer must be cleaned. OPERATION GUIDE 1 Open the front cover all the way. 2 Remove the blue colored cleaning brush. 3 Pull up the lock lever on the left side of the printer, and open the left cover 1.
Maintenance 4 Clean the separator by moving the cleaning brush from left to right along with the separator. NOTE: When removing jammed paper, be careful not to touch the printer drum. This can cause printer malfunction. 5 3-14 While rotating the transfer roller with the gear on its left, move the cleaning brush back and forth along the transfer roller to remove soiling as shown. After cleaning, return the cleaning brush to its storage space, and close the left cover 1 and the front cover.
4 Troubleshooting This chapter explains how to handle printer problems that may occur. If a problem cannot be corrected, contact your service representative. This chapter explains the following topics: • • • • OPERATION GUIDE General Guideline ....................................................... 4-2 Print Quality Problems................................................. 4-4 Indicators and Messages ............................................ 4-7 Correcting a Paper Jam ..................................
Troubleshooting General Guideline If some kind of problem should occur, check the following before concluding the printer is broken; Symptom The printer will not print from the computer. Check Items Check the READY indicator. Check the ATTENTION indicator. Corrective Action Off Look through the items below and check anything that seems appropriate. Flashing An error has occurred. Check the message display, and then take measures referring to Indicators and Messages on page 4-7.
Troubleshooting Tips Printer problems may be solved easily by following the tips below. When you have encountered a problem that following the above guidelines will not solve, try the following: OPERATION GUIDE • Turn the printer power off and wait for several seconds. Then, turn on the printer. • Reboot the computer which sends the print jobs to the printer. • Obtain and use the latest version of the printer driver. The latest versions of printer drivers and utilities are available at: http://www.
Troubleshooting Print Quality Problems As the following table shows, there are many possible causes of print quality problems, such as blank output. The troubleshooting procedure for each type of problem is explained below. If you still cannot solve the problem, contact your service representative. Printed Results Corrective Action Completely blank printout Check the toner container. Open the printer front cover and check that the toner container is correctly installed in the printer.
Troubleshooting Printed Results Faint or blurred printing Corrective Action Check the EcoPrint setting. When this setting is On, switch it to Off on the operation panel. Check the operation panel. • If the Toner low message is displayed and the ATTENTION indicator is flashing, install a new toner kit. Refer to Toner Container Replacement on page 3-3. • Set the print density from the operation panel to a higher level than the current setting. • Make sure the paper type setting is correct.
Troubleshooting Printed Results Dirt on the top edge or back of the paper Corrective Action Check the paper ramp. Open the printer left cover and check for toner on the paper ramp. Clean the paper ramp using a soft, dry, lintfree cloth. Refer to Toner Container Replacement on page 3-3. Check the transfer roller. Open the printer left cover 1 and check the transfer roller. If the transfer roller is dirty with toner, try printing several pages.
Troubleshooting Indicators and Messages The tables on the following pages indicate how to respond to problems indicated by the operation panel indicators and messages. Indicators Indicator READY DATA ATTENTION Condition Description Flashing An error occurs that you can clear by yourself. Lit The printer is on-line. The printer is ready to print. Off The printer is off-line. The printer stores but does not print received data.
Troubleshooting Message Corrective Action Call service ####:0123456 #### represents a mechanical error (#=0, 1, 2, ...). Call for service. The printer does not operate when this message is displayed. The total number of pages printed is also indicated, e.g. 0123456. Cassette # not loaded A cassette is not loaded properly in the printer. Properly load the cassette indicated by #. The number (#) of the cassette is from 1 to 4.
Troubleshooting Message Corrective Action The option document finisher is not installed correctly. Install it correctly. Finisher path error ;Ò Incorrect slot Please reinstall The hard disk or the network interface card has been installed in the wrong slot. Turn off the printer and reinstalled in the correct slot. Install MK The maintenance kit (MK-710 for FS-9130DN and FS-9530DN) needs to be replaced. Replace the maintenance kit since the total number of printed pages has reached 500,000.
Troubleshooting Message Corrective Action Missing chad box The punch unit chad box of the document finisher is not installed correctly. Install it correctly. Missing folding tray The folding tray is not installed correctly. Install it correctly. Missing folding unit The folding unit is not installed correctly. Install it correctly. Missing toner container Install the toner container. Refer to Toner Container Replacement on page 3-3. The printer does not operate when this message is displayed.
Troubleshooting Message Corrective Action Warning image adapt Printing job cannot be done in current resolution because there is not enough internal memory. Try adding more memory or changing resolution. Warning low memory The printer’s internal memory is running low due to the number of fonts and macros downloaded. Print a status page to see how much user memory is left, and try deleting unnecessary fonts and macros. ;Ò:Alarm buzzer sounds when an error occurs.
Troubleshooting Message Corrective Action I/F occupied This message is displayed when you attempt to use the printer’s operation panel to change the environmental settings on the interface from which data are presently being received. ID error The ID entered for a private job, or a stored job is not correct. Check the ID that is set using the printer driver. Insert the same Memory card You have inserted the wrong memory card when the Insert again message was displayed.
Troubleshooting Message Corrective Action The data transferred to the printer was too complex to print on a page. Press [GO] to resume printing. (The page may break in some pages.) You can abandon printing by [CANCEL]. Print overrun Press GO NOTE: After this message is displayed, page protect mode will be On. To maintain optimum use of memory during printing, display >Page Protect from the operation panel, and re-select Auto.
Troubleshooting Correcting a Paper Jam The Paper jam message is displayed on the message display when paper becomes stuck in the paper transport system, the paper feed timing is incorrect, or paper fails to feed at all. The jam can be corrected by removing the paper. The printer goes off-line when the Paper jam message is displayed. When a paper jam occurs, a paper jam message and the paper jam location are indicated on the message display.
Troubleshooting Paper jam message Paper jam location Paper jam Cassette 1, 2, 3, 4 Paper jam MP Tray Description Reference page Paper is jammed in the paper cassette. 4-16 B Paper is jammed at the multi purpose (MP) tray. 4-17 Paper jam MP Transport H Paper is jammed at the MP transport. 4-17 Paper jam Left Cover 1 M Paper is jammed in a left cover section. 4-21 Paper jam Left Cover 2 N Paper is jammed in a left cover section.
Troubleshooting Paper Cassette The following procedure also applies to the optional paper feeder. 1 Pull out the paper cassette. Paper Cassette 4-16 2 Remove the jammed paper while taking care not to tear it. If the paper has been torn, remove all the scraps from the inside the printer. 3 Close the paper cassette.
Troubleshooting MP Tray Paper is jammed at the MP tray. Remove the jammed paper using the procedure given below. 1 Remove the paper jammed at the MP tray. 2 If the jammed paper remains at the MP tray, pull up the lever and remove the jammed paper. If the missed paper cannot be removed, go to the next step. Release Lever Inside the MP transport 1 Pull up the lock lever and open left cover 1.
Troubleshooting 4-18 2 Remove the jammed paper. 3 Push the lever (gray colored) to raise the duplex unit and remove the jammed paper. 4 Open the front cover.
Troubleshooting 5 Turn the knob clockwise to release the jammed paper from the MP transport tray section. 6 Open left cover 1 to remove paper jammed in the MP transport tray. NOTE: When removing jammed paper, be careful not to touch the printer drum. This can cause printer malfunction. 7 OPERATION GUIDE Pull out the MP transport tray as far as it will go.
Troubleshooting 8 Open the MP transport tray cover and remove any jammed paper. 9 If the paper has been torn, remove the jammed paper. 10 4-20 Replace the MP transport tray in its original position, then close the front cover.
Troubleshooting Jam in Left Cover 1 WARNING: The printer’s fixing unit is extremely hot. Take sufficient care when working in this area, as there is a danger of getting burned. CAUTION:Take care not to leave any small pieces of paper in the printer when removing paper jams as this may result in fire. 1 Pull up the lock lever and open left cover 1. Left Cover 1 Lock Lever OPERATION GUIDE 2 Remove the jammed paper.
Troubleshooting 4 If there is jammed paper in the output section, remove it. 5 Close left cover 1. 1 Open left cover 2.
Troubleshooting 2 Remove the jammed paper. 3 Close left cover 2. Document Finisher Paper is jammed at the option document finisher. Remove jammed paper referring to the DF-710 Operation Guide or DF-730 Operation Guide.
Troubleshooting 4-24 OPERATION GUIDE
5 Specifications NOTE: Specifications are subject to change without notice.
Specifications Description Item FS-9130DN FS-9530DN Memory card slot 1: Memory card (CF) Self test Performed at power-up Maximum duty cycle 200,000 pages/month Drum Amorphous silicon drum Paper sizes -Cassette A3, A4, A5, B4, B5, Ledger, Letter, Legal, Folio, Oficio II, and Statement -MP Tray Media types -Cassette -MP Tray 300,000 pages/month A3, A4, A5, A6, B4, B5, B6, Ledger, Letter, Legal, Envelope Monarch, Envelope DL, Envelope C4, Envelope C5, ISO B5, Executive, Envelope # 6, Envelope #
Specifications Description Item FS-9130DN FS-9530DN Power consumption Maximum: 900 W (U.S.A./ Canada), 800 W (European countries) During printing: 780 W or less (U.S.A./Canada), 710 W or less (European countries) During standby: 130 W or less (U.S.A./Canada), 160 W or less (European countries) During low power mode: 25 W or less (U.S.A./Canada), 45 W or less (European countries) During sleep mode: 4.
Specifications 5-4 OPERATION GUIDE
A1
Rev. 1.3 2007.