
Manual


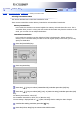
Table Of Contents
- FS-C1020MFP - User Guide
- Contents - User Guide
- Chapter contents - User Guide
- Chapter contents - User Guide
- Chapter contents - User Guide
- Chapter contents - User Guide
- Chapter contents - User Guide
- Chapter contents - User Guide
- Chapter contents - User Guide
- Chapter contents - User Guide
- Chapter contents - User Guide
- Chapter contents - User Guide
- Chapter contents - User Guide
- All titles - User Guide
- Help
- Introduction
- Trademarks
- Disclaimer
- Manuals for This Machine
- Machine Types
- How to Read This Manual
- Symbols
- Notes
- Web Browser
- Feature Highlights
- Using the Machine as a Printer
- Connecting via USB
- Connecting via a network
- Printing confidential documents
- Using the Machine as a Copier
- Making enlarged or reduced copies
- Copying multiple pages onto a single sheet of paper
- Copying both sides of an ID card onto one side of paper
- Making 2-sided copies
- Sorting the output paper
- Using the Machine as a Scanner
- Scanning from a computer
- Sending scanned files via e-mail
- Sending scanned files to an FTP server
- Sending scanned files to a computer's shared folder
- Using the Machine as a Fax Machine
- Using as a fax machine
- Using the machine with an external telephone
- Sending faxes from a computer (LAN-Fax)
- Guide to Components
- Exterior: Front View
- Exterior: Rear View
- Interior
- Control Panel
- Installing the Machine
- Where to Put the Machine
- Unpacking
- Turning the Power on
- Initial Setup
- Changing Operation Modes
- Saving Energy
- Multi-Access
- Connecting the Machine
- Connecting with USB Cable
- Connecting with Network Cable
- Reading the LED lamps
- Connecting to a Telephone Line
- Configuring the Machine
- Configuring the IP Address Settings
- Setting the machine to receive an IP address automatically
- Assigning the machine's IP address manually
- Configuring Telephone Network Settings
- Selecting the telephone line type
- Selecting the telephone network connection type
- Setting the outside line access number
- Sharing the Printer on a Network
- Installing Options
- Installing the Paper Feed Unit (Tray 2)
- Installing the Memory Unit (DDR-SDRAM Module)
- Paper and Other Media
- Supported Paper for Each Tray
- Specifications of Paper Types
- Unsupported Types of Paper
- Paper Storage Precautions
- Printable Area
- Loading Paper
- Loading Paper in Tray 1
- Loading Legal size paper
- Loading envelopes
- Loading Paper in the Optional Paper Feed Unit
- Loading Paper in the Bypass Tray
- Specifying Paper Type and Paper Size
- Specifying the paper type
- Specifying the standard paper size
- Specifying a custom paper size
- Placing Originals
- About Originals
- Recommended size of originals
- Types of originals not supported by the Auto Document Feeder
- Unscannable image area
- Placing Originals
- Placing originals on the exposure glass
- Placing originals in the Auto Document Feeder
- Entering Characters
- Value Input Mode
- Fax Number Input Mode
- Text Input Mode
- Restricting Machine Functions According to User
- Enabling the User Restriction Settings
- Modifying user entries
- Deleting user entries
- When a Message Requesting a User ID Appears
- Configuring Option Settings for the Printer
- Conditions for Bidirectional Communication
- If Bidirectional Communication is Disabled
- Windows
- Mac OS X
- Accessing the Printer Properties
- Accessing the Printer Properties from the [Printers and Faxes] Window
- Accessing the Printer Properties from an Application
- Windows
- Mac OS X
- Basic Operation in Printer Mode
- If a Paper Mismatch Occurs
- Continuing printing using mismatched paper
- Resetting the print job
- Canceling a Print Job
- Canceling a print job before printing has started
- Canceling a print job while printing
- Printing Confidential Documents
- Storing a Locked Print file
- Printing a Locked Print file
- Deleting a Locked Print file
- Checking which Locked Print File Jobs Have Been Canceled
- Using Various Print Functions
- Print Quality Functions
- Print Output Functions
- The Screen in Copier Mode
- Basic Operation in Copier Mode
- Canceling a Copy
- Making Enlarged or Reduced Copies
- Combining Multiple Pages
- Copying Two or Four Pages onto One Sheet
- Copying Both Sides of an ID Card onto One Side of Paper
- Making 2-sided Copies
- Specifying Scan Settings
- Adjusting Image Density
- Selecting the Document Type According to Original
- The Screen in Scanner Mode
- Registering Scan Destinations
- Modifying Scan Destinations
- Deleting Scan Destinations
- Scanning Using the Control Panel
- Basic Operation for Sending Scanned Files
- Specifying the scan destination
- Specifying the Scan Settings
- Specifying the scanning size according to the size of the original
- Adjusting image density
- Specifying resolution
- Scanning from a Computer
- Settings you can configure in the TWAIN dialog box
- The Screen in Fax Mode
- Setting the Date and Time
- Registering Fax Destinations
- Registering Fax Destinations Using the Control Panel
- Modifying fax destinations
- Deleting fax destinations
- Registering Fax Destinations Using Web Browser
- Modifying fax destinations
- Deleting fax destinations
- Sending a Fax
- Selecting Transmission Mode
- Basic Operation for Sending a Fax
- Canceling a fax
- Specifying the Fax Destination
- Specifying the destination using the One Touch buttons
- Specifying the destination using Speed Dial
- Specifying the destination using the broadcast function
- Specifying the destination using the redial function
- Useful Sending Functions
- Specifying the Scan Settings
- Adjusting image density
- Specifying the resolution
- Using the Fax Function from a Computer (LAN-Fax)
- Configuring the LAN-Fax Address Book
- Opening the LAN-Fax Address Book
- Registering destinations
- Modifying destinations
- Registering groups
- Modifying groups
- Deleting individual destinations or groups
- Exporting/Importing LAN-Fax Address Book data
- Basic Operation for Sending Faxes from a Computer
- Canceling a fax
- Configuring Transmission Settings
- Settings you can configure in the LAN-Fax driver's properties
- Receiving a Fax
- Selecting Reception Mode
- Receiving a Fax in Manual Mode
- Receiving a Fax in Fax Only Mode
- Receiving a Fax in FAX/TEL Mode
- Receiving a Fax in FAX/TAD Mode
- Basic Operation Using the Menu Screen
- Menu Chart
- Copy Settings
- Changing Copy Settings
- Copy Setting Parameters
- Scanner Settings
- Changing Scanner Settings
- Scanner Setting Parameters
- Fax Transmission Settings
- Changing Fax Transmission Settings
- Fax Transmission Setting Parameters
- Fax System Settings
- Changing Fax System Settings
- Fax System Setting Parameters
- Fax Directory Settings
- Registering Fax Destinations in Fax Quick Dial/Speed Dial
- Fax Directory Parameters
- Machine Settings
- Changing Machine Settings
- Machine Setting Parameters
- Network Settings
- Changing Network Settings
- Network Setting Parameters
- Reports Print
- Printing the Configuration Page
- Types of Report
- Reading the Configuration Page
- Reading the Activity Report
- Reading the Memory List
- Reading the Scan Transmission Log
- Administrator Settings
- Changing Administrator Settings
- Administrator Setting Parameters
- PDL Settings
- Changing PDL Settings
- PDL Setting Parameters
- Using Web Browser
- Displaying the Main Page
- Changing the Interface Language
- Checking the System Information
- Checking the Status Information
- Checking the Counter Information
- Checking the Machine Information
- Configuring the Machine Settings
- Configuring the Speaker Volume
- Configuring the Paper Settings
- Specifying the Size of Paper for Printing Copies
- Specifying the Tray for Printing Faxes
- Specifying the Tray Priority for the Printer Function
- Configuring Toner Saver Mode
- Registering Destinations
- Restricting Machine Functions According to User
- Printing Reports
- Configuring the Network Settings
- Checking the Network Status
- Configuring the Network Application Settings
- Configuring the DNS Settings
- Configuring the Alert Message Settings
- Configuring the SNMP Settings
- Configuring the SMTP Settings
- Configuring the Administrator Settings
- Configuring the Password
- Restoring the Default Settings
- Backing Up the Machine's Settings
- Restoring the Machine's Settings from a Backup File
- Configuring the Date and Time Settings
- Configuring the Power Saver Mode Settings
- Overview
- Common Problems
- Paper Feed Problems
- Removing Printing Jams
- If paper jams inside the fusing unit
- If paper jams inside a tray
- If paper jams inside the transfer unit
- Removing Scanning Jams
- Print Quality Problems
- Checking the Condition of the Machine
- Printer Problems
- Changing the Printer Driver Settings
- Printed Colors Do Not Match Displayed Colors
- Print Positions Do Not Match Display Positions
- Copier Problems
- Scanner Problems
- Fax Problems
- Error and Status Messages on the Screen
- Replacing Print Cartridges
- Replacing the Waste Toner Bottle
- Cleaning
- Cautions to Take When Cleaning
- Cleaning the Toner Density Sensor
- Cleaning the Friction Pad and Paper Feed Roller
- Cleaning the Registration Roller
- Cleaning the Exposure Glass
- Cleaning the Auto Document Feeder
- Moving the Machine
- Moving over a Short Distance
- Moving over a Long Distance
- Disposal
- If the Machine is Not Going to Be Used for a Long Time
- Preparing the Machine for a Long Period of Inactivity
- Using the Machine Again After It Has Been Inactive for a Long Period
- Consumables
- Print Cartridges
- Waste Toner Bottle
- Specifications of the Machine
- General Function Specifications
- Printer Function Specifications
- Copier Function Specifications
- Scanner Function Specifications
- Fax Function Specifications
- Specifications of Options
- Paper Feed Unit
- Memory Unit
- Electromagnetic Interference
- Information about Installed Software
- expat
- JPEG LIBRARY

Top Page > Using the Fax Function > Registering Fax Destinations > Registering Fax Destinations Using Web Browser > Modifying
fax destinations
Modifying fax destinations
This section describes how to modify the information of registered destinations.
Start the Web browsing software and access the machine by entering its IP address.
Click [One Touch Button] or [Fax Speed Dial].
If you modify the Speed Dial entry, proceed to step .
Click [Fax Quick Dial].
Select the entry to modify, and then click [Edit].
Modify settings as necessary.
Enter the administrator password if required.
Click [Submit].
Close the Web browsing software.
Top Previous Next
Copyright © 2009
Contents Previous Next Settings