INSTRUCTION HANDBOOK Introduction Chapter 1 Printer-related operation ■ 1. Printer Settings ■ 2. Memory Card / RAM Disk Chapter 2 Software-related operation ■ 1. Procedure for Installing and Printing with a Printer Driver ■ 2. Windows XL Driver ■ 3. Printer Driver for Windows 95/98 ■ 4. Printer Driver for Windows NT ■ 5. Printer Driver for Windows 2000 ■ 6.
Introduction About this On-Line Manual This On-Line Manual is included with your Printing System (M) and should be read in combination with the Instruction Handbook for that product. This manual contains information on making settings in your printer, as well as on installing and setting the printing properties for the corresponding Printer Drivers. The explanations in this manual were written with the assumption that the user has a basic understanding of how to work in Microsoft Windows.
IBM PROGRAM LICENSE AGREEMENT THE DEVICE YOU HAVE PURCHASED CONTAINS ONE OR MORE SOFTWARE PROGRAMS (“PROGRAMS”) WHICH BELONG TO INTERNATIONAL BUSINESS MACHINES CORPORATION (“IBM”). THIS DOCUMENT DEFINES THE TERMS AND CONDITIONS UNDER WHICH THE SOFTWARE IS BEING LICENSED TO YOU BY IBM. IF YOU DO NOT AGREE WITH THE TERMS AND CONDITIONS OF THIS LICENSE, THEN WITHIN 14 DAYS AFTER YOUR ACQUISITION OF THE DEVICE YOU MAY RETURN THE DEVICE FOR A FULL REFUND.
Typeface Trademark Acknowledgement All resident fonts in this printer are licensed from Agfa Corporation. Helvetica, Palatino and Times are registered trademarks of Linotype-Hell AG. ITC Avant Garde Gothic, ITC Bookman, ITC ZapfChancery and ITC Zapf Dingbats are registered trademarks of International Typeface Corporation. Agfa Japan License Agreement 1. “Software” shall mean the digitally encoded, machine readable, scalable outline data as encoded in a special format as well as the UFST Software. 2.
1. Printer Settings 1. Printer Settings IMPORTANT! All setting items and the selection of their actual settings are accomplished in this machine based on a maximum 3-digit entry system. Refer to “1-2 List of settings” on page 1-3 for information regarding the various items as well as their corresponding menu numbers and available settings. 1-1 Procedure for making settings 1 2 3 Press the Printer key.
1.
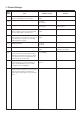
1. Printer Settings 1-2 List of settings Menu number Item Available settings Remarks P11 Printer Status Page print out Prints out a list of such items as the current printer default settings and memory volume, etc. ––– P20 Parallel TX/RX mode Sets the transmission and reception mode when the printer is connected to your computer with a parallel interface. (1) Auto (2) Normal (3) High Speed (4) Nibble (high) P21 NetWare ON/OFF (1) On (2) Off Available only when the Network Card is installed.
1. Printer Settings Menu number Item Available settings Remarks P31 KPDL Error Report print out ON/OFF Sets whether an Error Report will be automatically printed out whenever a KPDL error occurs. (1) On (2) Off P32 Auto emulation switching (parallel interface) Sets the back-up emulation that, depending upon the type of data received, may be switched to for printing out when “KPDL (AUTO)” (setting: 7) is selected under the “Emulation protocol” setting (menu: P30).
1. Printer Settings Menu number Item Available settings P47 Wide A4 ON/OFF Increases the printing area on A4 size paper. (1) On (2) Off P48 Printing orientation (parallel interface) (1) Portrait (2) Landscape P49 Printing orientation (network interface) (1) Portrait (2) Landscape P50 Smoothing ON/OFF Allows a printing resolution of an interpolated 2400 dpi x 600 dpi through the smoothing process. (1) On (2) Off P51 EcoPrint ON/OFF Allows printing in a toner-saving mode.
1. Printer Settings Menu number Item Available settings P71 Receive dump mode The data that the printer receives for debugging programs and files is turned into hexadecimal code and printed out. If “OK” (setting: 1) is selected here, this receive dump mode will be activated. The receive dump mode will be canceled under the following circumstances: • The Start (Go) key is pressed in the printer mode. • A force-print time-out occurs.
2. Memory Card 2. Memory Card / RAM Disk / RAM Disk 2-1 Memory Card This machine comes equipped with a slot for inserting a Memory Card. Use a Memory Card that contains fonts in order to print with fonts other than those already installed in the machine, or use the card to save and then read print data. Inserting the Memory Card Insert the Memory Card into the slot carefully with the front of the card facing the rear of the machine.
2. Memory Card / RAM Disk 2-3 Printer control commands It is possible to issue simple commands to the Memory Card and RAM Disk from the MS-DOS Prompt in Windows. 2-3-1 Using printer control commands A printer control command line includes “!R!” (Command operation start), as well the actual commands and parameters that are to be implemented and that are entered after that. The basic configuration of a printer control command line is as follows: [Example] To delete the print data entitled “SAMPLE.
2. Memory Card / RAM Disk 2-3-2 Formatting the Memory Card Perform the following procedure when you want to initialize the Memory Card from your computer. IMPORTANT! WARNING;: Initializing the Memory Card will erase all data in the card. Make sure that you want to initialize that Memory Card before starting the procedure. Procedure 1 Insert the Memory Card that you want to initialize into the Memory Card slot. 2 Open an MS-DOS Prompt in Windows.
2. Memory Card / RAM Disk 2-3-4 Writing font data Perform the following procedure when you want to write font data to a Memory Card or RAM Disk from your computer. At the same time as the font data is written to disk, it will be sent to the printer as well. * Verify beforehand that the Memory Card is in a write-enabled state and that the RAM Disk is turned ON. * Only TrueType fonts can be written to the Memory Card or RAM Disk. Procedure 1 Open an MS-DOS Prompt in Windows.
2. Memory Card / RAM Disk 2-3-5 Reading print data Perform the following procedure when you want to read print data that has been saved on a Memory Card or RAM Disk. * Verify beforehand that the Memory Card is in a write-enabled state and that the RAM Disk is turned ON. * To verify saved data and the corresponding partition name, it is helpful to print out the Partition List. Refer to “2-3-7 Printing out the Partition List” for information on printing that list. Procedure 1 Open an MS-DOS Prompt in Windows.
2. Memory Card / RAM Disk 2-3-7 Printing out the Partition List Perform the following procedure when you want to print out the Partition List in order to verify the print data and font data that has been saved on a Memory Card or RAM Disk. Procedure 1 Open an MS-DOS Prompt in Windows. 2 Type in the command to print out the Partition List and then press the ENTER key.
1. Procedure for Installing andwith Printing 1. Procedure for Installing and Printing a Printerwith Drivera Printer Driver 1-1 Included printer drivers The following printer drivers are included with this product. * Each type of printer driver has a version appropriate to a specific model of copy machine. Be sure to choose the driver that is appropriate for your copier.
1.
1. Procedure for Installing and Printing with a Printer Driver 1-3 Screen that Appears when the CD-ROM is Inserted This section explains the screen that appears when the CD-ROM supplied with the Printing System (M) is inserted into the CD-ROM drive. ■ Install Drivers Click to start installation of the printer driver. Follow the instructions displayed on the screen to install the printer driver. ■ Driver Tools Click to display a menu including uninstallation of the printer driver. [Remove Drivers] ......
1. Procedure for Installing and Printing with a Printer Driver 1-4 Installing the Printer Driver (Windows) Install the printer driver as follows: * The printer can be connected to the computer by one of the following two methods: local or network. If you want to connect them through network, refer to the operation manual of the operating system (OS). * DO NOT use Plug&Play when installing the printer driver. Depending upon the printer you are using, the printer driver may not be installed correctly.
1. Procedure for Installing and Printing with a Printer Driver 7 8 9 10 Select the driver type. From the list, select the type of driver to be installed, then click Next. * Refer to “1-1 Included printer Drivers” on page 1-1 for information regarding each printer driver. The End User Licence Agreement will be displayed. Please read all of the contract and, if you agree with the conditions contained therein, click on [Accept]. If you click on [No] the installation procedure will quit.
1. Procedure for Installing and Printing with a Printer Driver 12 13 14 15 16 Select a printer port. From the list, select the desired port, then click Next. * Normally, set to LPT1. * When installing the printer driver for Windows NT, the Add LPR Port button will appear below the box, so press the button to set the desired LPR printer. A name can be assigned to your printer. Specify a new name or select the desired name from the list, then click Next.
1. Procedure for Installing and Printing with a Printer Driver 1-5 Uninstalling the Printer Driver The following procedure explains how to uninstall the printer drivers. The uninstall program can be found on the CD-ROM that is included with this product. 1 2 Start Windows. Insert the printer driver installer CD-ROM into the CD-ROM drive on your computer. The window shown on the right will appear. 3 Click on [Driver Tools] and then on [Remove Drivers] from the subsequent menu.
1. Procedure for Installing and Printing with a Printer Driver 1-6 Printing The following is an example procedure for printing using a printer driver under the conditions and environment noted below. • OS : Windows 95 • Printer driver : KPDL2 Driver • Application : Wordpad If you use a system or driver other than that noted above, use the following procedure simply as a reference tool.
1. Procedure for Installing and Printing with a Printer Driver 6 7 8 ● Printing from the application Use the application that you want to use to open the document that you want to print. Select [Print] in the [File] menu. The [Print] dialogue box will appear. Select the desired number of copies that you want to make and which pages are to be printed. Select this printer in the [Name] field. Click on [Properties]. The Properties window will appear.
2. Windows 2. Windows XL DriverXL Driver The following section explains the functions of the XL driver. * The following procedure is explained as though it is being carried out in Windows 2000. If you are using another operating system, use this procedure simply as reference. * Depending upon version upgrades of the printer driver, the screenshots shown here may differ somewhat from that of the actual printer driver.
2. Windows XL Driver 2-2 Media Tab ■ Paper Size: Allows you to select a standard size of paper or an envelope size. The following sizes of paper or envelope can be used with this printer. Standard-size paper sheet Letter (8-1/2" x 11"), Legal (8-1/2" x 14"), Statement (5-1/2" x 8-1/2"), A4, A5, A6, JIS B5, JIS B6 and Folio Envelope COM-10, Monarch, DL and C5 ■ Custom... Click on this button when you want to print onto a non-standard size of paper. The “Custom Media Size” dialog box will appear.
2. Windows XL Driver 2-2-1 Custom Media Size dialog box ■ 1 Setting a custom paper size Perform the following procedure in order to register a custom size when you want to print onto a non-standard size of paper. The information registered here will be displayed under the “Page Size” setting in the Media Tab as well as in the Paper Size setting of your application. Select the desired unit of measurement in the “Units” block and the desired dimensions of the paper in the “Size” block.
2. Windows XL Driver 2-3 Layout Tab ■ Pages per Sheet: Allows you to print reduced images of multiple (1, 2, 4, 6, 9, 16 or 25) pages onto a single sheet of paper. This function is called “N-Up” printing (where “N” equals the number of image pages). Reduction of the images is calculated automatically so that all of the selected pages fit onto the single sheet of paper. The factory default setting is “1” (one page to each sheet of paper).
2. Windows XL Driver 2-4 Imaging Tab ■ Print Quality: Specifies the printing resolution (number of dots per inch) to be used when printing. Select between “600 dpi [High]”, “300 dpi [Low]” and “Draft Mode”. If you select the “Draft Mode” option, printing will be accomplished printing in a toner-saving mode. This mode is especially suited for test pages, etc., where high printing quality is not required. ■ Grayscale Adjustment Adjusts the brightness and contrast of the printed image.
2. Windows XL Driver 2-5 Output Tab ■ Copies Specifies the number of prints to be made. Select between 1 and 999 copies by clicking on the arrows at the right of the field or by typing the desired number directly into the field. The factory default setting is “1”. ■ Collate When you are printing more than one copy of one or more pages, it is possible to sort the printed copy sets. *It is necessary to create a RAM disk.
2. Windows XL Driver 2-6 Device Settings Tab To access the Device Settings screen, in step 4 on page 2-1 select [Properties] from the menu and then click on the Device Settings Tab. When you have added optional equipment, make the appropriate settings for that equipment here. Once the corresponding setting is complete, the corresponding function of the installed option will be added to the printer. ■ Device Options Select and installed options here.
2. Windows XL Driver 2-6-1 User Settings ■ General Register the desired user and/or department name. ■ Page Description Language The emulation modes that can be used with this product will be displayed in the dropdown list. If multiple modes are displayed, it is possible to select the desired mode. ■ GDI compatible mode Select this mode in order to accomplish printing that is more accurate to the data shown on your monitor. Select this mode if text corruption, etc.
3. Printer Driver 3. Printer Driver for Windowsfor 95/98Windows 95/98 The following procedure explains the functions of the Universal driver and the KPDL2 driver for those who use Windows 95 or Windows 98 as their operating system. * Depending upon version upgrades of the printer driver, the screenshots shown here may differ somewhat from that of the actual printer driver.
3. Printer Driver for Windows 95/98 3-2 Paper Tab (Universal Driver) ■ ■ Paper size: Select the size of standard-size paper sheet or envelope. The following standard-size paper sheets and envelopes can be used with this printer: Standard-size paper sheet Letter (8 1/2" x 11"), Legal (8 1/2" x 14"), Statement (5 1/2" x 8 1/2"), A4, A5, A6, Folio (210 x 330 mm), JIS B5, JIS B6 Envelope COM-10, Monarch, DL, C5 Orientation: Select the print orientation from the following: [Portrait] .....................
3. Printer Driver for Windows 95/98 3-3 Graphics Tab (Universal Driver) ■ Resolution: Specify the desired print resolution. The resolution must be specified in the number of dots per inch (dpi). Select between “600 x 600 dots per inch” and “300 x 300 dots per inch”. The factory default setting is “600 dots per inch”. ■ Dithering Specifies the method of Dithering. Refer to On-Line Help for more detailed information. ■ Intensity Allows you to adjust the printing contrast.
3. Printer Driver for Windows 95/98 3-4 Device Option Tab (Universal Driver) ■ Printer memory: Perform this setting according to the amount of memory in your printer. If a mistake is made in this setting, there is a possibility that printing will not be accomplished properly.
3. Printer Driver for Windows 95/98 3-5 Paper Tab (KPDL2 Driver) ■ Paper Size: Select the size of standard-size paper sheet or envelope.
3. Printer Driver for Windows 95/98 3-6 Graphics Tab (KPDL2 Driver) ■ Resolution: Specify the desired print resolution. The resolution must be specified in the number of dots per inch (dpi). Select between “600 x 600 dots per inch (dpi)” and “300 x 300 dots per inch (dpi)”. The factory default setting is “600 dots per inch (dpi)”. ■ Halftoning: Specifies values for the number of line per inch “frequency” and angle of the pattern that you want to use for halftone screens.
3. Printer Driver for Windows 95/98 3-7 Device Options Tab (KPDL2 Driver) ■ Available printer memory (in KB) Indicates the amount of memory available for printing. As this is determined according to the amount of memory entered as the “VM Option” setting under “Installable Options”, there is normally no need to change it. ■ Print features It is possible to change the settings related to various printer functions.
3. Printer Driver for Windows 95/98 3-8 PostScript Tab (KPDL2 Driver) Allows you to make PostScript-related settings. Refer to On-Line Help for more detailed information.
4. Printer Driver for WindowsNT 4. Printer Driver for WindowsNT The following procedure explains the functions of the Universal driver and the KPDL2 driver for those who use Windows NT4.0 as their operating system. * Depending upon version upgrades of the printer driver, the screenshots shown here may differ somewhat from that of the actual printer driver. * Refer to the Instruction Manual for Windows or to On-Line Help for information regarding items that are not explained in this Instruction Handbook.
4. Printer Driver for WindowsNT 4-2 Paper/Output (Universal Driver) ■ Paper Size: Select the size of standard-size paper sheet or envelope. Selection can be made in the “Change ‘Paper Size’ Setting” area.
4. Printer Driver for WindowsNT 4-4 Document Options (Universal Driver) ■ Media: Saves on toner. Setting can be made in the “Change ‘Media’ Setting” area. The factory default setting is “Eco Print-Off”.
4. Printer Driver for WindowsNT 4-5 Paper/Output (KPDL2 Driver) ■ Paper Size: Select the size of standard-size paper sheet or envelope. Selection can be made in the “Change ‘Paper Size’ Setting” area.
4. Printer Driver for WindowsNT 4-7 Document Options (KPDL2 Driver) 4-7-1 PostScript Options: Allows you to make PostScript-related settings. Refer to On-Line Help for more detailed information.
4. Printer Driver for WindowsNT 4-7-2 Printer Features ■ EcoPrint: Saves on toner. Setting can be made in the “Change ‘EcoPrint’ Setting” area. The factory default setting is “Off”. ■ Edge Smoothing: Turning this setting “On” allows the jaggies that appear around the edge of text and graphics to be evened out through the smoothing process. ■ PagePolicy: Perform this setting in conjunction with the settings to be made under “Paper source” on page 4-4. [Auto Size Select] ......................
4. Printer Driver for WindowsNT 4-8 Device Settings Tab In order to access the device settings, select “Properties” in step 4 on page 4-1 and then click on the “Device Settings” Tab. ■ Installed Memory (Kilobyte) Perform this setting according to the amount of memory in your printer. If a mistake is made in this setting, there is a possibility that printing will not be accomplished properly.
5. Printer Driver for Windows2000 5. Printer Driver for Windows2000 The following procedure explains the functions of the Universal driver and the KPDL2 driver for those who use Windows 2000 as their operating system. * Depending upon version upgrades of the printer driver, the screenshots shown here may differ somewhat from that of the actual printer driver. * Refer to the Instruction Manual for Windows or to On-Line Help for information regarding items that are not explained in this Instruction Handbook.
5. Printer Driver for Windows2000 5-2 Layout Tab ■ Orientation Select the print orientation from the following: [Portrait] ..................................... Prints lengthwise. [Landscape] ............................... Prints widthwise. [Rotated Landscape] ................ Selecting this option prints upside down. (only available with KPDL2 Driver) ■ Page Order The Printer has the ability to print from the 1st page or from the last page.
5. Printer Driver for Windows2000 5-3 Paper/Quality Tab : (Tray Selection) ■ Paper Source: (Universal Driver) Select the desired location of paper feed from the pulldown menu. The factory default setting is “Automatically Select”. * Items marked with an exclamation point (!) are currently unavailable. Refer to “5-5 Device Settings” and complete the appropriate setting for the corresponding function in order to use that item.
5. Printer Driver for Windows2000 5-4 Advanced Options The following explains the Advanced Options dialog box. * The explanations here are focused mostly on the special features of this product. Refer to On-Line Help for information regarding items that are not explained in this Instruction Handbook. 5-4-1 Paper/Output ■ Paper Size: Select the size of standard-size paper sheet or envelope. Selection can be made in the drop-down list.
5. Printer Driver for Windows2000 5-4-3 Document Options ■ Advanced Printing Features: Be sure to select “Enable” for this setting if you want to use the “Pages Per Sheet” (N-Up) function or the “Back to Front” option under the “Page Order” setting.
5. Printer Driver for Windows2000 5-4-4 Printer Features ■ Eco print: Saves on toner. The factory default setting is “Off”. ■ Edge Smoothing: Turning this setting “On” allows the jaggies that appear around the edge of text and graphics to be evened out through the smoothing process. ■ PagePolicy: (only available with KPDL2 Driver) Perform this setting in conjunction with the settings to be made under “Paper Source” on page 5-3. [Auto Size Select] ......................
5. Printer Driver for Windows2000 5-4-5 PostScript Options: This option can only be used with a KPDL2 Driver. Allows you to make PostScript-related settings. Refer to On-Line Help for more detailed information.
5. Printer Driver for Windows2000 5-5 Device Settings Tab In order to view this window and make settings for optional equipment, select “Properties” in step 4 on page 5-1 and then click on the “Device Settings” Tab. Perform the settings here whenever you add optional equipment. The functions of the optional equipment will only be available to the printer after you have completed the setting here. The optional equipment available for selection are as follows.
6. Printer Driver for Macintosh 6. Printer Driver for Macintosh When using unit as a network printer, it is possible to print PostScript files from a Macintosh Computer. This section contains explanations regarding the procedure to install the Macintosh PPD files and select this printer, as well as explanation about the computer environment required to run the installed files. Attention (Macintosh) *When using the Printer driver, change the emulation setting KPDL or KPDL (AUTO).
6. Printer Driver for Macintosh 2 3 4 5 6 Double-Click on the icon for the CD-ROM disk. “A copy machine product name of use” dialog box will appear. Double-Click on “the copy machine product name of use” Installer icon. The window shown on the right will appear. Click on “Continue”. A dialog box will appear. Click on [Install]. A dialog box will appear. Click on [Yes]. Installation was finished. Click on [Restart], and start again.
6. Printer Driver for Macintosh 7 8 9 10 11 Access the Apple Menu at the far left of the Menu of Bar and select Chooser. The Chooser will appear. Click once on the LaserWriter 8 icon. Select the name of this printer in the [Select a PostScript Printer] list and then click on the [Create] button. * The name of this printer can be verified by printing out a Status Page from the printer’s operation panel. A dialog box for selecting the appropriate options will appear.
6. Printer Driver for Macintosh 6-3 General Dialog Box *The actual layout of each dialog box and the available option and settings may differ somewhat depending upon the application and version of LaserWriter that you are using. ■ Printer: Selects the desktop printer to be used for printing your document. ■ Copies: Type the desired number of prints to be made (or the number of files to be saved to disk) directly into this field. Select a number between 1 - 999.
6. Printer Driver for Macintosh 6-4 Layout Dialog Box ■ Pages per sheet: Sets the number of pages to be printed on each sheet of paper. ■ Layout Direction: A button of either is clicked, and a layout direction is decided. If right button is selected, the pages are laid out from right to left. ■ Border: Sets the type of line to appear around the page.
6. Printer Driver for Macintosh 6-5 Printer Specific Options ■ Resolution: Specifies the printing resolution (number of dots per inch) to be used when printing. Select between “600 dpi” and “300 dpi”. The factory default setting is “600 dpi”. ■ Smoothing: Turning this setting “On” allows the jaggies that appear around the edge of text and graphics to be evened out through the smoothing process.
6. Printer Driver for Macintosh 6-6 Page Setup dialog Dialog Box Settings for paper size, page layout, magnification ratio and print direction (orientation) are performed in the Page Setup dialog box. To display the Page Setup dialog box, select Page Setup… in the File menu of the corresponding application. * The actual layout of each dialog box and the available options and settings may differ somewhat depending upon the application and the version of LaserWriter that you are using.
6. Printer Driver for Macintosh 6-7 PostScript Dialog Box The actual layout of each dialog box and the available options and settings may differ somewhat depending upon the application and the version of LaserWriter that you are using. ■ Visual Effects: Visual effects such as horizontal and vertical flip and image inverting can be selected here. Place a check in the check box next to the desired visual effects to select that effect.
6. Printer Driver for Macintosh 6-8 Custom paper sizes Dialog Box When a paper sizes is selected in “Custom paper sizes” Dialog Box , the paper size can be set as desired. * The actual layout of each dialog box and the available options and settings may differ somewhat depending upon the application and the version of LaserWriter that you are using. ■ New button To create a new custom page size, click this button. * The acceptable paper width is between 9.81 - 21.59 cm (metric) or 3.86”- 8.5” (inches).