
User Guide


Copying Functions
1-3
Original Size
Specify the size of originals that will serve as the basis for scanning. Be sure to specify the original
size when copying originals of nonstandard sizes.
Choose the original size from the following groups of original size.
• Standard Size - Standard sizes in commonly used.
Inch models: 11 × 17", 8
1/2 × 14", 11 × 8 1/2", 8 1/2 ×11", 51/2 ×81/2", 8 1/2 ×51/2", 8 1/2 ×131/2",
8
1/2 × 13", 11 × 15", B4 and A4
Metric models: A3, B4, A4, A4R, B5, B5R, A5, A5R, B6, B6R, A6R, Folio, 11 × 15", 11 × 8
1/2"
and 8
1/2 ×11"
• Other Standard Size - Standard sizes not in commonly used.
Inch models: A3, B4, B5, B5R, A5, A5R, B6, B6R, A6R, Folio, P. Card, OUFUKU, 8K, 16K and
16KR
Metric models: 11 × 17", 8
1/2 ×14", 51/2 ×81/2", 8 1/2 ×51/2", 8 1/2 ×131/2", 8 1/2 × 13", P. Card,
OUFUKU, 8K, 16K and 16KR
• Input Size - Non-standard sizes which you enter width and length.
• Custom Size - Non-standard sizes which you enter and register as custom sizes. For
instructions on registering original sizes, refer to Registering Non-standard Sizes for Originals
on page 3-40.
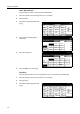
Standard Size
Follow the steps as below to specify the standard size.
1
Place the originals in the document processor or on the platen.
2
Press [Function].
3
Press [Select Orig.Size] ([Select Size
Orig.]).
4
Select the original size.
Choose [Auto] to match the size of
placed originals automatically.
5
Press the Start key to start copying.
Ready to copy.
11x8
½
Paper Size
Program
Function
User choiceBasic
Exposure Reduce
Cover
Bookl et
Up
Batch
Scanning
Auto
Selection
Bor der
Select
Orig.Image
2 sided/
Margi n/
Center ing
Sort/
Offset
Select
Orig.Size
Page #
Combi ne
Form
Overlay
Down
100%
Paper Separation
Mode /Enlarge
Erase Mode
Quality
Ready to copy.
Select
11x8½"
8½x5½"
5½x8½"11x17"
Other
Input size
Auto
8½x14"
8½x11"
11x15"
8½x13½"
8½x13"
A4
BackSelect Original Size
A4
Cust
o
stand.Si ze
Paper Size
11x8
½
100%
2x2"
2x2"
2x2"
2x2"
Shortcut
size