KM-C2525E KM-C3225E KM-C3232E KM-C4035E Operation Guide Please read the Operation Guide before using this machine. Keep it close to the machine for easy reference.
This Operation Guide is for models KM-C2525E, KM-C3225E, KM-C3232E and KM-C4035E. In this guide, KM-C2525E refers to the 25/25 ppm (prints per minutes) model, KM-C3225E to the 32/25 ppm model, KM-C3232E to the 32/32 ppm model and KM-C4035E to the 40/35 ppm model.
Taking Advantage of Advanced Functions Basic Copying...
Memo Mode Batch Scanning Sharpness Adjust Add space for notes next to copied images Copy high-volume originals in a single Adjust the sharpness of image copy job outlines 200 100 1 1 Background Exposure Adjust Proof Copy Repeat Copy Adjust the background of color images Copy a test sheet before a high-volume job Produce more copies as needed after making the initial copies 3 2 1 3 2 3 2 1 1 OHP Backing Sheet Mode EcoPrint Inverted Copying Insert plain paper backing sheets when printing t
Hue Adjust One Touch Image Adjust Color/B&W Selection Adjust the color (hue) of images Adjust image quality to match the image Make color and B&W copies in one operation Vivid Dull Sharp Single Color Copy Programmed Copying Make copies in 1 other than black Remember commonly used settings Job Build Set cover page, middle pages and for each page set shrink/enlarge and border erase settings and copy all pages in single operation 7 7 8 6 1 2 3 4 8 5 5 5 6 3 4 3 4 1 2 1 2 Convenient
Synergy Print Box Output Management Store commonly used documents...
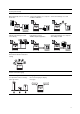
Scanning Functionality Full-color Scan Scan to PC Send E-mail Make high quality scans of even color Send scanned images to a computer Send scanned images as e-mail documents as PDF or JPEG files Scan to FTP TWAIN Database Connection Upload scanned images to FTP server directly Import images using a TWAIN-compliant application Send scanned images to a computer after adding text data Programmed Scanning Remember destination and feature settings Features for Easier Copying Job Accounting Language
Full optional equipment lineup...
Legal and Safety Information Please read this information before using your machine. This chapter provides information on the following topics: • Legal Information...viii • Regarding Tradenames...ix • Energy Saving Control Function...x • Automatic 2-Sided Copy Function...x • Paper Recycling...x • Energy Star (ENERGY STAR®) Program...x • Safety Conventions in This Guide...xi • Caution Labels...xii • Installation Precautions...xiii • Precautions for Use...
Legal Information Notice The information in this guide is subject to change without notification. Additional pages may be inserted in future editions. The user is asked to excuse any technical inaccuracies or typographical errors in the present edition. No responsibility is assumed if accidents occur while the user is following the instructions in this guide. No responsibility is assumed for defects in the printer’s firmware (contents of its read-only memory).
Regarding Tradenames • PRESCRIBE and ECOSYS are registered trademarks of Kyocera Corporation. • KPDL is trademark of Kyocera Corporation. • Windows and Windows Server are registered trademarks of Microsoft Corporation. • Windows NT is a trademark of Microsoft Corporation. • PCL and PJL are registered trademarks of Hewlett-Packard Company. • Adobe, Adobe Acrobat and Adobe Reader are registered trademarks of Adobe Systems Inc.
Energy Saving Control Function The device comes equipped with a Low Power Mode where printer and fax functions remain in a waiting state but energy consumption is still reduced after a certain amount of time elapses since the device was last used, as well as a Sleep Mode where printer and fax functions remain in a waiting state but power consumption is still reduced to a minimum when there is no activity with the device within a set amount of time.
Safety Conventions in This Guide Please read this Operation Guide before using the machine. Keep it close to the machine for easy reference. The sections of this guide and parts of the machine marked with symbols are safety warnings meant to protect the user, other individuals and surrounding objects, and ensure correct and safe usage of the machine. The symbols and their meanings are indicated below.
Caution Labels Caution labels have been attached to the machine at the following locations for safety purposes. Be sufficiently careful to avoid fire or electric shock when removing a paper jam or when replacing toner. Label 1, 2 High temperature inside. Do not touch parts in this area, because there is a danger of getting burned. NOTE: Do not remove these labels.
Installation Precautions Environment Caution Avoid placing the machine on or in locations which are unstable or not level. Such locations may cause the machine to fall down or fall over. This type of situation presents a danger of personal injury or damage to the machine. Avoid locations with humidity or dust and dirt. If dust or dirt become attached to the power plug, clean the plug to avoid the danger of fire or electrical shock.
Small amounts of ozone and other chemicals are released during copying, but the quantities do not present any health risk to humans. If, however, the machine is used over a long period of time in a poorly ventilated room or when making an extremely large number of copies, the smell may become unpleasant. To maintain the appropriate environment for copy work, it is suggested that the room be properly ventilated. Do not install this machine beneath fluorescent lights.
If anything harmful (paper clips, water, other fluids, etc.) falls into the machine, turn the main power switch off ( position) immediately. Next, be absolutely certain to remove the power plug from the outlet to avoid the danger of fire or electrical shock. Then contact your service representative. Do not remove or connect the power plug with wet hands, as there is a danger of electrical shock. Always contact your service representative for maintenance or repair of internal parts.
Cautions when handling consumables Caution Do not attempt to incinerate the toner container or the waste toner box. Dangerous sparks may cause burns. Keep the toner container and the waste toner box out of the reach of children. If toner happens to spill from the toner container or the waste toner box, avoid inhalation and ingestion, as well as contact with your eyes and skin. • If you do happen to inhale toner, move to a place with fresh air and gargle thoroughly with a large amount of water.
Laser Safety (Europe) Laser radiation could be hazardous to the human body. For this reason, laser radiation emitted inside this machine is hermetically sealed within the protective housing and external cover. In the normal operation of the product by user, no radiation can leak from the machine. This machine is classified as Class 1 laser product under IEC 60825. Caution: Performance of procedures other than those specified in this manual may result in hazardous radiation exposure.
Safety Instructions Regarding the Disconnection of Power Caution: The power plug is the main isolation device! Other switches on the equipment are only functional switches and are not suitable for isolating the equipment from the power source. VORSICHT: Der Netzstecker ist die Hauptisoliervorrichtung! Die anderen Schalter auf dem Gerät sind nur Funktionsschalter und können nicht verwendet werden, um den Stromfluß im Gerät zu unterbrechen.
About this Operation Guide This Operation Guide contains the following chapters: 1 Part Names Identifies machine parts and operation panel keys. 2 Preparation for Usage Explains adding paper, placing original, connecting the machine, and necessary configurations before first use. 3 Basic Operation Describes the procedures for basic copying, printing and scanning. 4 Optional Equipment Introduces the convenient optional equipment available for this machine.
Included Guides The following guides are included with this machine. Refer to the proper guide based on your requirements. Operation Guide (This Guide) Describes how to load paper, basic copy, print and scan operations, and troubleshooting. Advanced Operation Guide Explains copying, printing and scanning features in depth, as well as default settings. This guide is contained on the CD-ROM as a PDF file. Kyocera Extended Driver User Guide Explains how to install and setup the printer driver.
Conventions in This Guide The following conventions are used depending on the nature of the description. Convention Description Example Bold Indicates a message or button Press the Start key. displayed on the operation panel key or a computer screen. [Regular] Indicates touch panel keys. Press [Basic]. Italic Indicates touch panel messages. Ready to copy is displayed. Note Indicates supplemental information or operations for reference.
Originals and Paper Sizes This section explains the notation used in this guide when referring to sizes of originals or paper sizes. As in A4 and B5, which may be used either in the horizontal or vertical direction, in order to indicate the orientation of the original/paper, horizontal orientation is indicated by an additional R character. Set direction Indicated size † Vertical direction A4, B5, A5, B6, A6, 16K B A B A Original Size For original/paper, dimension A is longer than B.
Contents Legal and Safety Information ....................................................................................................................... vii About this Operation Guide ........................................................................................................................ xix 1 Part Names .................................................................................................... 1-1 Body .........................................................................
6 Troubleshooting ............................................................................................ 6-1 Solving Malfunctions ............................................................................................................... 6-2 Responding to Error Messages .............................................................................................. 6-4 Clearing Paper Jams ............................................................................................................
1 Part Names This chapter identifies machine parts and operation panel keys. • Body...1-2 • Operation Panel...1-4 • Touch Panel...
Part Names Body 1 2 3 4 14 15 17 16 18 13 5 11 7 12 19 6 8 9 10 1 Original Platen (Option) 2 Platen 3 Original Size Indicator Plates 4 Operation Panel 5 MP Tray (multi-purpose tray) 6 Slider 7 MP Tray Extension 8 Cassette 1 9 Cassette 2 10 Paper Length Guide 11 Paper Width Guide 12 Paper Width Adjusting Tab 13 Interface Cover 14 Network Interface Connector (Printer) 15 USB Interface Connector 16 Parallel Port Interface Connector 17 Memory Card (CompactFlash) Slot 18 Network I
Part Names 21 25 26 27 28 22 30 23 29 31 24 21 Output Tray 22 Left Cover 1 23 Left Cover 2 24 Front Cover 25 Toner Container (Black) 26 Toner Container (Yellow) 27 Toner Container (Cyan) 28 Toner Container (Magenta) 29 Toner Container Lock Lever 30 Waste Toner Box 31 Carrying Handles 1-3
Part Names Operation Panel 1 6 10 11 2 Ready to copy. 3 11×8½" Plain 11×17" Color 4 11×8½" Plain 11×8½" Plain MP tray Plain Basic User choice 5 9 8 12 13 14 16 Paper Size Set 11×8½" 100% ( Full-Color ) APS Auto % Staple Off 100% Auto Exposure Staple Left Top Reduce /Enlarge Exposure Mode Staple Function Color func.
Part Names Touch Panel Copy Screen Displayed by pressing the Copier key. Screen changes when 1, 2, 3, 4, and 5 are pressed. 1 [Basic] screen Ready to copy. Paper Size Set 11×8½" 100% ( Full-Color ) Combine 11×8½" Plain 11×17" Color 11×8½" Plain 11×8½" Plain APS MP tray Plain Basic [User choice] screen Staple Off 100% Auto Exposure Staple Left Top Reduce /Enlarge Exposure Mode Staple User choice 1 2 Auto % Function 2 3 Ready to copy. Sheet Erase Program Color func.
Part Names 5 [Program] screen Ready to copy. Paper Size Set 11×8½" 100% ( Full-Color ) Reg./Delete Recall abc list d Combine Register Margin/ Centering list a Sheet Erase Delete list b file 1 list c file 2 Basic User choice Function Change Name Color func. Program Printer Screen Displayed by pressing the Printer key. Ready to print. Printer Menu Cancel GO Scanner Screen Displayed by pressing the Scanner key. Select scanner function. 08/08/’05 14:00 Recall Program Edit Addr.
2 Preparation for Usage This chapter explains the preparations required before using the machine. • Loading Paper...2-2 • Setting Paper Type and Size for the Cassettes and MP Tray...2-7 • Placing Originals...2-16 • Language...2-20 • Connecting Cables...2-21 • Preparing the Printer...2-22 • Preparing the Scanner...
Preparation for Usage Loading Paper How to load paper in the 2 cassettes, the MP tray, and/or the optional paper feeder or 3000 sheet paper feeder. Before Loading Paper When you open a new package of paper, fan through the sheets to separate them slightly prior to loading as described below. 1 Bend the stack of paper so that the middle of the paper lifts upwards. 2 Gripping both ends of the paper, push inward to cause the stack of paper to fluff up.
Preparation for Usage 1 Pull the cassette out toward you until it stops. 2 Adjust the paper length guide to fit the paper size. NOTE: Paper sizes are marked on the cassette. 3 Holding the paper width adjusting tab both ends, move the paper width guide to fit the paper. NOTE: Paper sizes are marked on the cassette. When loading paper smaller than 11 × 8 1/2" or A4 into Cassette 1, raise the support lever as shown in the illustration.
Preparation for Usage IMPORTANT: Verify that the paper is pressed snugly against the vertical and horizontal size guides. If a gap is present, reset the width guide or length guide. Overloading may cause paper jams. Before loading the paper, be sure that it is not curled or folded. Overloading may cause paper jams. Ensure that the loaded paper does not exceed the level indicated. Overloading may cause paper jams.
Preparation for Usage NOTE: Before loading the paper, be sure that it is not curled or folded. Curled or folded paper may cause paper jams. Ensure that the loaded paper does not exceed the level indicated. 3 Gently push the cassette back in all the way. Loading Paper in the MP Tray In addition to standard and recycled paper, special paper (60 - 220 g/m2) may be loaded.
Preparation for Usage 2 Adjust the sliders to fit the width of the paper. 3 Insert the paper along the sliders into the tray until it stops. Ensure that the sliders are flush against the edges of the paper. IMPORTANT: Before loading postcards and other types of thick paper that may be curled, straighten out the paper. The paper may not be fed depending on the paper quality. To print on both the front and back side of the post card, be sure to print the back side before printing the address side.
Preparation for Usage Setting Paper Type and Size for the Cassettes and MP Tray When loading paper into Cassette 1 and 2 and the optional paper feeders (Cassette 3 and 4), set the paper size and type. Refer to Specifying Paper Size and Specifying the Paper Type on page 2-8 below. When loading paper into the optional 3000 sheet paper feeder (Cassette 3), set the paper type. Refer to Specifying the Paper Type on page 2-8. After loading paper in the MP tray, specify both the paper type and size.
Preparation for Usage 4 Press [S] or [T], select the cassette you wish to set the paper size from Paper size (1st cassette) - Paper size (4th cassette) and press [Change #].
Preparation for Usage 2 Press [Machine Default]. System Menu / Counter System Menu Copy Default 3 Language Job Accounting Scanner Default Printer Default MP tray Setting BOX Management Machine Default Document Management Register Orig. Size Print Report Use the numeric keys to enter the 4 digit management code. The default setting is 2500 for the 25/25 ppm model, 3200 for the 32/25 and 32/32 ppm models and 4000 for the 40/35 ppm model.
Preparation for Usage Specifying the Paper Size to the MP Tray Specify the paper size when using the MP tray. The following paper sizes are available. Setting method Unit Paper size Auto Detect Inch 11 × 17", 8 1/2 × 14", 11 × 8 1/2", 8 1/2 × 11", 5 1/2 × 8 1/2" Centimeter A3, B4, A4, A4R, B5, B5R, A5R, B6R, A6R Other Standard Sizes ISO B5, Envelope DL, Envelope C5, Envelope C4, Comm. #10, Comm. #9, Comm.
Preparation for Usage 3 Press [Auto Detection]. System Menu / Counter MP tray Setting Back Unit Paper Size Paper Type Auto Detection Centimeter Input size Inch Plain Others Standard 4 Select [Centimeter] ([Centimetre]) or [Inch]. 5 Press [Close]. The display returns to the [Basic] screen. Other Standard Sizes Specify special standard sizes. 1 Press the System Menu/Counter key. 2 Press [MP tray Setting].
Preparation for Usage 6 Press [Close]. The display returns to the [Basic] screen. Input Size Specify the required paper size. 1 Press the System Menu/Counter key. 2 Press [MP tray Setting]. System Menu / Counter System Menu Copy Default 3 Press [Input size]. Language Job Accounting Scanner Default Printer Default MP tray Setting BOX Management Machine Default Document Management Register Orig.
Preparation for Usage Custom Size Store frequently used paper sizes as custom sizes. Also, the paper type can be set for each custom size. Assignment Method 1 Press the System Menu/Counter key. 2 Press [Machine Default]. System Menu / Counter System Menu Copy Default 3 Language Job Accounting Scanner Default Printer Default MP tray Setting BOX Management Machine Default Document Management Register Orig. Size Print Report Use the numeric keys to enter the 4 digit management code.
Preparation for Usage 6 Press [On] and press [+] or [–] to set the Y (Length) and X (Width) sizes. Back Paper size (User reg. 1) 100% Stores Paper Size for MP Tray With the metric models, you may enter the size directly using the numeric keys by pressing [#-Keys]. Color/B&W selection To specify a paper type, press [Select Paper Type]. Select the paper type and press [Close]. On (37/8~115/8) Y (57/8 ~17) 1111/16 " Paper Type .169/16 " X Plain Off System Menu 7 Press [Close].
Preparation for Usage 6 Press [Close]. The display returns to the [Basic] screen. Specifying the Paper Type to the MP Tray Set the paper type when using the MP tray. The following paper types are available.
Preparation for Usage Placing Originals This section explains how to place an original for copying or scanning. Loading Originals on the Platen Open the original platen and place the original on the platen. You may also place non-sheet originals such as books or magazines. 1 Open the original platen. NOTE: If the optional document processor has been installed, open the document processor.
Preparation for Usage (Metric models) 3 Close the original platen. IMPORTANT: Do not push the original platen or document processor forcefully when you close it. Excessive pressure may crack the platen glass. Shadows may appear around the edges and in the middle of copies of open-faced originals such as books. Caution: Do not leave the document processor open as there is a danger of personal injury.
Preparation for Usage Loading Originals in the Document Processor (option) Use the optional document processor to automatically read multi-page originals one page at a time. Also automatically turn over and read both sides of two-sided originals. The document processor supports the following types of originals.
Preparation for Usage IMPORTANT: Before loading originals, be sure there are no originals left on the original eject table. Originals left on the original eject table may cause the new originals to jam. 1 Adjust the original width guides to fit the originals. 2 Place the originals. Place the side to be read facing up (the front side up for two-sided originals) and push the front edge of the original deep into the document processor.
Preparation for Usage Language Select the language displayed on the touch panel. The following languages are available. Model Type Language Inch models English, French (Français), Spanish (Español), Japanese ( Portuguese (Português) Metric models English, German (Deutsch), French (Français), Spanish (Español), Italian (Italiano) 1 Press the System Menu/Counter key. 2 Press [Language]. ), System Menu / Counter System Menu Copy Default 3 Select the key for the language you would like to set.
Preparation for Usage Connecting Cables Connect to a computer to use the printer and scanner features. This device has the following interfaces for connecting to computers. Use the type of cable appropriate for the interface used. Function Interface Printing Functionality Parallel port interface Parallel Port Cable (IEEE1284 specification, 1.5 m or less) Scanning Functionality Required cable USB Interface Hi-Speed USB-compatible cable (Hi-Speed USB specification, 5.
Preparation for Usage Preparing the Printer Network (TCP/IP) Settings To use this device as a network printer, first set the device IP address. NOTE: Set the IP address according to the operating environment. Obtain this address from your network administrator. For environments that use DHCP or BOOTP to automatically assign the IP address, this setting is not required because the DHCP or BOOTP setting is enabled by default. 1 Press the Printer key. 2 Press [Printer Menu]. Ready to print.
Preparation for Usage 5 Press [S] or [T] to select TCP/IP and press [Change #]. Interface Setting Item Value NetWare TCP/IP Ethertalk Network Status Page On On On Off Change # Parallel Network USB Printer menu 6 Press [On] below TCP/IP. Back TCP/IP TCP/IP Setting Item Off On Printer menu- Interface 7 Press [S] or [T] to select DHCP and press [Change #]. Back Setting Item terface Press [Off] and press [Close]. On On 0. 0. 0. 0 0. 0. 0. 0 0. 0. 0.
Preparation for Usage 11 Press [S] or [T] to select IP Address and press [Change #]. Back Setting Item DHCP BOOTP IP Address Subnet Mask Gateway Close Value On On 0. 0. 0. 0 0. 0. 0. 0 0. 0. 0. 0 Change # Interface - Network 12 Enter the IP address using the numeric keys. Input the address for the 3 digits displayed in reverse black and white and press the # key. .10 Verify the 3 digits entered # key. Printer menu- Interface 13 Back IP Address Confirm per 3 lines pressing # key. - Network .
Preparation for Usage Installing the Software To connect this device to a computer, install the printer driver, scanner utilities, and the Advanced Tools, etc. The installation procedure may vary depending on the version of the CD-ROM supplied with the device. Some versions may provide a choice between Express mode and Custom mode. For details, follow the CD-ROM wizard.
Preparation for Usage Preparing the Scanner This section explains the necessary operations to prepare the scanner function. Connecting to a Computer Connection Example Connect the scanner and computer with a network cable (10Base-T or 100Base-TX). Refer to Connecting Cables on page 2-21. Administrator PC Web Browser Address Editor DB Assistant Network Settings Scanner Settings User/Destination Registration SMTP Server Send E-mail Send scanned images as e-mail attachments.
Preparation for Usage Scanner Basic Settings The network settings for this device must be configured before using the scanner feature. The setting items are as follows. Configuration Item Description Host name Input a scanner host name no longer than 32 characters. IP address Enter the scanner interface IP address in ‘XXX.XXX.XXX.XXX’ notation. Subnet Mask Enter the scanner subnet mask in ‘XXX.XXX.XXX.XXX’ notation. Default Gateway Enter the scanner default gateway in ‘XXX.XXX.XXX.XXX’ notation.
Preparation for Usage 2 Press [Scanner Default]. System Menu / Counter System Menu Copy Default 3 Language Job Accounting Scanner Default Printer Default MP tray Setting BOX Management Machine Default Document Management Register Orig. Size Print Report Use the numeric keys to enter the 4 digit management code. The default setting is 2500 for the 25/25 ppm model, 3200 for the 32/25 and 32/32 ppm models and 4000 for the 40/35 ppm model.
Preparation for Usage Registering User Information Please register a user. The setting items are as follows. Configuration Item Description E-mail address For Send E-mail, mail will be sent to this address when recipients reply to the received mail. Also, transmission error notifications will be sent to this address. IP address or host name When selecting Scan to PC as the destination, select Save to User PC to send a graphic image to the computer at this address.
Preparation for Usage Modifying Common Address Book Register a destination in the common address book. E-Mail Common Address Book ... address book used when sending e-mail attachments Scan to PC Common Address Book ... address book used to directly send to recipient computer FTP Common Address Book ... address book used to send data to an FTP server NOTE: New addresses may also be registered. A web browser can also be used to make additions to the Common Address Book.
Preparation for Usage 1 Press the Scanner key. 2 Press [Edit Addr. Book]. scanner function. 08/08/’05 14:00 Recall Program Edit Addr. Book Scan to PC Change User Info. TWAIN Scan to FTP 3 Input the sending user’s user number and press [Enter]. History of Sending de. Stop User number (with #key) Clear Enter NOTE: Input the user number registered during user registration. For example, in the screen shown in the process on page 2-29 for Step 3, the user number for User A is ‘001’.
Preparation for Usage 6 Destination Registration Select the item to be configured using [S] or [T] and press [Change #]. The settings configuration screen is displayed. Follow the screen instructions to make the changes. When done, press [Complete entering] to save the destination. New Dest. Register Registra.list:Scan to PC address book Setting item IP address or host name Name to display Save folder No.
Preparation for Usage 2 Press [Machine Default]. System Menu / Counter System Menu Copy Default 3 Language Job Accounting Scanner Default Printer Default MP tray Setting BOX Management Machine Default Document Management Register Orig. Size Print Report Use the numeric keys to enter the 4 digit management code. The default setting is 2500 for the 25/25 ppm model, 3200 for the 32/25 and 32/32 ppm models and 4000 for the 40/35 ppm model.
Preparation for Usage 8 Press [+] and [–] to set the time and date. Back Date/Time Year .2005 Month .7 Day .20 O Time 14:00 O S System Menu - Machine Default NOTE: Set the date and time after setting the time difference. Daylight savings time is disabled if daylight savings time and time/date are changed at the same time. 9 Press [Close]. Settings are saved.
Preparation for Usage 4 Click the New button. 5 Input the file save folder number in the No. column and click the ... button. NOTE: Input a number (from 1-100) for the file save folder No. column. Enter the file save folder number from the No. column (001 in this example) into Save Number in Step 5 of Setting from a Web Browser on page 2-36. 6 Choose a folder and click the OK button. 7 Click the OK button.
Preparation for Usage 8 The save folder is registered. Click the OK button. 9 Click the OK button. Setting from a Web Browser Register users into this device using a web browser. NOTE: The network configuration for this device must be done before performing this setting. Contact your system administrator. This function is not available during scanning. Verify that the scanner function is not in use before configuring. 1 Start Internet Explorer or another web browser.
Preparation for Usage 3 Click on Sender List. 4 Click on the number of the Sender (User) List to register. 5 Input the Registration Name, Address of Address Book installed PC, and Save Number. NOTE: For Address of Address Book installed PC, enter the address of the computer on which Scanner File Utility is installed. For Save Number, enter the file save folder number you entered in the No. column in Step 5 of Registering File Save Folders on page 2-34. 6 Click the Registration button.
Preparation for Usage 2-38
3 Basic Operation This chapter explains the following operations. • Basic Copying Procedures...3-2 • Selecting Image Quality...3-5 • Adjusting Exposure...3-6 • Reducing/Enlarging...3-7 • Duplex Mode...3-11 • Split Mode...3-14 • Sort Mode...3-16 • Interrupt Copy...3-17 • Job Reservation...3-18 • Canceling a Print Job...3-19 • Scanner Operation...3-20 • Low-Power Mode...3-35 • Sleep Mode...
Basic Operation Basic Copying Procedures Follow the steps as below for basic copying. 1 Open the main power switch cover and move the main power switch to on ( | position). After warm-up is complete, the Start key’s Start indicator will glow green. 2 Press the Copier key. 3 Place the original. NOTE: Refer to Placing Originals on page 2-16 for original placement instructions. 4 3-2 Press the Auto Color, Full Color or Black&White key to select a color mode.
Basic Operation 5 Confirm that [APS] is selected. In this mode, paper that matches the size of the originals will be selected automatically. To change the paper size, press the desired paper size to select the paper source. Ready to copy. ( Full-Color ) Paper Size 11×8 100% 11×8½" Plain 11×17" Color APS 11×8½" Plain 11×8½" Plain MP tray Plain Basic User choice 6 Use the numeric keys to enter the copy quantity. You can specify up to 999 copies. 7 Press the Start key.
Basic Operation Turning off the main power switch Press the Power key on the operation panel, and after verifying the Power indicator has gone off, switch off the main power switch. Switching off the main power switch before pressing the Power key may cause damage to the internal hard disk. If the optional fax kit is installed, when the main power switch is off ( position), fax send/receive is disabled. To turn the power off, press the Power key on the operation panel.
Basic Operation Selecting Image Quality Choose the image quality suited to the type of original. Image Quality Description Text+Photo Appropriate for mixed text and photo originals. Photo Appropriate for photo originals taken with a camera. Print Appropriate for photo originals from magazines or printed media. Text Appropriate for document originals with large amounts of text. Map Appropriate for map originals. 1 Place the original. 2 Press [Function]. Ready to copy.
Basic Operation Adjusting Exposure Adjust the exposure automatically or manually. The default setting is [Manual]. Follow the steps as below for Manual mode. 1 Place the original. 2 Press the exposure adjustment key ( / ) to adjust the exposure level. Press [Auto Exposure] to use Auto Exposure mode. The machine determines a suitable exposure level for copying. To change the exposure mode from [Auto] to [Manual], press the exposure adjustment key ( / ). Ready to copy.
Basic Operation Reducing/Enlarging Adjust the magnification to reduce or enlarge the original image. The following zoom modes are available. • Auto Zoom – Automatically reduces or enlarges the original image suited to the selected paper size. • Manual Zoom – Reduces or enlarges the original image in 1 % increments between 25 - 400 %. • Preset Zoom – Reduces or enlarges at preset magnifications. • XY Zoom – Independently adjust vertical and horizontal magnifications.
Basic Operation Manual Zoom Reduces or enlarges the original image in 1 % increments between 25 - 400 %. 25 % Follow the steps as below to use manual zoom. 400 % 1 Place the original and press [Reduce/Enlarge]. Ready to copy. 11×8½" Plain 11×17" Color 11×8½" Plain APS 2 Press [+] and [–] to set the displayed magnification. Press [# keys] ([#-Keys]) to enter with numeric keys. User choice Ready to copy. 3-8 Press the Start key. Copying begins.
Basic Operation Preset Zoom Reduces or enlarges at preset magnifications.
Basic Operation XY Zoom Select vertical and horizontal magnifications individually. Set zoom size in 1 % increments between 25 - 400 %. Y Follow the steps as below to use XY zoom. X 1 Place the original and press [Reduce/Enlarge]. Ready to copy. 11×8½" Plain 11×17" Color 11×8½" Plain APS Auto % MP tray Plain 11×8½" Plain Basic 2 Press [XY Zoom]. 3 Press [+] and [–] to set the X and Y zoom ratios. User choice Ready to copy.
Basic Operation Duplex Mode Use Duplex mode to create two-sided copies from a variety of originals, including facing pages (such as books or magazines) and two-sided originals. 5 4 5 3 3 4 1 2 2 1 Original Copy One-sided to Two-sided Produces two-sided copies from one-sided originals. The back side of the last copied page will be blank for originals with an odd number of pages. 5 4 5 3 3 4 1 2 2 1 Original Copy The following binding options are available.
Basic Operation Book to Two-sided Produces two-sided copies from originals such as books and magazines with facing pages. 4 2 1 4 3 3 1 1 2 2 1 0 3 4 2 3 2 1 3 4 3 1 0 2 Original Copy NOTE: Supported paper sizes for Book to Two-Sided operation are limited to: 11 × 17", 8 1/2 × 11", A3, B4, A4R, B5R, A5R, and 8K. Follow the steps as below to use duplex copying. 1 Press [Function]. Ready to copy.
Basic Operation For [1 sided J 2 sided] ([1-sided J 2-sided]) or [2 sided J 2 sided] ([2-sided J 2-sided]), select the bind direction for Finished. 2 sided mode. Paper Size 11×8½ 100% ( Full-Color ) Shortcut 2 sided/Separation Back Finished Select Original I Direction. 1 sided J1 sided 2 sided J1 sided 1 sided J2 sided 2 sided J2 sided Book J1 sided Book J2 sided For [Book J 2 sided] ([Book J 2-sided]), set the copy page order for Finished. 2 sided mode.
Basic Operation Split Mode Use Split mode to create single-sided copies from two-sided originals or originals with facing pages (such as books or magazines) as follows. Two-sided to One-sided Copies each side of a two-sided original onto two individual sheets. 1 2 1 2 Original Copy NOTE: This operation requires the optional document processor. The following binding options are available. • Open from Left/Right: The back side and front side of the original are copied with the same orientation.
Basic Operation 2 Press [2 sided/Separation] ([2-sided/Split]). Ready to copy. Select Paper 2 sided/ Separation Select Orig.Size Combine Exposure Mode Reduce /Enlarge Auto Selection Batch Scanning Up Orig.Image Quality Margin/ Centering Page # Poster Down Sort/ Offset Border Erase Cover Mode Booklet Basic 3 Paper Size 11×8½ 100% ( Full-Color ) Select the desired Split mode. User choice Ready to copy. Function Color func.
Basic Operation Sort Mode Scans multiple originals to deliver complete sets of copies as required according to page number. 3 2 1 3 3 Follow the steps as below to use Sort mode. 2 2 1 1 3 2 1 Original 1 Press [Function]. Ready to copy. 11×8½" Plain 11×17" Color APS 11×8½" Plain 2 Press [Sort/Offset] ([Sort/Group]). User choice Ready to copy. Staple Off 100% Auto Exposure Staple Left Top Reduce /Enlarge Exposure Mode Staple Function Color func.
Basic Operation Interrupt Copy Interrupt copying is useful to pause one copy job and copy other originals with different copy settings. After completing the urgent job, you can resume the interrupted jobs according to their original settings. You can also pause copy or print jobs to make emergency copies. Follow the steps as below to use interrupt copying. 1 Press the Interrupt key. Interrupt Mode OK will be displayed. 2 Temporarily remove and set aside the original pages of the current job.
Basic Operation Job Reservation Scan an original and reserve the next job even when a copy or print job is being outputted. The reserved job will be started after the current job is completed. If the optional fax is installed, reserve jobs even when received fax data is being printed. Follow the steps as below to use Job Reservation mode. 1 Press [Reserve next copy]. opying. Copying can be reserved will be displayed.
Basic Operation Canceling a Print Job Follow the steps below to cancel printing and clear data. Canceling a Print Job Currently Being Processed Use the printer screen to cancel a print job that is currently spooling. 1 Press the Printer key. 2 Press [Cancel]. Processing. Orig. Page 11×8½" Network I/F Cancel User name: NO USER NAME 3 Select the interface to cancel. Back Select interface to cancel the job. Current Job On 4 Parallel Network Serial USB Printing is canceled.
Basic Operation Scanner Operation This section explains basic scanner operation. The following 5 methods may be used to scan originals. • Scan an Image for Send E-mail...3-20 • Scan an Image for Scan to PC...3-23 • Scan an Image Using TWAIN...3-27 • Database Connection Setup...3-28 • Scan an Image for Scan to FTP...3-32 Scan an Image for Send E-mail Use Send E-mail to send a scanned original image to an e-mail recipient as an attachment.
Basic Operation NOTE: If the scanner default setting for Selec. of senders (users) is set to [On], user number 001 will automatically be selected. If a password was entered when the user was registered, the password input screen is displayed. Input the password and press [Enter]. If the password is correct, the scanner settings screen is displayed. 4 To input a mail address, press [Enter dest.]. Ready to scan. Place the original and select destination.
Basic Operation NOTE: The private address book is not displayed if the Address Book for Scanner is not running on the sender(user)’s computer. 9 Confirm the destination(s) and press [Close]. Return to Step 4 to continue adding recipients. 10 Confirm the destination(s). Press [S] or [T] to confirm that all selected destinations are correct. Press [Delete] if a selected destination is not needed. Ready to scan. Place the original and select destination.
Basic Operation 14 Confirm settings, place the original, and press the Start key. Now scanning originals. Scanning of the original begins. Orig. Page 08/08 Send .3 If continuous scan is enabled, proceed to Step 15. If continuous sending is enabled, proceed to Step 16. Send E-mail 11×8½" 1 sided Top Edge 8½×11" SCAN0006_nnn.
Basic Operation Scanning an Image for Scan to PC 1 Press the Scanner key. 2 Press [Scan to PC]. Select scanner function. 08/08/’05 Recall Program 3 Select a destination (user name). Either press the number key or use the numeric keys to enter the user number and press [Enter]. Send E-mail Scan to PC Database Connection Scan to FTP TWAIN name. Stop User number (with #key) Enter NOTE: If the scanner default setting for Selec.
Basic Operation 6 Press [Common] ([Common book]) or [Private] ([Private book]) to display the destinations stored in the selected address book. In this example a destination is selected from the Common Address Book. Close 0-9 O Address Select GHI Group A PQR Group B 1. Up Address Properties Down Enter User A X User B User C Press [S] or [T], select the desired destination to be added and press [Enter] ([Add dest.]).
Basic Operation 11 If the original has been loaded with Top edge set at the rear, select [Top Edge] ([Back Edge]). If the original has been set to the left, press [Left Top Edge] ([Left top corner]). Press [Close] to save the setting, or press [Back] to leave settings as they are and return to the screen shown in Step 8. to scan. ( Full-Color ) Send Original 11×8½" 8½×11" 08/08/’05 14:00 riginal and select destination. Back tion Close Select Original Image Direction.
Basic Operation Scan an Image Using TWAIN TWAIN provides method to connect to the scanner from within TWAIN-compatible applications. Install the TWAIN driver together with the application you plan to use. This section only explains the settings to be made to the machine to enable TWAIN usage. Initiating the Connection from the Machine 1 Press the Scanner key. 2 Press [TWAIN]. Select scanner function.
Basic Operation 2 Click the Scan. Setup button to confirm that this machine is selected. If this machine is not selected, click the Edit button and input the IP address or host name, for the scanner to be used, in Scanner Address, then click the OK button. 3 Click the OK button. 4 Make necessary settings here and check the Waiting Scan checkbox. NOTE: Scanning begins after pressing the Start key on the operation panel while Waiting Scan is checked.
Basic Operation Database Connection Setup 1 Press the Scanner key. 2 Press [Database Connection]. Select scanner function. 08/08/’05 Recall Program 3 Select a destination (user name). Either press the number key or use the numeric keys to enter the user number and press [Enter]. Send E-mail Scan to PC Database Connection Scan to FTP TWAIN nection Stop User number (with #key) Enter me. NOTE: If the scanner default setting for Selec.
Basic Operation 5 Select the save folder for the desired image. From the folder selection screen, to save the image to the currently selected folder, press [Enter]. The text data screen is displayed (Proceed to Step 7). To save to a subfolder of the selected folder, press [Change inp. Folder]. The contents of the specified folder are displayed. Back 0-9 \100. Cancel Change inp.Folder Up [100]. Down Enter nation folder.
Basic Operation 9 Changed items are identified with a * mark. When satisfied with changes, select Indexing complete and press [Enter]. Back File Information Creator Indexing completed File Name Subject Keyword Comment Please select item for setting. 003-006 can be set for PDF only. 10 At the machine, place the original, and press the Start key to begin scanning. NOTE: Configure various settings from the operation panel. Change settings as necessary.
Basic Operation Scan an Image for Scan to FTP Scan FTP is a feature that converts original data scanned using the machine to PDF or TIFF format data and uploads directly to an FTP server. Up to 10 destination FTP servers can be saved and data can be simultaneously uploaded to those 10 saved FTP servers. If you already have a running FTP server, no additional software is necessary. IMPORTANT: Connection to servers outside the local area network (LAN) may fail due to network configuration.
Basic Operation 3 Select a destination (user name). Either press the number key or use the numeric keys to enter the user number and press [Enter]. name. Stop User number (with #key) Enter NOTE: If the scanner default setting for Selec. of senders (users) is set to [On], user number 001 will automatically be selected. If a password was entered when the user was registered, the password input screen is displayed. Input the password and press [Enter]. 4 Press [Address Book]. Ready to scan.
Basic Operation 8 Configure the scan settings. to scan. riginal and select destination. nding ( Full-Color ) Register Prgrm Original Send 8½×11" 11×8½" 08/08/’05 14:00 Cont. TX to Top Edge Auto Orig. Set Direction Select Orig.Size Address Book 9 Basic Place the original and press the Start key. Scanning of the original begins. Now scanning originals. After scanning is complete, the machine uploads the scanned data to the destination FTP server(s). Orig.
Basic Operation Low-Power Mode To activate Low-Power mode, press the Energy Saver key. On the operation panel, only the Energy Saver, Power, and main power indicators will remain lit. The machine automatically wakes and begins printing if print data is received during Low-Power mode. If the optional fax is installed, the machine also wakes up and begins printing when a fax is received. To resume copying, perform one of the following actions. The machine returns to a copy-ready condition.
Basic Operation Sleep Mode To activate Sleep mode, press the Power key. On the operation panel, only the Main Power indicator will remain lit. The machine will use much less power than Low-Power mode. Without illuminating the operation panel, printing begins automatically if print data is received during Sleep mode. If the optional fax is installed, the machine also wakes up and begins printing when a fax is received, without illuminating the operation panel. To resume copying, press the Power key again.
4 Optional Equipment This chapter introduces the optional equipment available for the machine. • Overview of Optional Equipment...4-2 • Document Processor...4-4 • Paper Feeder...4-4 • 3000 Sheet Paper Feeder...4-4 • Document Finisher...4-5 • 3000 Sheet Document Finisher...4-5 • Job Separator...4-5 • Key Counter...4-6 • Fax Kit...4-6 • Memory Card (CompactFlash)...4-6 • Hard Disk...4-7 • Additional Memory...4-7 • Security Kit...4-7 • Network Interface Card...
Optional Equipment Overview of Optional Equipment The following optional equipment is available for the machine.
Optional Equipment Serial Interface Additional Memory Network Interface Card Fax Kit Memory Card (CompactFlash) Hard Disk Security Kit 4-3
Optional Equipment Document Processor Automatically scans each page of single sided originals. Also automatically flips over 2-sided originals for duplex copying and split copying. For document processor usage operation, see Loading Originals in the Document Processor (option) on page 2-18. Paper Feeder Add an additional 2 paper cassettes like Cassette 2 of the main unit. Paper capacity and loading method is the same as Cassettes 1 and 2. See Loading Paper into Cassette 1, 2 on page 2-2.
Optional Equipment Document Finisher The document finisher holds a large quantity of finished copies. The finisher offers a convenient means of sorting. Sorted finished copies may also be stapled. For further details, refer to the document finisher Operation Guide. 3000 Sheet Document Finisher The document finisher holds a large quantity of finished copies. The finisher offers a convenient means of sorting.
Optional Equipment Key Counter Use the key counter to monitor machine usage. The key counter offers a convenient solution for centralized management of copy volume for different departments in a large company. Inserting the Key Counter Insert the key counter securely into the key counter slot. NOTE: When the key counter function is activated, copies can only be made when a key counter is inserted into the machine. If the key counter is not inserted securely, Insert key counter will be displayed.
Optional Equipment Hard Disk The hard disk is used to store print queue data. Also, the hard disk is required to use all e-MPS functionality. Additional Memory Increase the memory available to the printer. Additional memory enables printing more complex data. An additional 128 MB, 256 MB or 512 MB may be added. Security Kit This machine functions by temporarily storing scanned data on an internal hard disk.
Optional Equipment Network Interface Card Like the machine’s standard network interface, the network interface card supports TCP/IP, IPX/SPX, NetBEUI and EtherTalk protocols to enable network printing for Windows, Macintosh, UNIX, Netware and other environments. Serial Interface Install for connecting to printers with serial port interfaces. Supports the RS-232C serial interface. Document Table Place original or other documents when using the machine. It has a drawer to accommodate clips.
5 Maintenance This chapter describes cleaning and toner replacement. • Cleaning...5-2 • Toner Container and Waste Toner Box Replacement...
Maintenance Cleaning Clean the machine regularly to ensure optimum copy quality. Caution: For safety, always unplug the power cord before cleaning the machine. Original Platen and Platen Open the document processor. Wipe the platen and the backside of the document processor with a soft cloth dampened with alcohol or mild detergent. IMPORTANT: Do not use thinner or other organic solvents. Document Processor (option) Open the document processor.
Maintenance Slit Glass When black streaks or dirt appears in copies when using the optional document processor, clean the slit glass with the included cleaning cloth. The message: Clean the slit glass for original fed from DP (Clean the slit glass for original fed) may be displayed if the slit glass requires cleaning. After cleaning, press [End]. Clean the slit glass for original fed from DP. 1.Open the document processor. 2.Clean the surface of narrower glass located at left with a dry cloth. 3.
Maintenance 3 Open left cover 1. 4 Open duplex unit A1. 5 As shown in the figure, clean dirt from the separator by moving the brush from side to side along the separator. 6 Set duplex unit A1 securely to the original position and close left cover 1. IMPORTANT: Push the indicated position to close left cover 1 securely. 7 5-4 Put away the cleaning brush and close the front cover.
Maintenance Toner Container and Waste Toner Box Replacement This machine uses 4 types of toner: cyan (C), magenta (M), yellow (Y) and black (K). When the touch panel displays Add toner. [C] [M] [Y] [K], replace the toner container for the color shown. Replace the toner without delay when this message is displayed. When replacing the toner container, also replace the waste toner box. Add toner.
Maintenance 2 Turn the toner container lock lever to the vertical position. 3 Push up the toner container top clip A and pull the toner container down towards you. 4 Lift the toner container up and out. 5 Close the pickup opening, with the cap attached to the back side, on the old toner container. A Caution : Do not attempt to incinerate the toner container or the waste toner box. Dangerous sparks may cause burns.
Maintenance 6 Place the used toner container in the provided plastic disposal bag. 7 Remove the new toner container from the box. 8 Hold the toner container with the toner container lock lever positioned on the top, and tap the top side ten times or more while keeping the container horizontal. 9 Holding the toner container in both hands, hold vertically and shake up and down strongly at least ten times to distribute the toner evenly.
Maintenance 12 Return the toner container lock lever to its original position. Replace the other toner colors in the same fashion. 13 Hold down waste toner box release lever B, and slowly pull out the waste toner box. NOTE: Do not turn the removed old waste toner box upside down. 5-8 14 As shown in the illustration, seal the old waste toner box with a cap. 15 Place the used toner container in the provided plastic disposal bag. 16 Remove the cap from the new waste toner box.
Maintenance 17 Install the new waste toner box. 18 Close the front cover. After use, always dispose of the toner container and the waste toner box in accordance with Federal, State and Local rules and regulations.
Maintenance 5-10
6 Troubleshooting This chapter explains how to solve problems with the machine. • Solving Malfunctions...6-2 • Responding to Error Messages...6-4 • Clearing Paper Jams...
Troubleshooting Solving Malfunctions The table below provides general guidelines for problem solving. If a problem occurs with your machine, check the checkpoints and perform procedures indicated on the following pages. If the problem persists, contact your Service Representative. Symptom Checkpoints Corrective Actions Reference Page The operation panel does Is the machine plugged in? not respond when the machine is turned on ( | position). Plug the power cord into an AC outlet.
Troubleshooting Symptom Checkpoints Corrective Actions Reference Page Printing is skewed. Are the originals loaded correctly? When placing originals on the platen, page 2-16 place them face-down and flush against the original size indicator plates. When placing originals in the document page 2-18 processor, align the original width guides securely before placing the originals. Paper jams frequently occur. Is the paper loaded correctly? Check the position of the paper width guides.
Troubleshooting Responding to Error Messages If the touch panel displays any of these messages, follow the corresponding procedure. Copy Error Messages If the Copy mode touch panel displays any of these messages, follow the corresponding procedure. Error Messages Checkpoints Corrective Actions Reference Page Close ### cover. Is the indicated cover open? Close all covers securely. — Check the cover. Are any covers open? Close all covers securely.
Troubleshooting Error Messages Checkpoints Corrective Actions Check paper size. Is the specified size paper loaded? Load paper of a size that can be used. — Reposition original. Is the orientation of the specified paper different from that of the original? Change the orientation of the original. If you press the Start key without doing so, the original will be copied at the current size. — Load the specified paper. Adjust any settings that are incorrect.
Troubleshooting Error Messages Checkpoints Corrective Actions The top tray is full of paper. Remove paper, and press "Continue" key. During printing, is the maximum capacity of the output tray exceeded? Remove some pages from the output tray and press [Continue]. Printing continues. — Finisher paper capacity exceeded. (Tray #) Remove paper, and press "Start" key.
Troubleshooting Error Messages Checkpoints Check the waste punch box. Is the optional 3000 sheet document Refer to the optional 3000 sheet finisher waste punch box securely document finisher Operation Guide fastened? to securely fasten the waste punch box. — Empty waste punch box. Is the container for hole punch waste Refer to the optional 3000 sheet paper in the optional 3000 sheet document feeder Operation Guide to document finisher full? empty the waste punch box. — Out of staples. Add staples.
Troubleshooting Error Messages Checkpoints Corrective Actions Please wait. Remote edit. Is Job account editing being done from a network connected computer? Copying is not possible until editing is complete. Security key is not recognized. Not available. Is it re-displayed after opening and Contact your Service Representative closing the front cover, turning off or Authorized Service Center.
Troubleshooting Error Messages Checkpoints Corrective Actions Reference Page File not found Press GO. — A file error has occurred. Press [GO]. — Warning image adapt. — Printing not possible at currently set resolution due to insufficient memory. Add memory to the printer or change the print resolution. — Print overrun Press GO. — Overrun has occurred due to insufficient memory. — Press the Printer key to switch to printer mode. Press [GO] to continue printing.
Troubleshooting Scanner Error Messages If the Scanner mode touch panel displays any of these messages after pressing the Scanner key, follow the corresponding procedure. Error Messages Checkpoints Corrective Actions Reference Page Unable to use scanner. Is the network cable connected properly? Confirm the network cable is properly connected. If the scanner has just been started, try again later (approximately 2 minutes). — This name is already in use. Input new name again.
Troubleshooting Error Messages Checkpoints Corrective Actions The file was not saved. Check the destination PC. Has the maximum hard disk usage set by Scanner File Utility at the sending PC been exceeded? Increase available space and try again. Are you trying to send from multiple Try again later or change the scanners using the same filename? filename. Destination PC is in use. Try again later. — Reference Page — — A connection currently exists between the sending PC and a scanner.
Troubleshooting Error Messages Checkpoints Corrective Actions Reference Page Unable to find FTP server. Contact administrator. Is the network cable connected properly? Confirm the network cable is properly connected. page 2-21 Is the FTP server running? Contact your server administrator or support personnel. — Unable to Log in to the FTP Server. — FTP server login failed. Make sure page 2-30 username and password have been configured. The Path attempted to use for saving does not exist.
Troubleshooting Scanner Error Codes Below is a list of scanner send log error codes and their corrective actions. Error code Detail contents Corrective Actions E001 User initiated cancel during send. E010 Connection to destination PC lost during • data transmission (an error greater than E011 has occurred that cannot be further categorized). Or, connection to the • computer running Address Book for Scanner (Private Address Book) has been lost.
Troubleshooting Error code Detail contents Corrective Actions E039 Invalid command received from computer during Scan to PC. An unexpected condition has occurred on the destination PC. • Check that the Scanner File Utility on the destination PC is running properly. • Confirm that no other programs to receive network data are running on the computer other than Scanner File Utility. • Resolve the error condition on the destination PC. E059 Command received from computer is • invalid.
Troubleshooting Clearing Paper Jams If a paper jam occurs, the touch panel will display Paper misfeed and the copying will stop. Refer to these procedures to remove the jammed paper. Paper misfeed. 1.Remove paper. 2.Open duplex unit A1 and remove any paper that is inside. 3.Open cassette 1. 4.Remove paper. 5.Reset the cassette and close the cover. JAM 00 Jam Location Indicators When a paper jam occurs, the jam location indicators and corrective action are displayed.
Troubleshooting Paper Jam Precautions • Do not reuse paper cleared from a jam. • If the paper was torn during removal, be sure to remove any loose scraps of paper from the machine inside. Scraps of paper left in the machine may cause subsequent jamming. • Jammed paper from the document finisher (option) or 3000 sheet document finisher (option) will be fed out again. Do not return this paper to the document finisher tray. Caution : The fixing unit of this product is extremely hot.
Troubleshooting 4 Remove any jammed paper. If the paper tears, remove any loose scraps from the machine. 5 Pull out Cassette 1. 6 Remove any jammed paper. If the paper tears, remove any loose scraps from the machine. 7 Gently push Cassette 1 back in all the way. 8 Set duplex unit A1 securely to the original position and close left cover 1. IMPORTANT: Push the indicated position to close left cover 1 securely.
Troubleshooting Cassette 2 Follow the steps below to clear Cassette 2 jams. Paper misfeed. 1.Open left cover 2 of the machine and remove any paper that is inside. 2.Open cassette 2. 3.Remove paper. 4.Reset the cassette and close the cover. JAM 00 1 Open left cover 2. 2 Remove any jammed paper. If the paper tears, remove any loose scraps from the machine. 3 Pull out Cassette 2. 4 Remove any jammed paper. If the paper tears, remove any loose scraps from the machine.
Troubleshooting Cassette 3, 4 (option) Follow the steps below to clear paper jams when using the optional paper feeder or 3000 sheet paper feeder and a jam occurs in Cassettes 3 or 4. Paper misfeed. 1.Open the left cover 3 of the machine and remove any paper. 2.Open cassette 3. 3.Remove paper. 4.Reset the cassette and close the cover. JAM 00 1 Open left cover 3. 2 Remove any jammed paper. If the paper tears, remove any loose scraps from the machine. 3 Pull out the cassette in use.
Troubleshooting MP Tray Follow the steps below to clear paper jams in the MP tray. Paper misfeed. JAM 00 1 Open left cover 1. 2 Remove any jammed paper. If the paper tears, remove any loose scraps from the machine. 3 Open duplex unit A1. 4 Remove any jammed paper. If the paper tears, remove any loose scraps from the machine. 6-20 1.Remove paper. 2.Open duplex unit A1 and paper feed guide B1 to remove any paper. 3.Remove any paper from the multi purpose tray. 4.Open cassette 1.
Troubleshooting 5 Open feed guide B1. B1 Caution : The fixing unit of this product is extremely hot. Take sufficient care when working in this area, as there is a danger of getting burned. 6 Remove any jammed paper. If the paper tears, remove any loose scraps from the machine. 7 Remove all paper from the MP tray. 8 Pull out Cassette 1. 9 Rotate Handle B2 to the left at least 10 times. Jammed paper will be fed inside the left cover.
Troubleshooting 6-22 10 Remove any jammed paper. Follow the steps below if unable to remove jammed paper. 11 Pull out paper feed unit B3. 12 Open the cover B4 and remove the jammed paper. 13 If the paper tears, pull paper feed unit B3 out fully, lift upward and remove. 14 Pull Cassette 1 out fully, lift upward and remove.
Troubleshooting 15 Remove any jammed paper. 16 Return Cassette 1 and paper feed unit B3 to their original positions. 17 Set feed guide B1 and duplex unit A1 securely to each original position and close left cover 1. IMPORTANT: Push the indicated position to close left cover 1 securely. 18 Reload the paper in the MP tray. Left Cover 1 Interior Follow the steps below to clear jams occurring inside left cover 1. Paper misfeed. 1.Open left cover 1. 2.Remove paper. 3.
Troubleshooting 3 Open duplex unit A1. 4 Remove any jammed paper. If the paper tears, remove any loose scraps from the machine. 5 Set duplex unit A1 securely to the original position and close left cover 1. IMPORTANT: Push the indicated position to close left cover 1 securely. Left Cover 2 Interior Follow the steps below to clear jams occurring inside left cover 2.
Troubleshooting 2 Remove any jammed paper. If the paper tears, remove any loose scraps from the machine. 3 Close left cover 2. Fixing Unit Follow the steps below to clear paper jams in the fixing unit. Paper misfeed. 1.Remove paper. 2.Open duplex unit A1 and remove any 3.Open fixing cover A2 to check paper inside. 4.Close the cover. JAM 00 1 Open left cover 1. 2 Remove any jammed paper. If the paper tears, remove any loose scraps from the machine. 3 Open duplex unit A1.
Troubleshooting 4 Remove any jammed paper. If the paper tears, remove any loose scraps from the machine. 5 Open fixing unit cover A2. Caution : The fixing unit of this product is extremely hot. Take sufficient care when working in this area, as there is a danger of getting burned. 6 Remove any jammed paper. If the paper tears, remove any loose scraps from the machine. 7 If jammed paper can be seen around the eject section, remove by pulling toward you.
Troubleshooting Document Processor (option) Follow the steps below to clear paper jams in the document processor. Paper misfeed. 1.Open the document processor top cove 2.Hold up the reverse unit. 3.Turn the left dial. 4.Remove the original. 5.Close the document processor top cove JAM 00 1 Remove any originals on the original table. 2 Open the document processor cover. 3 Remove the jammed paper. If the original cannot be easily removed, turn the feed knob.
Troubleshooting 4 Lift up the reverse unit. 5 Remove the jammed paper. If the original tears, remove any loose scraps from inside the machine. 6 Return the reverse unit to its original position and close the document processor cover. 7 Replace the originals into the original table. Document Finisher (option) If a paper jam occurs in the optional document finisher or 3000 sheet document finisher, clear jams according to the corresponding Operation Guide.
Appendix This section explains the specifications of this device. • Body...Appendix-2 • Copying Performance...Appendix-3 • Printing Performance...Appendix-4 • Scanning Performance...Appendix-4 • Document Processor (option)...Appendix-5 • Paper Feeder (option)...Appendix-5 • 3000 Sheet Paper Feeder (option)...Appendix-5 • Document Finisher (option)...Appendix-6 • 3000 Sheet Document Finisher (option)...Appendix-6 • Job Separator (option)...Appendix-7 • Environmental Specifications...
Appendix Specifications NOTE: These specifications are subject to change without notice.
Appendix Copying Performance Copying Speed (When using the cassette) 25/25 ppm model Black and White copy 11 × 17"/A3: 13 sheets/min 8 1/2 × 14"/B4: 13 sheets/min 11 × 8 1/2"/A4: 25 sheets/min 8 1/2 × 11"/A4R: 17 sheets/min B5: 25 sheets/min B5R: 17 sheets/min Color copy 11 × 17"/A3: 13 sheets/min 8 1/2 × 14"/B4: 13 sheets/min 11 × 8 1/2"/A4: 25 sheets/min 8 1/2 × 11"/A4R: 17 sheets/min B5: 25 sheets/min B5R: 17 sheets/min 32/25 ppm model Black and White copy 11 × 17"/A3: 16 sheets/min 8 1/2 × 14"/B4:
Appendix Printing Performance Printing Speed Same as Copying Speed (When using the cassette) First Print Time Same as First Copy Time Resolution 600 dpi (2/4 bit) Supported Operating Systems Windows 95 OSR2, Windows 98 Second Edition, Windows NT 4.0 Service Pack 5 or later, Windows 2000 Service Pack 2 or later, Windows Me, Windows XP, Windows Server 2003, Apple Macintosh OS 9.x/OS X 10.
Appendix Document Processor (option) Original Feed Method Automatic feed Supported Original Types Sheet originals Paper Size Maximum: 11 × 17"/A3 Minimum: 5 1/2 × 8 1/2"/A5R Paper Weight 1-sided original: 45 - 160 g/m2 2-sided original: 50 - 120 g/m2 Original No. of Sheets 11 × 8 1/2"/A4 or smaller: 100 sheets or less 50 - 80 g/m2 8 1/2 × 14"/B4 or larger: 70 sheets or less 50 - 80 g/m2 Device Dimensions (W) × (D) × (H) 22 1/2 × 19 3/16 × 5 1/4" 571 × 488 × 134 mm Weight Approx. 25.3 lbs.
Appendix Document Finisher (option) Number of Trays 1 tray Paper Size (Non-stapling) 11 × 17", 8 1/2 × 14", A3, B4: 500sheets 11 × 8 1/2", 8 1/2 × 11", A4, A4R, B5, B5R, Folio: 1000 sheets Supported Paper Weight Stapling: 80 g/m2 or less Maximum Sheets for Stapling† 11 × 17", 8 1/2 × 14", A3, B4: 20 sheets, 11 × 8 1/2", 8 1/2 × 11", A4, A4R, B5: 30 sheets (Paper weight 80 g/m2 or less) Dimensions (W) × (D) × (H) 22 × 20 11/16 × 36 1/16" 558 × 526 × 916 mm Weight Approx. 55 lbs./Approx.
Appendix Job Separator (option) Number of Trays 1 tray Maximum Sheets 100 sheets (80 g/m2) Paper Size 11 × 17", 8 1/2 × 14", 11 × 8 1/2", 8 1/2 × 11", 7 1/4 × 10 1/2", 5 1/2 × 8 1/2", 8 1/2 × 13", 8 1/2 × 13 1/2", A3, B4, A4, A4R, B5, B5R, A5R, Folio Paper Type Paper weight: 60 - 105 g/m2 Paper type: standard, recycled, color, thin, letterhead Device Dimensions (W) × (D) × (H) 22 7/16 × 22 7/16 × 9 1/2" 570 × 570 × 240 mm Weight 5.06 lbs. or less /2.
Appendix Appendix-8
Index Index Numerics 3000 sheet document finisher 4-5 Paper jams 6-28 Specifications Appendix-6 3000 sheet paper feeder 4-4 Loading paper 2-4 Paper jams 6-19 Specifications Appendix-5 Specifying the paper type 2-8 A Additional memory 4-7 Adjusting exposure Auto Exposure mode 3-6 Manual Exposure mode 3-6 Auto Low-Power mode 3-35 Auto Sleep mode 3-36 B Background exposure adjust ii Batch scanning ii Booklet i Border erase i C Cable connection Network interface 2-21 Parallel port interface 2-21 USB interfa
Index Hue adjust iii I Image repeat copy ii Included guides xx Installation precautions xiii Interface cover 1-2, 2-21 Interrupt copy 3-17 Inverted copying ii J Job accounting v Job build iii Job reservation 3-18 Job separator 4-5 Specifications Appendix-7 Job storage iv K Key counter 4-6 How to insert 4-6 L Language v, 2-20 Left cover 1 1-3, 5-4, 6-16, 6-20 Left cover 2 1-3, 6-18, 6-24 Legal and safety information Automatic 2-sided copy function x Caution labels xii Energy saving control function x Ene
Index Size xxii, 2-7, 2-10 Type 2-8, 2-15 Paper feeder 4-4 Loading paper 2-2 Paper jams 6-19 Specifications Appendix-5 Specifying paper size 2-7 Specifying the paper type 2-8 Paper jams 6-15 3000 sheet document finisher 6-28 3000 sheet paper feeder 6-19 Cassette 1 6-16 Cassette 2 6-18 Document finisher 6-28 Document processor 6-27 Fixing unit 6-25 Jam location indicators 6-15 Left cover 1 6-23 Left cover 2 6-24 MP tray 6-20 Paper feeder 6-19 Paper jam precautions 6-16 Paper length guide 1-2, 2-3 Paper width
Index Copying performance Appendix-3 Document finisher Appendix-6 Document processor Appendix-5 Environmental specifications Appendix-7 Job separator Appendix-7 Paper feeder Appendix-5 Printing performance Appendix-4 Scanning performance Appendix-4 Split mode i, 3-14 Symbols xi Synergy print box iv T TCP/IP 2-22 Toner container 1-3 Replacement 5-5 Toner container lock lever 1-3, 5-6 Touch panel 1-5 TWAIN v, 3-27 Initiating the connection from the computer 3-27 Initiating the connection from the machine 3-2
For best results and machine performance, we recommend that you use only our original supplies for your products.
©2007 is a trademark of Kyocera Corporation
Rev.1.0 2007.