
Operation Manual


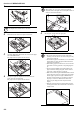
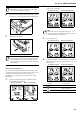
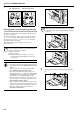
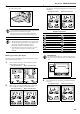
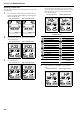


Table Of Contents
- Energy Star Program
- Please read this Operation Guide before using the copier. Keep it close to the copier for easy re...
- Section 1 IMPORTANT! PLEASE READ FIRST.
- Section 2 NAMES OF PARTS
- Section 3 PREPARATIONS
- Section 4 BASIC OPERATION
- Section 5 COPY FUNCTIONS
- Making 2-Sided copies from various types of originals
- Copying two-page originals onto separate sheets: Page Separation/Split Copy Modes
- Making a margin space on the copies
- Making copies with clean edges
- Fitting the image of either two or four originals onto a single copy page
- Automatic Sorting of copy sets
- Saving on toner use
- Memorizing frequently used settings: Program Function
- Section 6 COPIER MANAGEMENT
- Copy Management Mode
- Department Management Modes
- Department Management Code Operations Procedures
- Department Code Registration
- Deleting Department Codes
- Clearing the Department Management Count
- Outputting the Department Management List
- How to set the Department Management Mode
- Making copies when the copier is in the Department Management Mode
- Default Setting Mode
- Checking the Total Counter and Printing Out the Counter Report
- Copy Management Mode
- Section 7 OPTIONAL EQUIPMENT
- Section 8 TROUBLESHOOTING
- Section 9 MAINTENANCE AND OPERATION INFORMATION
- Appendix: Functions and Settings Combination Chart

Section 3 PREPARATIONS
3-2
1 Pull the drawer all the way out towards you.
Note
Do not pull out several drawers at one time.
2 Push down on the drawer base plate and secure it.
3 Grasp the Width Size Adjustment tab and match the paper
size to the Width Guide.
The paper sizes are impressed in the drawer.
4 Grasp the Length Size Adjustment tab and match the
paper size to the Length Guide.
The paper sizes are impressed in the drawer.
IMPORTANT!
When setting 11" × 17" paper, move the length size
adjustment tab to the right side end and push it down as
shown in the illustration below.
5 Set the paper straight from the upper part.
IMPORTANT!
• Be careful not to bend and crease the paper when
inserting it into the drawer. Creases in the paper may
lead to paper misfeeds.
• The maximum paper limit indicator (1) is on the Width
Guide. Make sure that the paper loaded is below the
maximum limit indicator.
• When loading paper into the drawer, set it so that the
side which was facing upwards in its packaging faces
up.
• Always match the Width and Length Guides to the
paper size before loading the paper. Failure to do so
may result in paper skewing or jamming.
• Make sure that the Length and Width Guides are flush
against the paper. If there is space between the Guide
and the paper, adjust the Length or Width Guide to
eliminate it. If the Guides are not firmly set against
the paper, a size that is different from that in the
drawer may be displayed on the Paper Selection
display.
• When the paper has become wrinkled from moisture,
set the paper so that the wrinkled side is towards the
Length Guide.
(1)