
Operation Manual
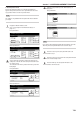
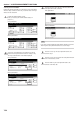
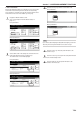
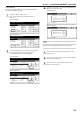
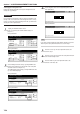

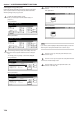
Table Of Contents
- Section 1 IMPORTANT! PLEASE READ FIRST.
- Section 2 NAMES OF PARTS
- Section 3 PREPARATIONS
- Section 4 BASIC OPERATION
- Section 5 OTHER CONVENIENT FUNCTIONS
- 1. Making 2-sided copies from various types of originals [2-sided copy modes]
- 2. Copying two-page originals onto separate sheets [Page separation/Split copy modes]
- 3. Making a margin space on the copies [Margin mode]
- 4. Centering the copy image [Centering/Image shift mode]
- 5. Adding a space next to the copy images for making notes [Memo mode]
- 6. Making copies with clean edges [Border erase modes]
- 7. Fitting the image of either two or four originals onto a single copy page [Combine/Merge Copy modes]
- 8. Printing page numbers on copies [Print page numbers mode]
- 9. Overlaying one image over another [Form overlay mode]
- 10. Making booklets from sheet originals [Booklet/Stitching mode]
- 11. Making booklets from book originals [Book to Booklet mode]
- 12. Automatic sorting of copy sets without the Document Finisher [Sort/Finished mode]
- 13. Auto rotation function
- 14. Adding a front and/or back cover to your copy sets [Cover mode]
- 15. Original size selection mode
- 16. Feeding paper as a backing sheet for OHP transparencies [Transparency + backing sheet mode]
- 17. Inverting black and white [Invert mode]
- 18. Making mirror image copies [Mirror image mode]
- 19. Making a test copy prior to large volume copying [Proof mode]
- 20. Making more of the same copies after a copy job is finished [Repeat copy mode]
- 21. Copying a large volume of originals in one operation [Batch scanning mode]
- 22. Saving on toner use [Eco print mode]
- 23. Original set direction
- 24. Memorizing frequently used settings [Program function]
- 25. Registration keys
- 26. Easily add covers and insert sheets between various sets of originals in one operation [Job build mode]
- Section 6 DOCUMENT AND OUTPUT MANAGEMENT FUNCTIONS
- Section 7 COPIER MANAGEMENT FUNCTIONS
- 1. Copy management mode
- (1) Copy management procedures
- (2) Accessing the copy management menu screen
- (3) Editing copy management information
- (4) Checking the copy management counts
- (5) Turning the copy management function ON/OFF
- (6) Changing the copy management default settings
- (7) Making copies when copy management is turned ON
- 2. Default settings
- 3. Multi-bypass tray paper settings
- 4. Original size registration
- 5. Drum refresh
- 6. Checking the total counter and printing out the counter report
- 7. Box management default settings
- 8. Hard disk management
- 9. Report print out
- 10. Changing the language used for messages
- 11. Entering characters
- 1. Copy management mode
- Section 8 OPTIONAL EQUIPMENT
- Section 9 TROUBLESHOOTING
- Section 10 MAINTENANCE AND OPERATION INFORMATION

Section 7 COPIER MANAGEMENT FUNCTIONS
7-55
● Time difference
Perform the following procedure to set a designated time difference
from the world standard time (GMT).
1
Display the “Machine default” screen.
(See “(2) Accessing the machine default settings” on
page 7-41.)
Inch specifications
Default setting
Copy
default
Machine
default
Language Management
End
BOX
Management
Bypass
setting
Document
Management
Register
orig. size
Print
report
Counter
check
User
Adjustment
Default setting / Counter
Metric specifications
Default setting
Copy
default
Machine
default
Language Management
End
Hard Disk
Management
Bypass
setting
Document
Management
Register
orig. size
Print
report
Counter
check
User
Adjustment
Default setting / Counter
2
Select “Time difference” in the settings list on the left side of
the touch panel and then touch the “Change #” key.
The “Time difference” screen will be displayed.
Inch specifications
Key sound ON/OFF
Silent mode
Date/Time
Time difference
Management code change
Default setting / Counter
On
On
2001/10/30 14:02
GMT+08:00
5000
Default menu
Down
Change #
Setting mode
Up
Machine default
Close
Metric specifications
Machine default
Key sound ON/OFF
Silent mode
Date/Time
Time difference
Change MGMT code with #
On
Off
30/10/'01 14:02
GMT+08:00
5000
Up
Down
Change #
Close
Default setting
Default menu Setting mode
Default setting / Counter
3
Touch the “+” key or the “–” key to change the displayed time
difference to the desired setting.
Inch specifications
GMT+ 00 : 00
Default setting - Machine default
Back Close
Time difference
Metric specifications
Time difference
Back Close
GMT+ 00 : 00
Default setting - Machine default
NOTE
If you want to quit the displayed setting without changing it, touch the
“Back” key. The touch panel will return to the screen in step 2.
4
Touch the “Close” key. The touch panel will return to the
screen in step 2.
5
Touch the “Close” key once again. The touch panel will return
to the “Default setting”screen.
6
Touch the “End” key. The touch panel will return to the
contents of the “Basic” tab.