
Operation Manual
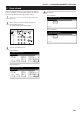
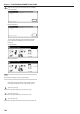
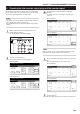
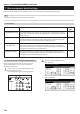
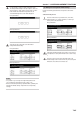
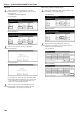
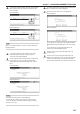
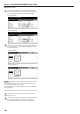
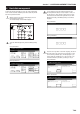
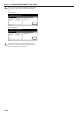
Table Of Contents
- Section 1 IMPORTANT! PLEASE READ FIRST.
- Section 2 NAMES OF PARTS
- Section 3 PREPARATIONS
- Section 4 BASIC OPERATION
- Section 5 OTHER CONVENIENT FUNCTIONS
- 1. Making 2-sided copies from various types of originals [2-sided copy modes]
- 2. Copying two-page originals onto separate sheets [Page separation/Split copy modes]
- 3. Making a margin space on the copies [Margin mode]
- 4. Centering the copy image [Centering/Image shift mode]
- 5. Adding a space next to the copy images for making notes [Memo mode]
- 6. Making copies with clean edges [Border erase modes]
- 7. Fitting the image of either two or four originals onto a single copy page [Combine/Merge Copy modes]
- 8. Printing page numbers on copies [Print page numbers mode]
- 9. Overlaying one image over another [Form overlay mode]
- 10. Making booklets from sheet originals [Booklet/Stitching mode]
- 11. Making booklets from book originals [Book to Booklet mode]
- 12. Automatic sorting of copy sets without the Document Finisher [Sort/Finished mode]
- 13. Auto rotation function
- 14. Adding a front and/or back cover to your copy sets [Cover mode]
- 15. Original size selection mode
- 16. Feeding paper as a backing sheet for OHP transparencies [Transparency + backing sheet mode]
- 17. Inverting black and white [Invert mode]
- 18. Making mirror image copies [Mirror image mode]
- 19. Making a test copy prior to large volume copying [Proof mode]
- 20. Making more of the same copies after a copy job is finished [Repeat copy mode]
- 21. Copying a large volume of originals in one operation [Batch scanning mode]
- 22. Saving on toner use [Eco print mode]
- 23. Original set direction
- 24. Memorizing frequently used settings [Program function]
- 25. Registration keys
- 26. Easily add covers and insert sheets between various sets of originals in one operation [Job build mode]
- Section 6 DOCUMENT AND OUTPUT MANAGEMENT FUNCTIONS
- Section 7 COPIER MANAGEMENT FUNCTIONS
- 1. Copy management mode
- (1) Copy management procedures
- (2) Accessing the copy management menu screen
- (3) Editing copy management information
- (4) Checking the copy management counts
- (5) Turning the copy management function ON/OFF
- (6) Changing the copy management default settings
- (7) Making copies when copy management is turned ON
- 2. Default settings
- 3. Multi-bypass tray paper settings
- 4. Original size registration
- 5. Drum refresh
- 6. Checking the total counter and printing out the counter report
- 7. Box management default settings
- 8. Hard disk management
- 9. Report print out
- 10. Changing the language used for messages
- 11. Entering characters
- 1. Copy management mode
- Section 8 OPTIONAL EQUIPMENT
- Section 9 TROUBLESHOOTING
- Section 10 MAINTENANCE AND OPERATION INFORMATION

Section 7 COPIER MANAGEMENT FUNCTIONS
7-97
3
If you want to change the name of that box, first select “Box
name” and then touch the “Change #” key. Enter the new
name as desired.
Inch specifications
Box007
Box name ABCD_0000101
Password (No register)
Default menu
Reset
Box
Change #
Close
Default setting - Document Management - Box editing
Setting mode
Metric specifications
Box 007
Box name ABCD_0000101
Password (No register)
Close
Default menu
Reset
Box
Change #
Default setting - Document management - Box editing
Setting mode
NOTE
Refer to “11. Entering characters” on page 7-104 for information on
entering characters.
4
If you want to change the name of that box, first select
“Password” and then touch the “Change #” key. The
“Password” screen will be displayed.
5
Use the keypad to enter the new password for that box and
then touch the “Close” key. The new password will be
registered and the touch panel will return to the screen in
step 3.
Inch specifications
Password (Enter by #key)
Password
Back Close
Default setting - Document Management - Box editings - 007
Enter new password.
Clear
Metric specifications
Password (Enter #-key)
Password
Back Close
Default settund - Document management - Box editing - 007
Enter new password.
Clear
NOTES
• The password can be between 1 and 8 digits long.
• If you decide not to register a password for that box, touch the
“Clear” key and then, with nothing entered in the password field,
touch the “Close” key.
6
If you want to delete all of the data in that box, select “Reset
Box”. A verification screen will be displayed.
7
Touch the “Yes” key or the “No” key, as appropriate.
Inch specifications
Box No. :
Box name :
Reset this Box. Do you really want to reset?
Ye s N o
Stop
007
ABCD_0000101
Metric specifications
Box No. :
Box name :
Stop
007
ABCD_0000101
Reset this Box. Do you really want to reset?
Ye s N o
If you selected “Yes”, all the data in the selected box will be
deleted and the touch panel will return to the screen in step
3.
If you selected “No”, the touch panel will return to the
screen in step 3 without deleting any data.
8
Touch the “Close” key. The touch panel will return to the
screen in step 2.
9
Touch the “Close” key. The touch panel will return to the
screen in step 1. Touch the “Close” key. The touch panel will
return to the “Default setting” screen.Touch the “End” key.
The touch panel will return to the contents of the “Basic” tab.