
Operation Manual

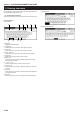

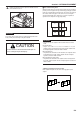
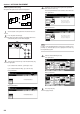
Table Of Contents
- Section 1 IMPORTANT! PLEASE READ FIRST.
- Section 2 NAMES OF PARTS
- Section 3 PREPARATIONS
- Section 4 BASIC OPERATION
- Section 5 OTHER CONVENIENT FUNCTIONS
- 1. Making 2-sided copies from various types of originals [2-sided copy modes]
- 2. Copying two-page originals onto separate sheets [Page separation/Split copy modes]
- 3. Making a margin space on the copies [Margin mode]
- 4. Centering the copy image [Centering/Image shift mode]
- 5. Adding a space next to the copy images for making notes [Memo mode]
- 6. Making copies with clean edges [Border erase modes]
- 7. Fitting the image of either two or four originals onto a single copy page [Combine/Merge Copy modes]
- 8. Printing page numbers on copies [Print page numbers mode]
- 9. Overlaying one image over another [Form overlay mode]
- 10. Making booklets from sheet originals [Booklet/Stitching mode]
- 11. Making booklets from book originals [Book to Booklet mode]
- 12. Automatic sorting of copy sets without the Document Finisher [Sort/Finished mode]
- 13. Auto rotation function
- 14. Adding a front and/or back cover to your copy sets [Cover mode]
- 15. Original size selection mode
- 16. Feeding paper as a backing sheet for OHP transparencies [Transparency + backing sheet mode]
- 17. Inverting black and white [Invert mode]
- 18. Making mirror image copies [Mirror image mode]
- 19. Making a test copy prior to large volume copying [Proof mode]
- 20. Making more of the same copies after a copy job is finished [Repeat copy mode]
- 21. Copying a large volume of originals in one operation [Batch scanning mode]
- 22. Saving on toner use [Eco print mode]
- 23. Original set direction
- 24. Memorizing frequently used settings [Program function]
- 25. Registration keys
- 26. Easily add covers and insert sheets between various sets of originals in one operation [Job build mode]
- Section 6 DOCUMENT AND OUTPUT MANAGEMENT FUNCTIONS
- Section 7 COPIER MANAGEMENT FUNCTIONS
- 1. Copy management mode
- (1) Copy management procedures
- (2) Accessing the copy management menu screen
- (3) Editing copy management information
- (4) Checking the copy management counts
- (5) Turning the copy management function ON/OFF
- (6) Changing the copy management default settings
- (7) Making copies when copy management is turned ON
- 2. Default settings
- 3. Multi-bypass tray paper settings
- 4. Original size registration
- 5. Drum refresh
- 6. Checking the total counter and printing out the counter report
- 7. Box management default settings
- 8. Hard disk management
- 9. Report print out
- 10. Changing the language used for messages
- 11. Entering characters
- 1. Copy management mode
- Section 8 OPTIONAL EQUIPMENT
- Section 9 TROUBLESHOOTING
- Section 10 MAINTENANCE AND OPERATION INFORMATION

8-1
Section 8 OPTIONAL EQUIPMENT
(1) Document Processor
The Document Processor automatically feeds one-sided originals one
by one for scanning. It also reverses two-sided originals automatically
for duplex copying and page separation copying.
11
11
1 Originals that can be used with the Document Processor
• Sheet originals only
•Original weights: Single-sided original of 35 g/m
2
to 160 g/m
2
two-
sided original of 50 g/m
2
to 120g g/m
2
•Original sizes: 11" x 17"/A3 (maximum) to 5 1/2" x 8 1/2"/A5R
(minimum)
• Capacity:
100 sheets (8 1/2" x 11"/A4 and smaller, 75 g/m
2
or 80 g/m
2
)
70 sheets (8 1/2" x 14"/Folio and larger, 75 g/m
2
or 80 g/m
2
)
30 sheets in auto selection mode
22
22
2 Precautions for the use of Document Processor
Do not use any of the originals given below with the Document
Processor. Also do not set originals with punch holes or tear-off strips
positioned at the leading edge.
•Transparency films
• Carbon paper and extremely creased or folded originals, originals of
sort material such as vinyl
• Non-square originals, wet originals, originals with adhesive tape or
glue
•Originals bundled with a paper clip or staple (if inevitable, remove
the paper clip or staple and straighten out the creases and folds
before setting the originals)
• Clipped out originals, originals with slippery surface
•Originals with still-wet whiteout
•Originals with creases (if inevitable, straighten out the creases
before setting the originals)
33
33
3 Document Processor part names
1 Original table
(Place the originals here.)
2 Original insertion guides
(Adjust the guides to the width of the originals.)
3 Document Processor open/close handle
(Hold this handle when opening and closing the Document
Processor.)
4 Original eject cover
(Copied originals are stored here.)
5 Document Processor original cover
(Open this cover to remove an original misfed in the Document
Processor.)
6 Original set indicator
(Lights green when the originals are set.)
1
2
5
6
3
4